Toyota RAV4 (XA40) 2013-2018 Service Manual: Seat position sensor
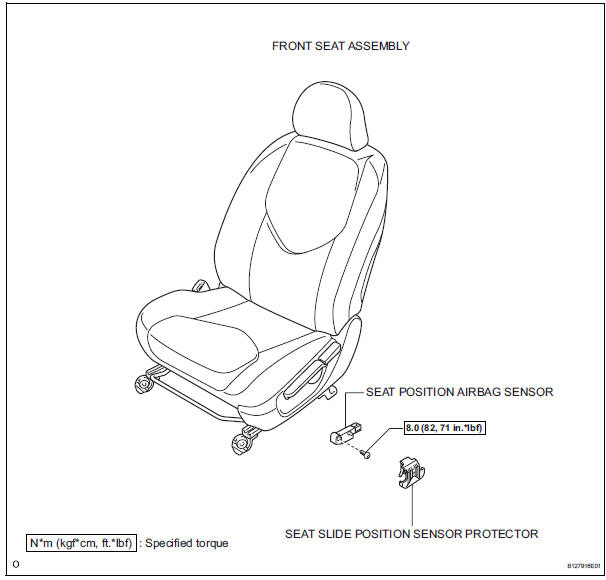
Components
On-vehicle inspection
- Check seat position sensor (vehicle not involved in collision)
- Perform a diagnostic system check (see page rs- 49).
- Check seat position sensor (vehicle involved in collision)
- Perform a diagnostic system check (see page rs- 49).
- Even if the airbag was not deployed, check if there
is any damage to the seat position sensor.
If there are any defects as mentioned below, replace the seat position sensor with a new one:
- Cracks, dents or chips on the sensor housing.
- Cracks or other damage to the connector.
Caution:
For removal and installation procedures of the seat position sensor, be sure to follow the correct procedure.
Removal
Caution:
Be sure to read the precautionary notices concerning the srs airbag system before servicing it (see page rs-1).
- Disconnect cable from negative battery terminal
Caution:
Wait at least 90 seconds after disconnecting the cable from the negative (-) battery terminal to prevent airbag and seat belt pretensioner activation.
- Remove front seat assembly (for manual seat) (see page se-11)
- Remove front seat assembly (for power seat) (see page se-27)
- Remove seat position airbag sensor

- Remove the seat slide position sensor protector from the seat position sensor.
- Using a t30 "torx" socket, remove the "torx" screw and seat position sensor.
- Disconnect the connector.
Installation
Caution:
Be sure to read the precautionary notices concerning the srs airbag system before servicing it (see page rs-1).
- Install seat position airbag sensor
- Using a 1 mm (0.039 In.) Feeler gauge, install the seat position sensor.
Notice:
- If the seat position sensor has been dropped, or there are any cracks, dents or other defects in the case or connector, replace the seat position sensor with a new one.
- When installing the seat position sensor, be careful that the srs wiring does not interfere with other parts and that it is not pinched between other parts.
Hint
Be sure that the clearance between the seat position sensor and the seat rail is within 0.6 Mm to 1.4 Mm (0.023 To 0.055 In.).
- Using a t30 "torx" socket, tighten the "torx" screw to
install the seat position sensor.
Torque: 8.0 N*m (82 kgf*cm, 71 in.*Lbf)
- Make sure that the clearance between the seat position sensor and the seat rail is within 0.6 Mm to 1.4 Mm (0.023 To 0.055 In.).
- Connect the connector.
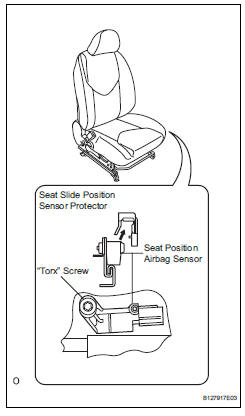
- Install the seat slide position sensor protector to the seat position sensor.
- Install front seat assembly (for manual seat) (see page se-22)
- Install front seat assembly (for power seat) (see page se-37)
- Connect cable to negative battery terminal
- Check srs warning light
- Check the srs warning light (see page rs-34).
 Rear airbag sensor
Components
On-vehicle inspection
Check rear airbag sensor (vehicle not
involved in collision)
Perform a diagnostic system check (see page rs-
49).
Check rear airbag sensor (ve ...
 Occupant classification ecu
Components
On-vehicle inspection
Inspect occupant classification ecu
(vehicle not involved in collision)
Perform a diagnostic system check (see page rs-
236).
Inspect occupant ...
Other materials:
Installation
Install upper instrument panel
Attach the 6 clips and 5 claws to install the
instrument panel.
Connect the connectors and clamps.
Install the 2 bolts and 2 screws.
Connect the passenger airbag connector.
Install the 2 bolts to the passenger airbag.
Torque: 20 n*m (204 k ...
Child restraint seat tether anchor
Components
Removal
Remove child restraint seat tether anchor cover
Using a screwdriver, detach the 4 claws and remove
the cover.
Hint:
Tape the screwdriver tip before use.
Remove roof headlining assembly
Hint:
It is not necessa ...
If the vehicle is submerged
or water on the road is rising
This vehicle is not designed
to be able to drive on roads
that are deeply flooded with
water. Do not drive on roads
where the roads may be
submerged or the water
may be rising. It is dangerous
to remain in the vehicle,
if it is anticipated that the
vehicle will be flooded or
set adrift. Remain calm ...
