Toyota RAV4 (XA40) 2013-2018 Service Manual: Occupant classification ecu
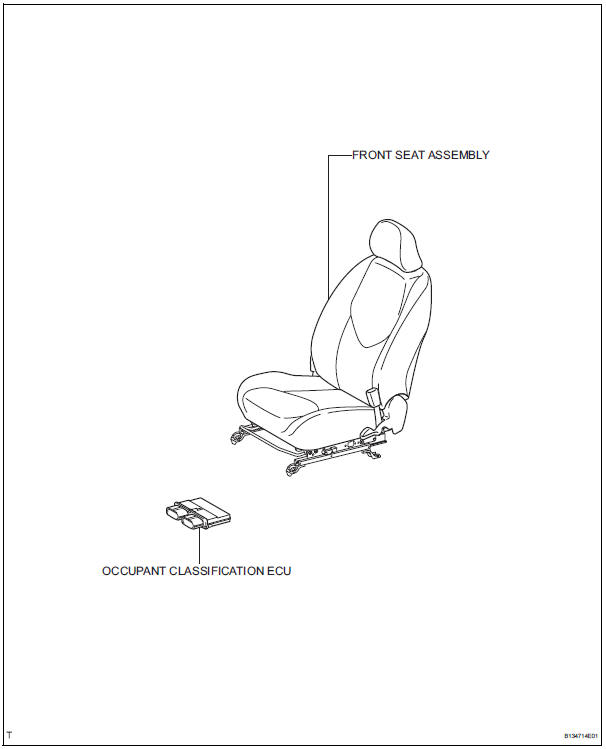
Components
On-vehicle inspection
- Inspect occupant classification ecu (vehicle not involved in collision)
- Perform a diagnostic system check (see page rs- 236).
- Inspect occupant classification ecu (vehicle involved in collision)
- Perform a diagnostic system check (see page rs- 236).
- Even if the airbag was not deployed, check if there is any damage to the occupant classification ecu. If there are any defects as mentioned below, replace the occupant classification ecu with a new one:
- Cracks, dents or chips on the case.
- Cracks or other damage to the connector.
Caution:
Be sure to follow the correct removal and installation procedures.
Removal
- Disconnect cable from negative battery terminal
Caution:
Wait at least 90 seconds after disconnecting the cable from the negative (-) battery terminal to prevent airbag and seat belt pretensioner activation.
- Remove front seat assembly (for manual seat) (see page se-11)
- Remove occupant classification ecu
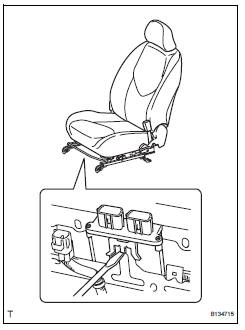
- Disconnect the 2 connectors from the occupant classification ecu.
- Using a screwdriver, remove the occupant classification ecu
Installation
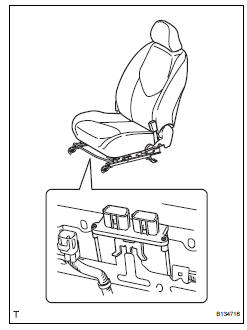
- Install occupant classification ecu
- Check that the ignition switch is off.
- Check that the negative battery (-) terminal is disconnected.
Caution:
After disconnecting the negative battery terminal, wait for at least 90 seconds before starting the operation.
- Install the occupant classification ecu.
- Connect the 2 connectors to the occupant classification ecu.
Notice:
- If the occupant classification ecu has been dropped, or there are any cracks, dents or other defects in the case or connector, replace it with a new one.
- When installing the occupant classification ecu, be careful that the srs wiring does not interfere with other parts and that it is not pinched between other parts.
- Install front seat assembly (for manual seat) (see page se-23)
- Connect cable to negative battery terminal
- Inspect slide adjuster lock (for manual seat)
- Inspect seat heater operation (w/ seat heater system)
- Inspect srs warning light
- Inspect the srs warning light (see page rs-245).
 Seat position sensor
Components
On-vehicle inspection
Check seat position sensor (vehicle not
involved in collision)
Perform a diagnostic system check (see page rs-
49).
Check seat position sensor ...
 Other system
...
Other materials:
Passenger airbag on / off indicator circuit malfunction
Description
The passenger airbag on / off indicator circuit consists of the center airbag
sensor and the heater
control panel*1 or *2.
This circuit indicates the operation condition of the front passenger airbag,
the front passenger side airbag
and passenger side seat belt pretensioner ...
Pressure sensor circuit
Description
This dtc is output when the refrigerant pressure is either extremely low
(0.19 Mpa [2.0 Kgf/cm2, 28 psi]
or less) or extremely high (3.14 Mpa [32.0 Kgf/cm2, 455 psi] or more). The air
conditioning pressure
sensor, which is installed on the pipe of the high pressure side, detec ...
Dtc check / clear
Check dtc
Connect the intelligent tester (with can vim) to the
dlc3.
Turn the ignition switch on and turn the intelligent
tester on.
Read the dtc by following the prompts on the
tester screen.
Hint:
Refer to the intelligent tester operator's manual for
further details.
...
