
Toyota RAV4 (XA40) 2013-2018 Owners Manual: Steering wheel audio switches
Some audio features can be controlled using the switches on the steering wheel.
Operation may differ depending on the type of audio system or navigation system. For details, refer to the manual provided with the audio system or navigation system.
Operating the audio system using the steering wheel switches
- Volume switch
- Increases/decreases volume
- Press and hold: continuously increases/decreases volume
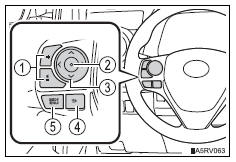
- Enter switch
- Displays the audio screen (except when audio screen is displayed)
- Displays the preset/list screen (when audio screen is displayed)
- Selects items (when audio list screen is displayed)
- Cursor switch
 button
- Selects (radio stations/tracks/files/songs/videos)
- Moves cursor
- Press and hold: fast preset/station up/down
Fast track up/down (tracks/files/songs)
 Button
- Tab change
- Press and hold: seek up/down (radio stations)
Fast up/down (tracks/files/videos)
- Back switch
- Returns to the previous screen (only when “back button� is displayed)
- “Mode/hold� switch
- Changes audio source
- Press and hold this switch to mute or pause the current operation to cancel the mute or pause, press and hold.
Caution
To reduce the risk of an accident
Exercise care when operating the audio switches on the steering wheel.
 Audio system
Operations such as listening to audio, using the hands-free
phone, confirming vehicle information and changing audio system
settings are started by using the following buttons.
Audio system operati ...
 Usb port/aux port
Connect an ipod, usb memory device or portable audio player
to the usb/aux port as indicated below. Select “ipod�, “usb� or
“aux� on the audio source selection screen and the device can
...
Other materials:
Operating a usb memory
Connecting a usb memory enables you to enjoy music from the
vehicle speakers.
Connecting a usb memory
Open the cover and connect
a usb memory.
Turn on the power of the usb
memory if it is not turned on.
Press the “media� button repeatedly until “usb� is displayed.
Cont ...
Front console illumination
On-vehicle inspection
Inspect front console illumination
Connect the battery's positive (+) lead to terminal 1
and the negative (-) lead to terminal 2, then check
that the light comes on.
Ok:
light comes on.
If the result is not as specified, replace the front
console illumin ...
Dtc check / clear
Check dtc
Connect the intelligent tester (with can vim) to the
dlc3.
Turn the ignition switch on and turn the intelligent
tester on.
Select the following menu items: diagnosis /
obd/mobd / immobiliser / dtc info /
current codes.
Check dtcs and then write them down.
Hint ...
