Toyota RAV4 (XA40) 2013-2018 Owners Manual: Using the bluetoothÂź audio/phone
Audio unit
- BluetoothÂź connection condition
If âbtâ is not displayed, the
bluetoothÂź audio/phone cannot
be used. 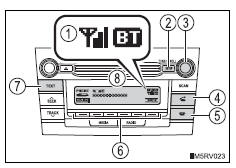
- Displays set up menu
- Selects items such as menu and number
Turn: selects an item
Press: inputs the selected item
- Off-hook switch
Turns the hands-free system on/starts a call
- On-hook switch
Turns the hands-free system off/ends a call/refuses a call
- Selects speed dials
- Displays information that is too long to be displayed at one time on the display (press and hold)
- Display
A message, name, number, etc. Is displayed.
Lower-case characters and special characters cannot be displayed.
Steering wheel switches (bluetoothÂź audio)
Steering wheel switches (bluetoothÂź phone)
- Volume
The voice guidance volume
cannot be adjusted using this
button.
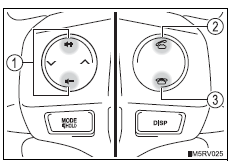
- Off-hook switch
Turns the hands-free system on/start a call
- On-hook switch
Turns the hands-free system off/ends a call/refuse a call
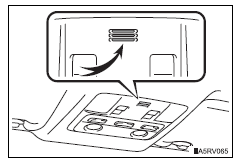
Microphone
Using the bluetoothÂź audio/phone for the first time
Before using the bluetoothÂź audio/phone, it is necessary to register a bluetoothÂź device in the system. Follow the procedure below to register (pair) a device:
- Press the âsetupâ button and select âbluetooth*â using the âtuneâąscrollâ knob.
- Press the knob and select âbt pairingâ using the knob.
A passkey will be displayed.
- Ssp (secure simple pairing) incompatible bluetoothÂź devices:
input the passkey into the device.
Ssp (secure simple pairing) compatible bluetoothÂź devices: select âyesâ to register the device. Depending on the type of device, it may register automatically.
If a bluetoothÂź device has both music player and cellular phone functions, both functions will be registered at the same time. When deleting the device, both functions will be deleted at the same time.
If the off-hook switch is pressed and the âphoneâ mode is entered when no phones have been registered, the registration screen will be automatically displayed.
*: Bluetooth is a registered trademark of bluetooth sig, inc.
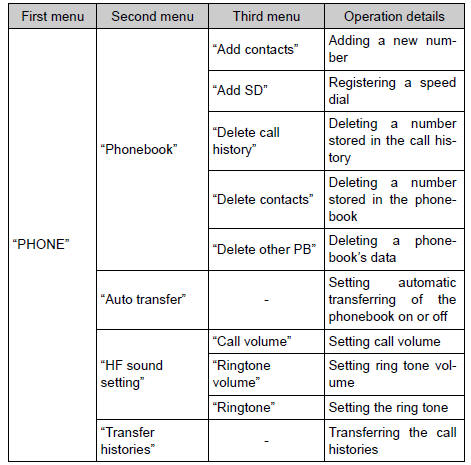
Menu list of the bluetoothÂź audio/phone
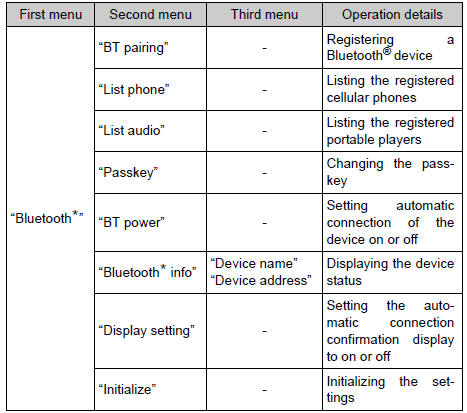
*: Bluetooth is a registered trademark of bluetooth sig, inc.
BluetoothÂź audio/phone system functions
Depending on the bluetoothÂź device, certain functions may not be available.
 BluetoothÂź audio/phone
BluetoothÂź audio
The bluetoothÂź audio system enables you to enjoy music played on
a portable digital audio player (portable player) from the vehicle
speakers via wireless communication.
This a ...
 Operating a bluetoothÂź enabled portable player
Power
Volume
Search playback
Next commands, random play
or back button
Repeat play
Fast-forwarding, rewinding or
selecting an album
Changing the audio source/
playback
Playb ...
Other materials:
Terminals of ecu (2006/01- )
Check air conditioning amplifier
Measure the voltage and resistance of the
connectors.
Hint:
Check from the rear of the connector while it is
connected to the air conditioning amplifier.
Hint:
*: For 2gr-fe
Using an oscilloscope, check waveform 1.
Can communi ...
Wiper switch
Precaution
Precaution for vehicle with srs
Some procedures in this section may affect the
supplemental restraint system (srs). Prior to
performing the procedures, read the srs section's
"precaution" (see page ss-2).
Components
Removal
Disconnect cable from negat ...
Air mix damper control servo motor circuit (passenger side)
Description
The air mix damper servo sends pulse signals to indicate the damper position
to the air conditioning
amplifier. The air conditioning amplifier activates the motor (normal or
reverse) based on these signals to
move the air mix damper (passenger seat) to the appropriate position ...
