Toyota RAV4 (XA50) 2019-2026 Owners Manual: Wireless remote control
The keys are equipped with the following wireless remote control:
Vehicles without smart key system
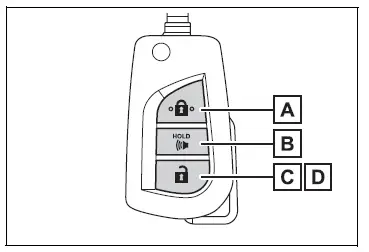
- Locks all the doors
- Sounds the alarm
- Unlocks all the doors
- Opens the side windows*
*: This setting must be customized at your Toyota dealer.
Vehicles with smart key system
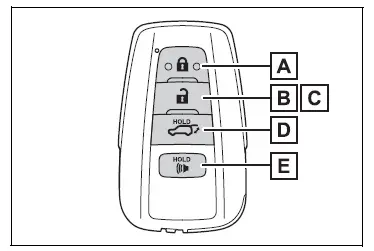
- Locks all the doors
- Unlocks all the doors
- Opens the side windows*1 and the moon roof*1, 2 or panoramic moon roof*1, 2
- Opens and closes the power back door*2
- Sounds the alarm
*1:These settings must be customized at your Toyota dealer.
*2:If equipped
â– Theft deterrent panic mode
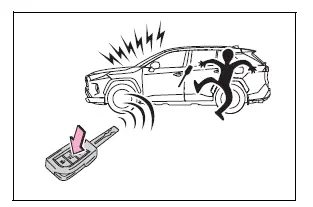
Vehicles without smart key system
When  is pressed for longer
than about 1 second, an alarm will
sound intermittently and the vehicle
lights will flash to deter any person
from trying to break into or damage
your vehicle.
To stop the alarm, press any button on the key.
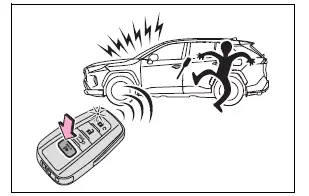
Vehicles with smart key system
When  is
is
pressed for longer
than about 1 second, an alarm will
sound intermittently and the vehicle
lights will flash to deter any person
from trying to break into or damage
your vehicle.
To stop the alarm, press any button on the electronic key.
â– Conditions affecting operation
Vehicles without smart key system
The wireless remote control function may not operate normally in the following situations.
- When the wireless key battery is depleted
- Near a TV tower, electric power plant, gas station, radio station, large display, airport or other facility that generates strong radio waves or electrical noise
- When carrying a portable radio, cellular phone or other wireless communication device
- When the wireless key is in contact with, or is covered by a metallic object
- When other wireless key (that emits radio waves) is being used nearby
- If window tint with a metallic content or metallic objects are attached to the rear window
Using the master key (vehicles without smart key system)
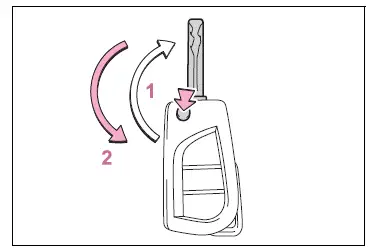
- Releasing
To release the key, press the button. - Folding
To stow the key back in its case, push the key back to the stowed position while pressing the button.
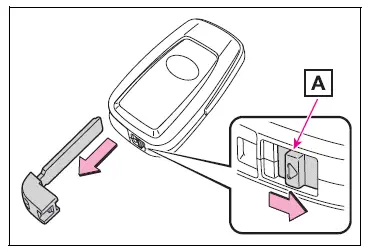
Using the mechanical key (vehicles with smart key system)
To take out the mechanical key, slide the release lever A and take the key out.
The mechanical key can only be inserted in one direction, as the key only has grooves on one side. If the key cannot be inserted in a lock cylinder, turn it over and re-attempt to insert it.
After using the mechanical key, store it in the electronic key. Carry the mechanical key together with the electronic key. If the electronic key battery is depleted or the entry function does not operate properly, you will need the mechanical key.
â– When required to leave the vehicle's key with a parking attendant
Lock the glove box as circumstances demand.
Remove the mechanical key for your own use and provide the attendant with the electronic key only.
â– If a wrong key is used
The key cylinder rotates freely to isolate inside mechanism.
 Key types
The following keys are provided
with the vehicle.
Vehicles without smart key
system
Master keys
Operating the wireless remote control
function
Key number plate
Vehicles with smart key system
...

Other materials:
Removal
Notice:
Do not heat the vehicle body, emblem and name plate
excessively.
Hint:
When removing the emblem and name plate, heat the vehicle
body, emblem and name plate using a heat light.
Standard heating temperature
Remove no. 1 Back door emblem assembly
Put protective tape aroun ...
Diagnosis system
Bus check
Select "bus check" from the "obd / mobd
menu" screen.
Hint:
The ecus and sensors that are properly connected
to the can communication system can be displayed
using the intelligent tester via can vim.
Press "enter" on the intelligen ...
Optimal use of the audio system
Displays the “setup” menu
Changes the following settings
Sound quality and volume
balance
The sound quality and balance
setting can be changed to produce
the best sound.
Automatic sound levelizer
Language
Selecting the mode
Using the audio control function
C ...
