Toyota RAV4 (XA40) 2013-2018 Service Manual: Data list / active test
- Read data list
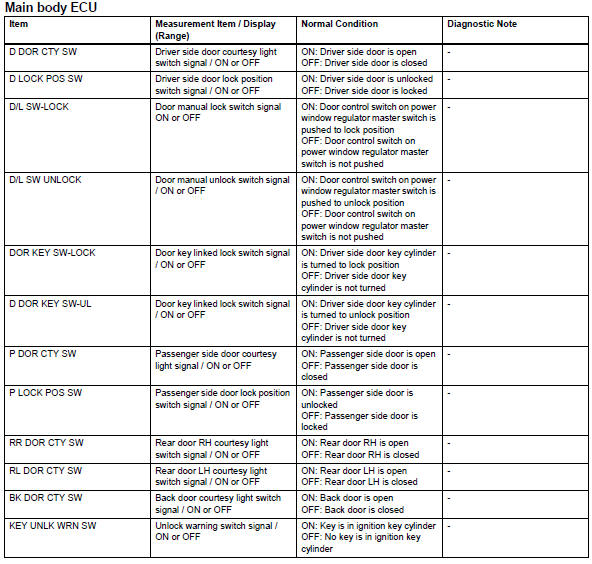
Hint:
Using the intelligent tester's data list allows switch, sensor, actuator and other item values to be read without removing any parts. Reading the data list early in troubleshooting is one way to save time.
- Connect the intelligent tester (with can vim) to the dlc3.
- Turn the ignition switch on.
- Read the data list on the tester's screen.
- Perform active test
Hint:
Performing the intelligent tester's active test allows relay, vsv, actuator and other items to be operated without removing any parts. Performing the active test early in troubleshooting is one way to save time.
The data list can be displayed during the active test.
- Connect the intelligent tester (with can vim) to the dlc3.
- Turn the ignition switch on.
- Perform the active test according to the display on the tester.

- All doors cannot be locked / unlocked simultaneously
- Only driver door lock / unlock functions do not operate
- Only passenger door lock / unlock functions do not operate
- Only rear door lh lock / unlock functions do not operate
- Only rear door rh lock / unlock functions do not operate
- Only back door lock / unlock functions do not operate
- Key lock-in prevention function does not work properly
 Diagnosis system
Description
Power door lock control system data can be read in the
data link connector 3 (dlc3) of the vehicle. When the
system seems to be malfunctioning, use the intelligent
tester to check ...
 All doors cannot be locked / unlocked simultaneously
Description
The main body ecu receives switch signals from the door control switch on the
power window regulator
master switch, door control switch and driver side door key cylinder, and
activat ...
Other materials:
Front drive shaft assembly (for 4wd)
Components (2005/11-2006/01)
Components (2006/01- )
...
Disassembly
Remove radiator grille sub-assembly
Remove the 4 bolts and 4 nuts.
Detach the 6 claws and remove the radiator grille.
Remove no. 1 Radiator grille lower
Detach the 18 claws and remove the radiator grille.
Remove no. 2 Radiator grille lower
Detac ...
Bottle holders
Front
Rear
Caution
Items unsuitable for the bottle holder
Do not place anything other than a bottle in the bottle holders.
Other items may be thrown out of the holders in the event of an accident or
sudden braking and cause injury.
Notice
Items that should not be stowed in the bott ...
