
Toyota RAV4 (XA40) 2013-2018 Service Manual: Knock sensor 1 circuit
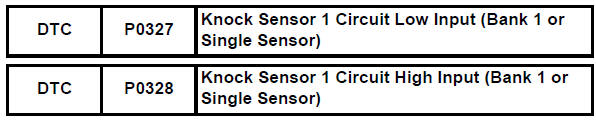
Description
Flat type knock sensors (non-resonant type) have structures that can detect vibrations over a wide band of frequencies: between approximately 6 khz and 15 khz.
A knock sensor is fitted onto the engine block to detect engine knocking.
The knock sensor contains a piezoelectric element which generates a voltage when it becomes deformed.
The voltage is generated when the engine block vibrates due to knocking. Any occurrence of engine knocking can be suppressed by delaying the ignition timing.

Hint:
When any of dtcs p0327 and p0328 are set, the ecm enters fail-safe mode. During fail-safe mode, the ignition timing is delayed to its maximum retardation. Fail-safe mode continues until the ignition switch is turned off.
Reference: inspection using an oscilloscope
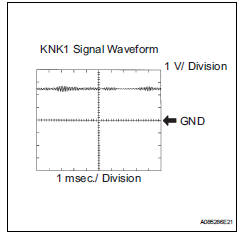
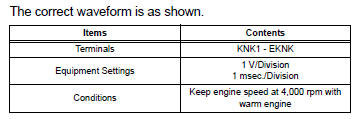
Monitor description
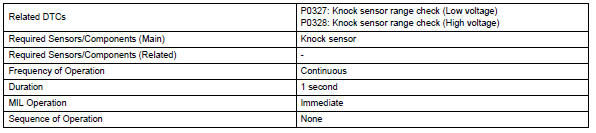
If the output voltage transmitted by the knock sensor remains low or high for more than 1 second, the ecm interprets this as a malfunction in the sensor circuit, and sets a dtc.
The monitor for dtcs p0327 and p0328 begins to run when 5 seconds have elapsed since the engine was started.
If the malfunction is not repaired successfully, either dtc p0327 or p0328 is set 5 seconds after the engine is next started.
Monitor strategy
Typical enabling conditions

Typical malfunction thresholds
Typical malfunction thresholds

Wiring diagram
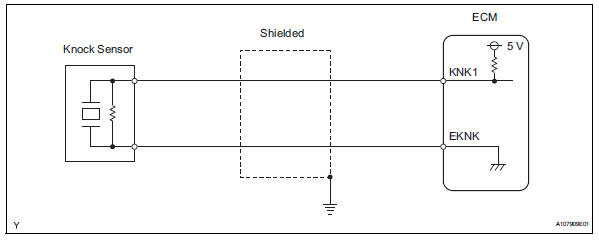
Inspection procedure
Hint:
Read freeze frame data using the intelligent tester. Freeze frame data records the engine condition when malfunctions are detected. When troubleshooting, freeze frame data can help determine if the vehicle was moving or stationary, if the engine was warmed up or not, if the air-fuel ratio was lean or rich, and other data from the time the malfunction occurred.
- Read value using intelligent tester (knock fb val)
- Connect the intelligent tester to the dlc3.
- Start the engine and turn the tester on.
- Warm up the engine.
- Select the following menu items: diagnosis / enhanced obd ii / data list / user data / knock fb val.
- Read the values displayed on the tester while driving the vehicle.
Standard: the values change.
Hint 
Hint:
The knock feedback value change can be confirmed by running the engine at high load, for example, by activating the air conditioning system and revving up the engine.


- Check harness and connector (ecm - knock sensor)
- Disconnect the b30 ecm connector.
- Measure the resistance between the terminals.
Standard 
- Reconnect the ecm connector.
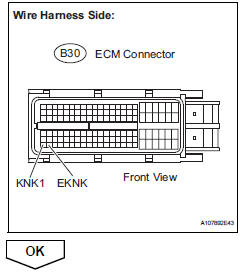

- Inspect ecm (knk1 voltage)
- Disconnect the b18 knock sensor connector.
- Turn the ignition switch on.
- Measure the voltage between the knock sensor terminals.
Standard voltage

- Reconnect the knock sensor connector.
Notice:
Fault may be intermittent. Check the wire harness and connectors carefully and retest.

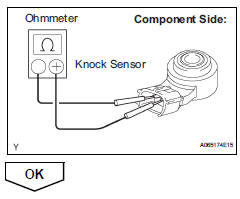
- Inspect knock sensor
- Remove the knock sensor.
- Measure the resistance between the terminals.
Standard resistance

- Reinstall the knock sensor.


 Random / multiple cylinder misfire detected
Description
When the engine misfires, high concentrations of hydrocarbons (hc) enter the
exhaust gas. Extremely
high hc concentration levels can cause increases in exhaust emission levels. ...
 Crankshaft position sensor "A"
Description
The crankshaft position (ckp) sensor system consists of a ckp sensor plate
and a pickup coil.
The sensor plate has 34 teeth and is installed on the crankshaft. The pickup
coil ...
Other materials:
How to proceed with troubleshooting
Hint:
Use these procedures to troubleshoot the engine immobiliser
system.
*: Use the intelligent tester.
Vehicle brought to workshop
Inspect battery voltage
Standard voltage:
11 to 14 v
If the voltage is below 11 v, recharge or replace the battery
before proceeding.
cran ...
Bus ic communication malfunction
Description
The air conditioning harness connects the air conditioning amplifier and the
servos. The air conditioning
amplifier supplies power and sends operation instructions to each servo through
the air conditioning
harness. Each servo sends damper position information to the air condi ...
Using the mechanical key (vehicles with a smart key system)
To take out the mechanical key,
push the release button and take
the key out.
The mechanical key can only be
inserted in one direction, as the
key only has grooves on one side.
If the key cannot be inserted in a
lock cylinder, turn it over and reattempt
to insert it.
After using the mec ...
