Toyota RAV4 (XA40) 2013-2018 Service Manual: Removal (2005/11-2006/01)
- Disconnect cable from negative battery terminal
Caution:
Wait at least 90 seconds after disconnecting the cable from the negative (-) battery terminal to prevent airbag and seat belt pretensioner activation.
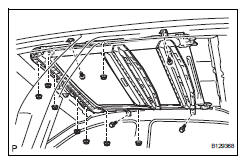
- Remove roof headlining assembly
- Remove the roof headlining (see page ir-26).
- Remove sliding roof side garnish lh

- Using a screwdriver, detach the claws and remove the garnish.
Hint:
Tape the screwdriver tip before use.
- Remove sliding roof side garnish rh
Hint:
Use the same procedures described for the lh side.
- Remove sliding roof glass sub-assembly
- Using a t25 "torx" driver, remove the 4 screws and glass.
- Pull the glass upward to remove it.
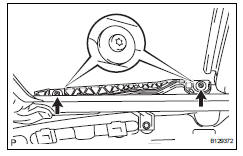
- Remove sliding roof weatherstrip
- Disconnect sliding roof drain hose
- Disconnect the 4 drain hoses.
- Remove sliding roof housing assembly
- Remove the 4 bolts, 8 nuts and housing.
Notice:
Be careful not to damage the curtain shield airbag when removing the housing.

 Removal (2006/01- )
Disconnect cable from negative battery
terminal
Caution:
Wait at least 90 seconds after disconnecting the
cable from the negative (-) battery terminal to
prevent airbag and seat belt preten ...
Other materials:
Ecm power source circuit
Description
When the ignition switch is turned on, the battery voltage is applied to the
igsw of the ecm. The output
signal from the mrel terminal of the ecm causes a current to flow to the coil,
closing the contacts of the
integration relay (efi main relay) and supplying power to either term ...
Turning the high beam on/off manually
Switching to low beam
Pull the lever to original position.
Switching to high beam
Turn the light switch to
position.
The automatic high beam indicator
will turn off and the high
beam indicator will turn on.
The automatic high beam can be operated when
Vehicles without a smart ke ...
Terminals of ecu (2006/01- )
Check air conditioning amplifier
Measure the voltage and resistance of the
connectors.
Hint:
Check from the rear of the connector while it is
connected to the air conditioning amplifier.
Hint:
*: For 2gr-fe
Using an oscilloscope, check waveform 1.
A/c compressor* ...
