Toyota RAV4 (XA40) 2013-2018 Service Manual: Removal (2006/01- )
- Disconnect cable from negative battery terminal
Caution:
Wait at least 90 seconds after disconnecting the cable from the negative (-) battery terminal to prevent airbag and seat belt pretensioner activation.
- Remove air cleaner case sub-assembly (for 2az-fe)
- Remove the air cleaner case (see page em-98).
Hint:
Refer to the procedures from the removal of the purge vsv up until the removal of the air cleaner case.
- Remove air cleaner case (for 2gr-fe)
- Remove the air cleaner case (see page em-21).
Hint:
Refer to the procedures from the removal of the air cleaner cap sub-assembly up until the removal of the air cleaner case.
- Drain brake fluid
Notice:
Wash off brake fluid immediately if it comes in contact with any painted surface.
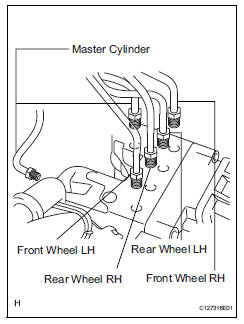
- Disconnect brake lines
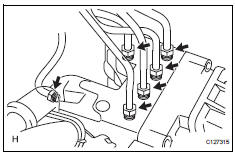
- Using sst, disconnect the 6 brake lines from the actuator.
Sst 09023-00101
- Place tags or marks to identify the installation locations of each brake line.
- Remove abs and traction actuator assembly with bracket
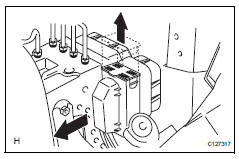
- Pull the lock lever upward and disconnect the connector.
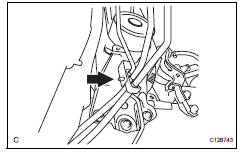
- Disconnect the brake tube clamp from the bracket.

- Remove the 3 nuts and actuator with bracket.
Notice:
Be careful not to damage the brake tubes.
Disassembly
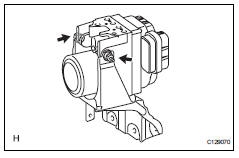
- Remove abs and traction actuator assembly

- Remove the 2 nuts and actuator from the bracket.
- Remove brake actuator bolt holder
- Remove the 2 bolt holders from the actuator.
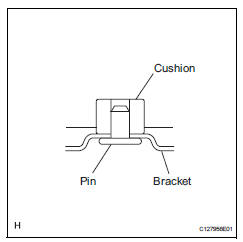
- Remove brake actuator bolt cushion
- Remove the 3 cushions from the actuator.
Reassembly
- Install brake actuator bolt cushion
- Install the 3 cushions to the actuator.
- Install brake actuator bolt holder
- Install the 2 bolt holders to the actuator.
- Install abs and traction actuator assembly
Notice:
- Do not remove the hole plug before connecting the brake tube. New actuators are filled with brake fluid.
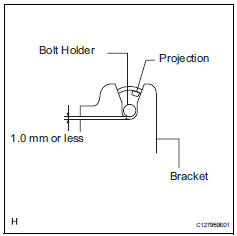
- The clearance between the bolt holder and bracket is less than 1.0 Mm (0.039 In.).
- The projection should be set as shown in the illustration.
- Install the 2 nuts to assemble the actuator and bracket.
Torque: 5.4 N*m (55 kgf*cm, 48 in.*Lbf)
 Removal (2005/11-2006/01)
Disconnect cable from negative battery
terminal
Caution:
Wait at least 90 seconds after disconnecting the
cable from the negative (-) battery terminal to
prevent airbag and seat belt prete ...
 Installation (2005/11-2006/01)
Install abs and traction actuator assembly with bracket
Notice:
Do not remove the hole plug before connecting the
brake tube. New actuators are filled with brake fluid.
Install the actuato ...
Other materials:
Engine (ignition) switch
(vehicles without a
smart key system)
Starting the engine
Check that the parking brake is set.
Check that the shift lever is set in p.
Firmly depress the brake pedal.
Turn the engine switch to the “start” position to start the engine.
Changing the engine switch positions
“Lock”
The steering wheel is locked an ...
Srs airbag instructions
for canadian owners
(in french)
The following is a french explanation of srs airbag instructions
extracted from the srs airbag section in this manual.
See the srs airbag section for more detailed srs airbag instructions
in english.
Coussins gonflables srs avant
Coussin gonflable srs du conducteur/coussin gonflable srs ...
Front wiper motor and link
Components
Removal
Disconnect cable from negative battery
terminal
Caution:
Wait at least 90 seconds after disconnecting the
cable from the negative (-) battery terminal to
prevent airbag and seat belt pretensioner activation.
Remove front wiper arm head cap
Remove the 2 c ...
