Toyota RAV4 (XA40) 2013-2018 Service Manual: Disassembly
Caution:
Wear protective gloves. Sharp areas on the seat frame (with adjuster) may injure your hands.
Hint:
- Use the same procedures for the rh side and lh side.
- The procedures listed below are for the lh side.
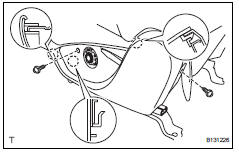
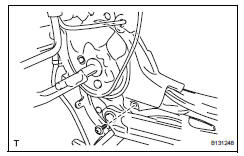
- Remove vertical adjuster cover lh (for driver side)
- Using a screwdriver, detach the 2 claws and remove the cover.
Hint:
Tape the screwdriver tip before use.
- Remove vertical adjusting handle lh (for driver side)
- Remove the 2 screws and handle.
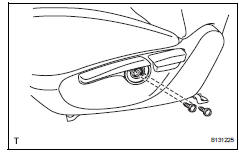
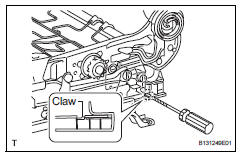
- Remove reclining adjuster release handle lh (for driver side)
- Raise the reclining adjuster release handle to reveal the claw. Using a screwdriver, detach the claw and remove the release handle.
Hint:
Tape the screwdriver tip before use.
- Remove reclining adjuster release handle rh (for front passenger side)
Hint:
Use the same procedures described for the driver side.
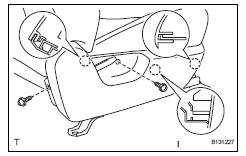
- Remove front seat cushion shield lh (for driver side)
- Disconnect the 2 rubber bands of the front seatback board or front seatback cover from the front seat frame (with adjuster).
- Remove the 2 screws.
- Using a screwdriver, detach the 3 claws and remove the cushion shield.
Hint:
Tape the screwdriver tip before use.
- Remove front seat cushion shield rh (for front passenger side)
- Disconnect the 2 rubber bands of the front seatback board or front seatback cover from the front seat frame (with adjuster).
- Remove the 2 screws.
- Using a screwdriver, detach the 3 claws and remove the cushion shield.
Hint:
Tape the screwdriver tip before use.
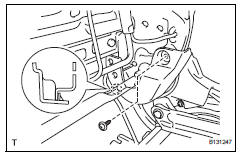
- Remove front seat cushion inner shield lh

- Remove the screw.
- Using a screwdriver, detach the claw and clip. Then remove the inner shield.
Hint:
Tape the screwdriver tip before use.
- Remove front seat inner belt assembly lh (see page sb-22)
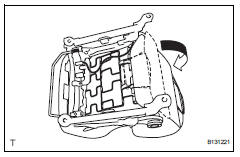
- Remove front seat cushion cover
- W/ seat heater system: disconnect the connector.
- Using a clip remover, remove the 2 clips.
- Detach the 2 hooks on the seat cushion front side.
- Using a screwdriver, detach the hooks and remove the seat cushion cover (with pad).
Hint:
Tape the screwdriver tip before use.
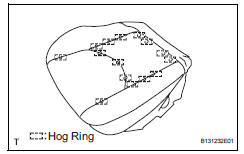
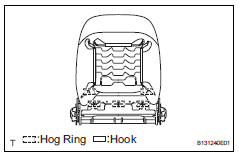
- Remove the 15 hog rings and seat cushion cover from the seat cushion pad.
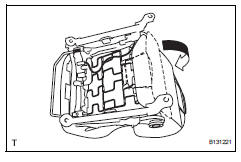
- Remove front seat cushion heater (w/ seat heater system)
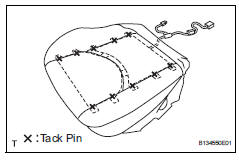
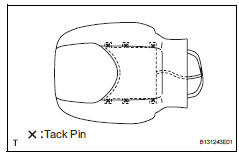
- Cut off the 10 tack pins which fasten the seat heater, and then remove the seat cushion heater from the seat cushion cover.
Notice:
Be careful not to damage the seat cushion cover and seat heater.
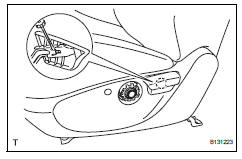
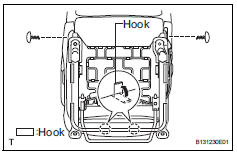
- Remove front seatback board subassembly lh (w/ seatback board)
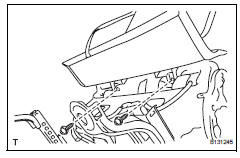
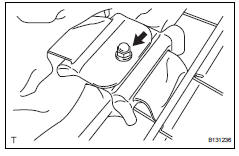
- Open the lower part of the seatback board. Then remove the 2 screws.
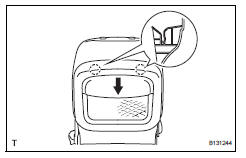
- Pull the seatback board in the direction indicated by
the arrow in the illustration to detach the 2 claws.
Then, remove the seatback board.
- Remove front seatback cover
- W/ seatback board: remove the 5 hog rings
- W/ seatback board: using a screwdriver, detach the hooks.
Hint:
Tape the screwdriver tip before use.
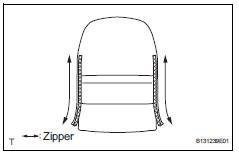
- W/o seatback board: open the 2 zippers.
- W/o seatback board: lift up the seatback cover and remove the 3 hog rings.
- Detach the 4 claws and remove the 2 headrest supports.
- W/ front seat side airbag: remove the nut and move the 2 seatback cover brackets.
- Remove the seatback cover (with pad) from the seat frame (with adjuster).

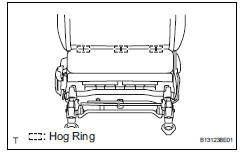
- Remove the 11 hog rings and seatback cover from the seatback pad.
- Remove front seatback heater (w/ seat heater system)
- Cut off the 6 tack pins which fasten the seat heater, and then remove the seat cushion heater from the seat cushion cover.
Notice:
Be careful not to damage the seat cushion cover and seat heater.
- Remove reclining adjuster lower inside cover lh
- Remove the screw.
- Detach the claw and remove the inside cover.
- Remove reclining adjuster lower inside cover rh
Hint:
Use the same procedures described for the lh side.
- Remove reclining adjuster upper inside cover lh
- Remove the screw and inside cover.
- Remove reclining adjuster upper inside cover rh
- Remove the screw and inside cover.
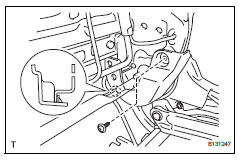
- Remove front seat cushion lower shield lh
- Using a screwdriver, detach the claw and remove the lower shield.
Hint:
Tape the screwdriver tip before use.
- Remove front seat cushion lower shield rh
Hint:
Use the same procedures described for the lh side.
- Remove seat position airbag sensor (for driver side) (see page rs-390)
- Remove occupant classification ecu (for front passenger side) (see page rs-393)
 Removal
Hint:
Use the same procedures for the rh side and lh side.
The procedures listed below are for the lh side.
Disconnect cable from negative battery
terminal
Caution:
Wait at least 90 ...
 Reassembly
Caution:
Wear protective gloves. Sharp areas on the seat frame
(with adjuster) may injure your hands.
Hint:
Use the same procedures for the rh side and lh side.
The procedures listed below ar ...
Other materials:
Reassembly
Install cooler (solar sensor) thermistor
(for automatic air conditioning system)
Install automatic light control sensor
(for automatic light control system)
Install front passenger airbag assembly
(see page rs-351)
Install no. 2 Instrument panel register
assembly
Install no. 1 Ins ...
Gauges and meters (with 12.3-inch multi-information display)
The meters display various drive information.
Meter display
â– Locations of gauges and meters
The meter type can be changed on
of the multi-information display.
Type 1/Type 2
The units of measure may differ depending on the intended destination of
the vehicle.
Multi-information display
Presen ...
Parts location
System diagram
The configuration of the electronic control system in the
u140f automatic transaxle is as shown in the following chart.
System description
System description
The electronic controlled automatic transaxle
(ect) is an automatic transaxle that elect ...
