Toyota RAV4 (XA40) 2013-2018 Service Manual: Removal
Hint:
- Use the same procedures for the rh side and lh side.
- The procedures listed below are for the lh side.
- Disconnect cable from negative battery terminal
Caution:
Wait at least 90 seconds after disconnecting the cable from the negative (-) battery terminal to prevent airbag and seat belt pretensioner activation.
- Remove front seat headrest assembly
- Remove front seat track bracket outer cover lh
- Lift up the seat track adjusting handle and move the seat to the foremost position
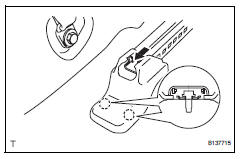
- Using a screwdriver, detach the 4 claws.
Hint:
Tape the screwdriver tip before use.
- Remove the outer cover in the direction indicated by the arrow in the illustration.
- Remove front seat track bracket inner cover lh
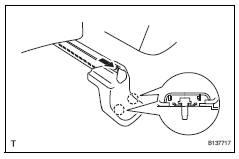
- Using a screwdriver, detach the 2 claws.
Hint:
Tape the screwdriver tip before use.
- Remove the inner cover in the direction indicated by the arrow in the illustration.
- Remove front seat assembly
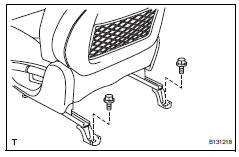
- Remove the 2 bolts on the rear side of the seat.
- Lift up the seat track adjusting handle and move the seat to the rearmost position.
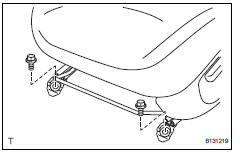
- Remove the 2 bolts on the front side of the seat.
- Lift up the seat track adjusting handle and move the seat to the center position. Also, operate the reclining adjuster release handle and move the seatback to the upright position.
- Disconnect the connector under the seat.
- Remove the seat.
Notice:
Be careful not to damage the vehicle body.
 Front seat assembly (for manual seat)
Components
...
 Disassembly
Caution:
Wear protective gloves. Sharp areas on the seat frame
(with adjuster) may injure your hands.
Hint:
Use the same procedures for the rh side and lh side.
The procedures listed below ar ...
Other materials:
Reassembly
Install wiring harness clamp bracket
Install the bracket with the bolt.
Install elbow tube
Install straight pin
Using a plastic hammer, install the 4 straight pins to
the rear differential carrier.
Thoroughly clean oil and water from the surface of
the rear different ...
System diagram
System diagram (2005/11-2006/01)
System diagram (2006/01- )
...
If you have a flat tire
Your vehicle is equipped with a spare tire. The flat tire can be
replaced with the spare tire.
For details about tires
Caution
If you have a flat tire
Do not continue driving with a flat tire.
Driving even a short distance with a flat tire can damage the tire and the
wheel beyond repair, ...
