Toyota RAV4 (XA40) 2013-2018 Service Manual: Reassembly
Caution:
Wear protective gloves. Sharp areas on the seat frame (with adjuster) may injure your hands.
Hint:
- Use the same procedures for the rh side and lh side.
- The procedures listed below are for the lh side.
- Install occupant classification ecu (for driver side) (see page rs-394)
- Install seat position airbag sensor (for driver side) (see page rs-390)
- Install front seat cushion lower shield lh
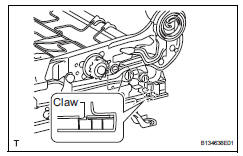
- Attach the claw to install the lower shield.
- Install front seat cushion lower shield rh
Hint:
Use the same procedures described for the lh side.
- Install reclining adjuster upper inside cover lh
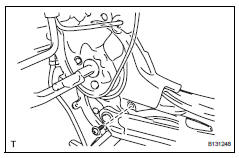
- Install the inside cover with the screw.
- Install reclining adjuster upper inside cover rh
- Install the inside cover with the screw.
- Install reclining adjuster lower inside cover lh
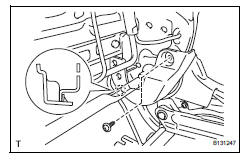
- Attach the claw to install the inside cover.
- Install the screw.
- Install reclining adjuster lower inside cover rh
Hint:
Use the same procedures described for the lh side.
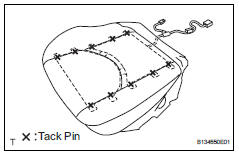
- Install front seatback heater (w/ seat heater system)
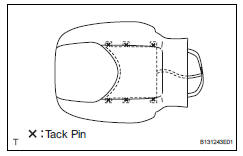
- Using a tacker, install the seatback heater to the end of the seat cover with 6 new tack pins.
Notice:
Do not substitute other metal parts for tack pins.
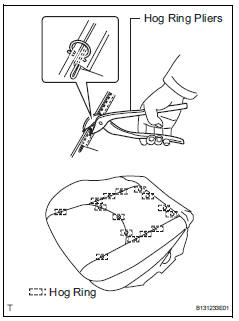
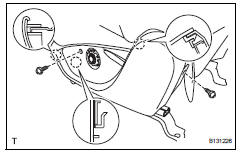
- Install front seatback cover
Notice:
- Be careful not to damage the cover.
- When installing the hog rings, avoid wrinkling the cover.
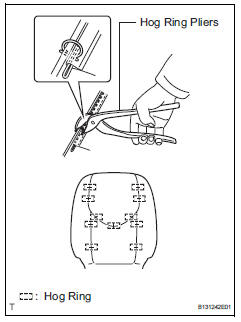
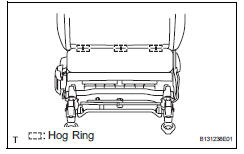
- Using hog ring pliers, install the seatback cover to the seatback pad with 11 new hog rings.
- Install the seatback cover (with pad) to the seat frame (with adjuster).
- W/ front seat side airbag: fully cover the airbag with the 2 seatback cover brackets and install the nut.
Torque: 5.5 N*m (56 kgf*cm, 49 in.*Lbf)
Caution:
- For vehicles with side airbags, the seatback cover must be securely installed. Otherwise, the side airbags may not deploy properly.
- Make sure that the strap is not twisted after installing the bracket.
- Install the bracket securely.
- Attach the 4 claws to install the 2 headrest supports.
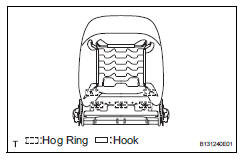
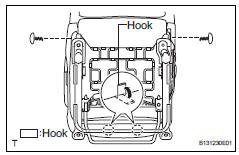
- W/ seatback board: attach the hooks.
- W/ seatback board: using hog ring pliers, install 5 new hog rings.
- W/o seatback board: using hog ring pliers, install 3 new hog rings.
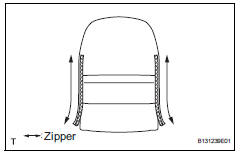
- W/o seatback board: close the 2 zippers.
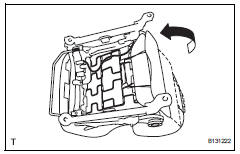
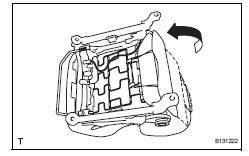
- Install front seatback board subassembly lh (w/ seatback board)
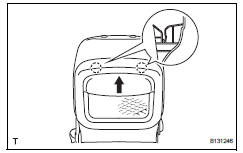
- Push the seatback board in the direction indicated by the arrow in the illustration to attach the 2 claws.
- Open the lower part of the seatback board. Then install the seatback board with the 2 screws.
- Install front seat cushion heater (w/ seat heater system)
- Using a tacker, install the seat cushion heater to the end of the seat cover with 10 new tack pins.
Notice:
Do not substitute other metal parts for tack pins.
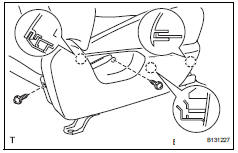
- Install front seat cushion cover
- Using hog ring pliers, install the seat cushion cover to the seat cushion pad with 15 new hog rings.
Notice:
- Be careful not to damage the cover.
- When installing the hog rings, avoid wrinkling the cover.
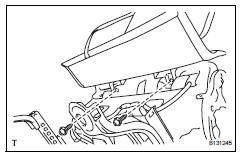
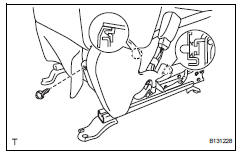
- Install the seat cushion cover (with pad) to the seat frame (with adjuster).
- Attach the hooks and install the 2 clips.
- W/ seat heater system: connect the connector.
- Install front seat inner belt assembly (see page sb-23)
- Install front seat cushion inner shield lh
- Attach the clip and claw to install the inner shield.
- Install the screw.
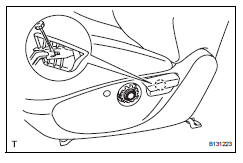
- Install front seat cushion shield lh (for driver side)
- Attach the 3 claws to install the cushion shield.
- Install the 2 screws.
- Connect the 2 rubber bands of the front seatback board or front seatback cover to the seat frame (with adjuster).
- Install front seat cushion shield rh (for front passenger side)
- Attach the 3 claws to install the cushion shield.
- Install the 2 screws.
- Connect the 2 rubber bands of the front seatback board or front seatback cover to the seat frame (with adjuster).
- Install reclining adjuster release handle lh (for driver side)
- Attach the claw to install the release handle.
- Install reclining adjuster release handle Rh (for front passenger side)
Hint:
Use the same procedures described for the driver side.
- Install vertical adjusting handle (for driver side)
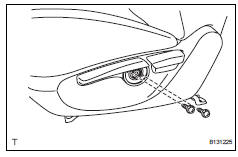
- Install the handle with the 2 screws.
- Install vertical adjuster cover lh (for driver side)
- Attach the 2 claws to install the cover.
 Disassembly
Caution:
Wear protective gloves. Sharp areas on the seat frame
(with adjuster) may injure your hands.
Hint:
Use the same procedures for the rh side and lh side.
The procedures listed below ar ...
 Front seat assembly (for power seat type lh side)
Components
...
Other materials:
Reassembly
Install wiring harness clamp bracket
Install the bracket with the bolt.
Install elbow tube
Install straight pin
Using a plastic hammer, install the 4 straight pins to
the rear differential carrier.
Thoroughly clean oil and water from the surface of
the rear different ...
Terminals of ecu (2005/11-2006/01)
Check air conditioning amplifier
Measure the voltage and resistance of the
connectors.
Hint:
Check from the rear of the connector while it is
connected to the air conditioning amplifier.
Using an oscilloscope, check waveform 1.
Compressor and pulley operation signa ...
Door control receiver
Components
Removal
Remove rear door scuff plate rh
Using a screwdriver, detach the 9 claws.
Hint:
Tape the screwdriver tip before use.
Using a clip remover, detach the 2 clips and remove
the garnish.
Remove rear door opening trim
weatherstrip rh
...
