Toyota RAV4 (XA40) 2013-2018 Service Manual: Rear seat inner belt assembly
Components
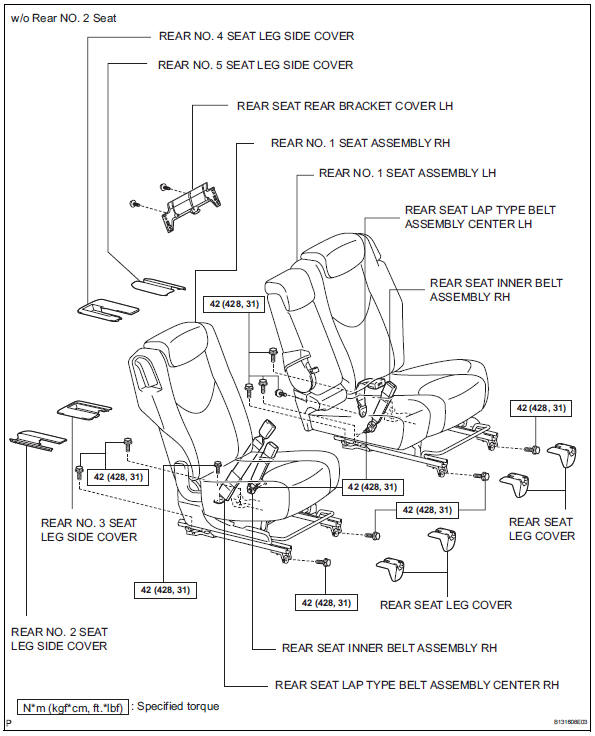
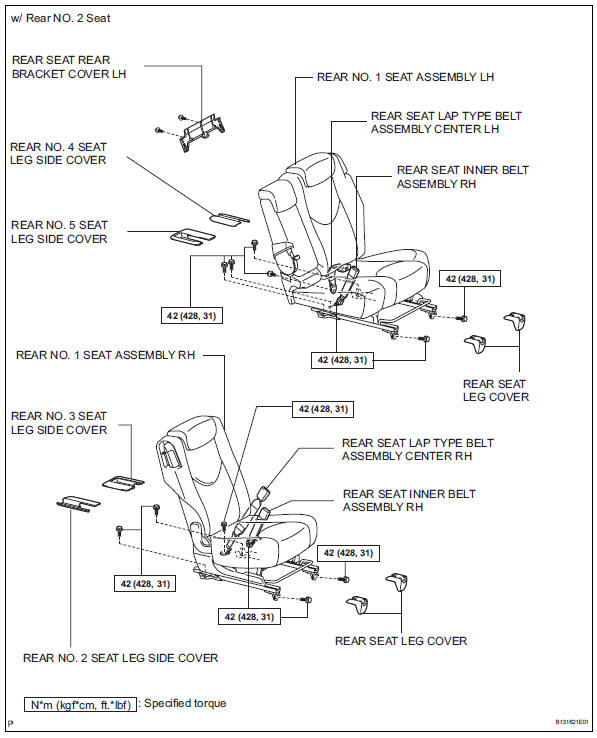
Removal
- Remove rear seat leg cover
- Remove rear no. 2 Seat leg side cover
- Remove rear no. 3 Seat leg side cover (w/ rear no. 2 Seat) (see page se-81)
- Remove rear no. 3 Seat leg side cover (w/o rear no. 2 Seat) (see page se-81)
- Remove rear no. 4 Seat leg side cover
- Remove rear no. 5 Seat leg side cover
- Remove rear seat lap type belt assembly center rh (w/o rear no. 2 Seat)
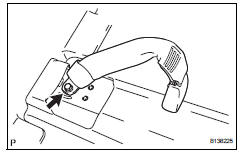
- Remove the bolt and seat belt.
- Remove rear seat lap type belt assembly center rh (w/ rear no. 2 Seat)
- Remove the bolt and seat belt.
- Remove rear no. 1 Seat assembly lh (see page se-50)
- Remove rear seat rear bracket cover lh (see page se-54)
- Remove rear seat lap type belt assembly center lh
- Remove the bolt and the seat belt.
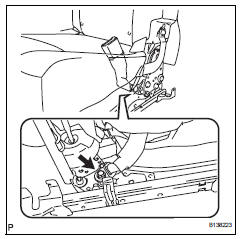
- Remove rear seat inner belt assembly rh (for 60/40 split seat type lh side)
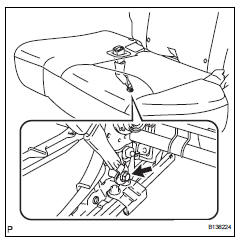
- Remove the bolt and the seat belt.
- Remove rear no. 1 Seat assembly rh (see page se-84)
- Remove rear seat inner belt assembly rh (for 60/40 split seat type rh side)
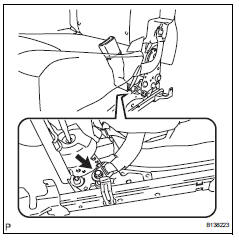
- Remove the bolt and the seat belt.
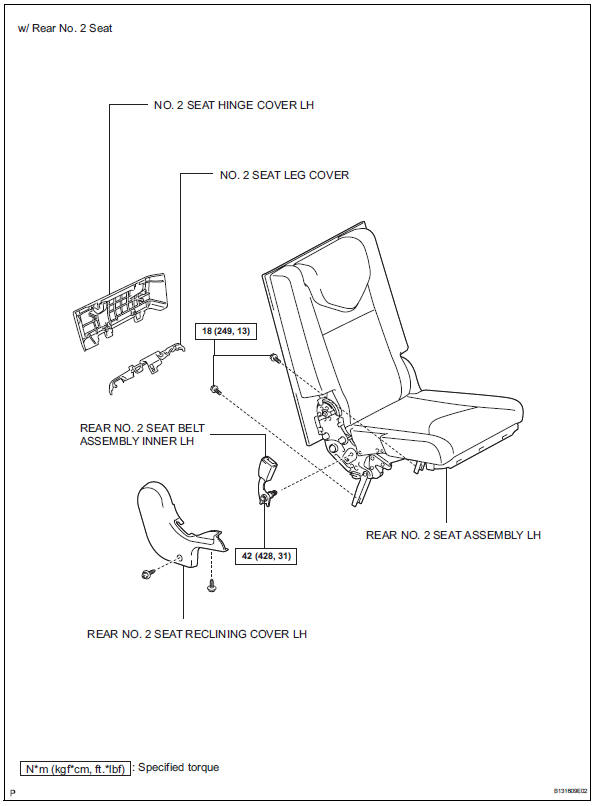
- Remove no. 2 Seat hinge cover lh (w/ rear no.
2 Seat) (see page se-109)
- Remove no. 2 Seat leg cover (w/ rear no. 2 Seat) (see page se-109)
- Remove rear no. 2 Seat assembly lh (w/ rear no. 2 Seat) (see page se-110)
- Remove rear no. 2 Seat reclining cover lh (w/ rear no. 2 Seat) (see page se-111)
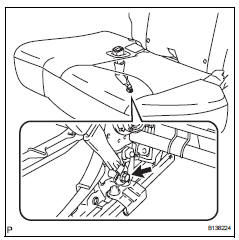
- Remove rear no. 2 Seat inner belt assembly lh (w/ rear no. 2 Seat)
- Remove the bolt and seat belt.
Installation
- Install rear no. 2 Seat inner belt assembly lh (w/ rear no. 2 Seat)
- Install the seat belt with the bolt.
Torque: 42 n*m (428 kgf*cm, 31 ft.*Lbf)
- Install rear no. 2 Seat reclining cover lh (w/ rear no. 2 Seat) (see page se-121)
- Install rear no. 2 Seat assembly lh (w/ rear no. 2 Seat) (see page se-121)
- Install no. 2 Seat leg cover (w/ rear no. 2 Seat) (see page se-123)
- Install no. 2 Seat hinge cover (w/ rear no. 2 Seat) (see page se-123)
- Install rear seat inner belt assembly rh (for 60/40 split seat type rh side)
- Install the belt with the bolt.
Torque: 42 n*m (428 kgf*cm, 31 ft.*Lbf)
- Install rear no. 1 Seat assembly rh (see page se-97)
- Install rear seat inner belt assembly rh (for 60/40 split seat type lh side)
- Install the belt with the bolt.
Torque: 42 n*m (428 kgf*cm, 31 ft.*Lbf)
- Install rear seat lap type belt assembly center lh
- Install the belt with the bolt.
Torque: 42 n*m (428 kgf*cm, 31 ft.*Lbf)
- Install rear seat rear bracket cover lh (see page se-60)
- Install rear no. 1 Seat assembly lh (see page se-64)
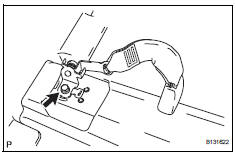
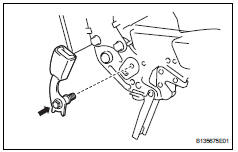
- Install rear seat lap type belt assembly center rh (w/o rear no. 2 Seat)
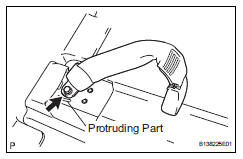
- Install the belt with the bolt.
Torque: 42 n*m (428 kgf*cm, 31 ft.*Lbf)
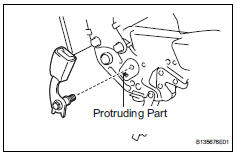
Notice:
The anchor part of the seat belt must not overlap the protruding part.
- Install rear seat lap type belt assembly center rh (w/ rear no. 2 Seat)
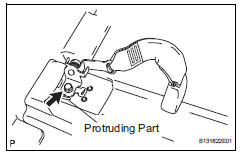
- Install the belt with the bolt.
Torque: 42 n*m (428 kgf*cm, 31 ft.*Lbf)
Notice:
The anchor part of the seat belt must not overlap the protruding part.
- Install rear no. 5 Seat leg side cover
- Install rear no. 4 Seat leg side cover
- Install rear no. 3 Seat leg side cover (w/ rear no. 2 Seat) (see page se-72)
- Install rear no. 3 Seat leg side cover (w/o rear no. 2 Seat) (see page se-72)
- Install rear no. 2 Seat leg side cover
- Install rear seat leg cover
 Disposal
Hint:
When scrapping vehicles equipped with a seat belt
pretensioner or disposing of a front seat outer belt (with seat
belt pretensioner), always first activate the seat belt
pretensioner in acco ...
 Rear seat outer belt assembly
Components
...
Other materials:
Deterioration of battery
Description
The ecm determines the battery power according to the voltage of the batt
terminal while the engine is
running (not cranking).
Inspection procedure
Inspect battery
Inspect the battery specific gravity.
Check the specific gravity of each cell.
Standard gravity: ...
Headlight (hi-beam) circuit
Description
The body ecu controls the headlight relay, no. 2 Daytime running light relay
(marking: drl no. 2) And
no. 4 Daytime running light relay (marking: drl no. 4).
Wiring diagram
Inspection procedure
Perform active test by intelligent tester
Connect the intelligent test ...
If a warning light turns on or
a warning buzzer sounds
Calmly perform the following actions if any of the warning
lights comes on or flashes. If a light comes on or flashes, but
then goes off, this does not necessarily indicate a malfunction
in the system. However, if this continues to occur, have
the vehicle inspected by your Toyota dealer.
Actions to ...
