Toyota RAV4 (XA40) 2013-2018 Service Manual: Front shock absorber with coil spring
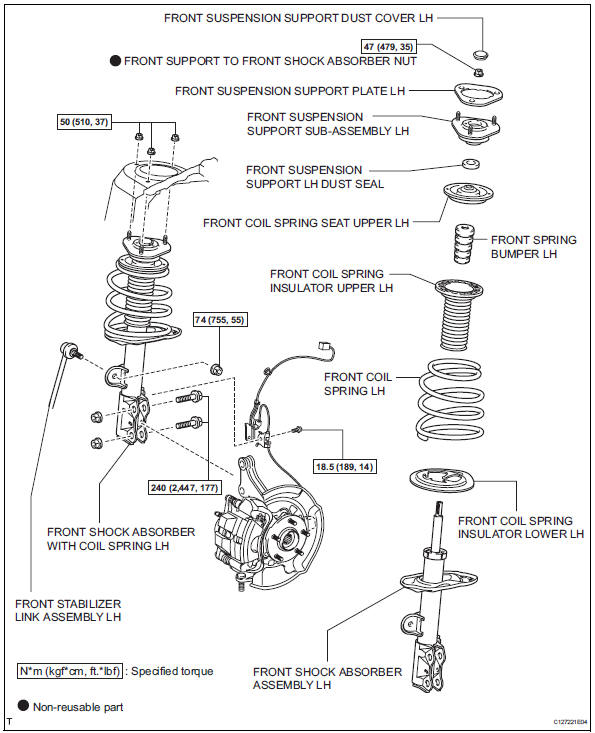
Components
Removal
Hint:
- Use the same procedures for the rh side and lh side.
- The procedures listed below are for the lh side.
- Remove front wheel
- Disconnect front speed sensor lh
- Disconnect front stabilizer link assembly lh
- Remove front shock absorber with coil spring lh
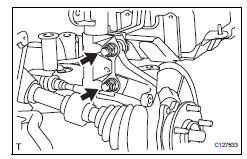
- Remove the 2 bolts and 2 nuts, and disconnect the shock absorber from the steering knuckle.
Hint:
While fixing the nuts in place, loosen and remove the bolts.
- Remove the 3 nuts and shock absorber with coil spring.
Disassembly
Hint:
- Use the same procedures for the rh side and lh side.
- The procedures listed below are for the lh side.
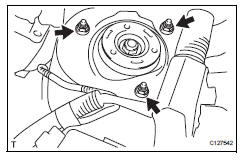
- Remove front suspension support plate lh
- Remove the plate from the shock absorber.
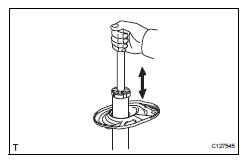
- Remove front suspension support dust cover lh
- Using a screwdriver, remove the dust cover from the suspension support.
Hint:
Tape the screwdriver tip before use.
- Remove front support to front shock absorber nut
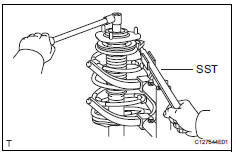
- Install 2 nuts and 2 bolts to the bracket at the lower portion of the shock absorber and secure it with a vise.
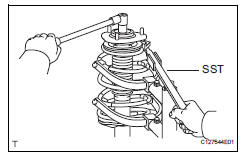
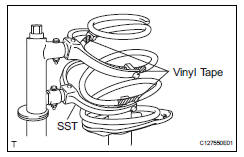
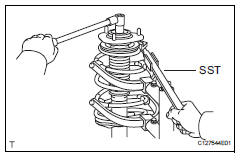
- Using sst, compress the coil spring.
Sst 09727-30021 (09727-00010, 09727-00021, 09727-00031)
Hint:
To prevent the coil spring from being damaged, wind vinyl tape on the coil spring.
Notice:
- When holding the shock absorber with the coil spring removed, do not hold it by the spring lower seat. Also, do not knock the spring lower seat.
- Do not use an impact wrench which will damage sst.
- Using sst to hold the spring upper seat, remove the nut.
Sst 09729-22031
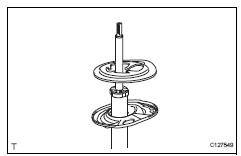
- Remove front suspension support subassembly lh
- Remove the suspension support from the shock absorber.
- Remove front suspension support lh dust seal
- Remove the dust seal from the shock absorber.
- Remove front coil spring seat upper lh
- Remove the seat upper from the shock absorber.
- Remove front coil spring insulator upper lh
- Remove the insulator upper from the shock absorber.
- Remove front spring bumper lh
- Disengage the spring bumper from the spring seat.
- Remove front coil spring lh
- Remove the coil spring from the shock absorber.
- Remove sst from the coil spring.
- Remove front coil spring insulator lower Lh
- Remove the insulator lower from the shock absorber.
Inspection
- Inspect front shock absorber assembly lh
- Compress and extend the shock absorber rod 4
times or more. Check that there is no abnormal
resistance or unusual sound during the operation.
If there is any abnormality, replace the shock absorber assembly with a new one.
Notice:
When disposing of the shock absorber, see disposal (see page sp-13).
Reassembly
Hint:
- Use the same procedures for the rh side and lh side.
- The procedures listed below are for the lh side.
- Install front coil spring insulator lower lh
- Install the insulator lower to the shock absorber.
- Install front spring bumper lh
- Engage the spring bumper to the spring seat.
- Install front coil spring lh
- Using sst, compress the coil spring.
Sst 09727-30021 (09727-00010, 09727-00021, 09727-00031)
Hint:
To prevent the coil spring from being damaged, wind vinyl tape around the coil spring.
Notice:
Do not use an impact wrench which will damage sst.
- Install the coil spring to the shock absorber.
Hint:
Fit the lower end of the coil spring to the gap of the lower spring seat.
- Install front coil spring insulator upper lh
- Install the insulator upper to the shock absorber.
- Install front coil spring seat upper lh
- Install the seat upper to the shock absorber.
- Install front suspension support lh dust seal
- Install the dust seal to the shock absorber.
- Install front suspension support subassembly lh
- Install the suspension support to the shock absorber.
- Install front support to front shock absorber nut
- Using sst to hold the spring upper seat, install a new nut.
Sst 09729-22031
Torque: 47 n*m (475 kgf*cm, 34 ft.*Lbf)
- Remove sst.
Sst 09727-30021 (09727-00010, 09727-00021, 09727-00031)
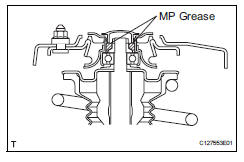
- Pack the suspension support with mp grease.
- Install front suspension support dust cover lh
- Install the dust cover to the shock absorber.
- Install front suspension support plate lh
- Install the support plate to the shock absorber with coil spring.
 Rear wheel alignment
adjustment
Inspect tire
Inspect the tire (see page tw-1).
Measure vehicle height
Measure the vehicle height (see page sp-3).
Inspect toe-in
Standard toe-in
If the ...
 Suspension & axle front shock absorber with coil spring (for sport package)
Components
Removal
Hint:
Use the same procedures for the rh side and lh side.
The procedures listed below are for the lh side.
Remove front wheel
Remove front speed sensor lh (see ...
Other materials:
Lost communication with front satellite sensor bus rh
Description
The front airbag sensor rh consists of the diagnostic circuit and the frontal
deceleration sensor.
If the center airbag sensor receives signals from the frontal deceleration
sensor, it determines whether or
not the srs should be activated.
Dtc b1602/83, b1603/83, b1612/83 ...
Child restraint seat tether anchor
Components
Removal
Remove child restraint seat tether anchor cover
Using a screwdriver, detach the 4 claws and remove
the cover.
Hint:
Tape the screwdriver tip before use.
Remove roof headlining assembly
Hint:
It is not necessa ...
Driving mode select switch
The driving modes can be
selected to suit the driving
and usage conditions.
Selecting a driving mode
â– FF vehicles/Dynamic
Torque Control AWD vehicles
Eco drive mode
Suitable for driving to improve fuel
economy by more smoothly generating
torque in response to accelerator
pedal operations comp ...
