
Toyota RAV4 (XA40) 2013-2018 Owners Manual: Fuel consumption information
The fuel consumption information can be displayed on entune premium audio with navigation and entune audio screen.
Display the trip information or past record screen
- Vehicles with entune audio
Press the “car� button.
- Vehicles with entune premium audio with navigation and entune audio plus
Press the “apps� button, and then select “eco� on the screen.
Fuel consumption
Trip information
If the “trip information� screen does not appear, select “trip information�.
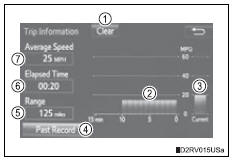
- Reset the trip information data
- Previous fuel consumption per minute
- Current fuel consumption
- “Past record� screen appears
- Cruising range
- Elapsed time
- Average vehicle speed
Average fuel consumption for the past 15 minutes is divided by color into past averages and averages attained since the engine switch was last turned to the “on� position (vehicles without a smart key system) or ignition on mode (vehicles with a smart key system). Use the displayed average fuel consumption as a reference.
These images are examples only, and may vary slightly from actual conditions.
Past record
If the “past record� screen does not appear, select “past record�.
- Reset the past record data
- Best recorded fuel consumption
- Average fuel consumption (if equipped)
- Previous fuel consumption record
- Current fuel consumption
- Update the past record data
- “Trip information� screen
appears
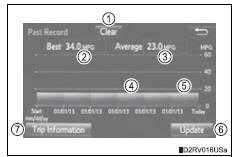
These images are examples only, and may vary slightly from actual conditions.
Resetting the data
Selecting “clear� on the “trip information� screen will reset the trip information data.
Selecting “clear� on the “past record� screen will reset the past record data.
Updating the past record data
Selecting “update� on the “past record� screen will update the past record data.
Also, the average fuel consumption displayed in the multi-information display will be reset at the same time.
Cruising range
Displays the estimated maximum distance that can be driven with the quantity of fuel remaining.
This distance is computed based on your average fuel consumption. As a result, the actual distance that can be driven may differ from that displayed.
 Multi-information display
Display contents
The multi-information display presents the driver with a variety of driving-
related data including the current outside air temperature.
Outside temperature display
Indicates th ...

Other materials:
Initialization
Zero point calibration
Notice:
Make sure that the front passenger seat is not
occupied before performing the operation.
Hint:
Perform the zero point calibration and sensitivity check if
any of the following conditions apply.
The occupant classification ecu is replaced.
Accessories ( ...
Compressor circuit
Description
When the a/c switch is turned on, the magnetic clutch on signal is sent from
the air conditioning
amplifier. Then the mg clt relay turns on to operate the magnetic clutch.
Wiring diagram
Inspection procedure
Perform active test by intelligent tester (a/c mag clutch)
C ...
Driver side - side airbag sensor assembly initialization incomplete
Description
The side airbag sensor lh consists of part including the diagnostic circuit
and the lateral deceleration
sensor.
When the center airbag sensor receives signals from the lateral deceleration
sensor, it determines
whether or not the srs should be activated.
Dtc b1623/81, b ...
