Toyota RAV4 (XA40) 2013-2018 Service Manual: Installation (2005/11-2006/01)
- Install sliding roof weatherstrip
- Install the sliding roof weatherstrip.
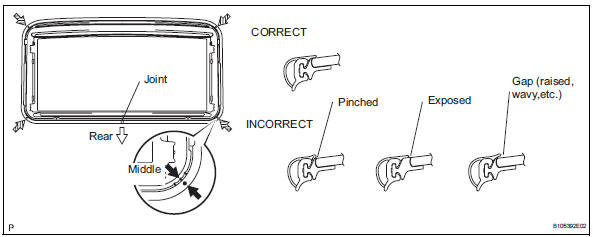
- Position the joint of the weatherstrip at the rear center.
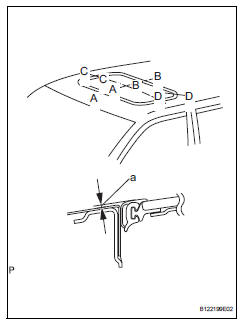
- Align the marks on the weatherstrip with the middle marks at the corners of the plastic on the edge of the sliding roof panel and install the weatherstrip. Make sure that the marks on the weatherstrip are positioned within the area indicated by the marks at the corners of the plastic on the edge of the sliding roof panel.
- Install the lip of the weatherstrip firmly.
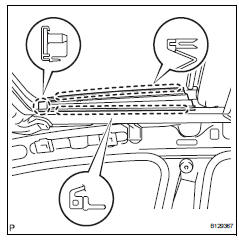
- Install sliding roof housing assembly
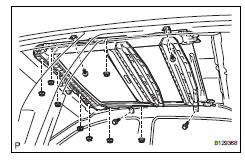
- Install the housing with the 4 bolts and 8 nuts.
Torque: 5.4 N*m (55 kgf*cm, 48 in.*Lbf)
- Connect sliding roof drain hose
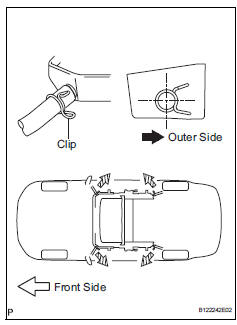
- Connect the 4 drain hoses.
Notice:
The clip must face toward the outside of the vehicle and also be above the lower surface of the sliding roof housing when installing the drain hoses.
- Install sliding roof glass sub-assembly
- Using a t25 "torx" driver, temporarily install the sliding roof glass sub-assembly with the 4 screws.
- Perform a level check.
- Check the difference in level for "a" between the roof panel and the upper surface of the weatherstrip when the sliding roof glass is fully closed.
Standard measurement 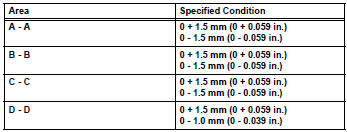
Hint:
"+" Represents the condition that the glass is above the panel level. "-" Represents the condition that the glass is below the panel level.
- Perform a gap check.
- Check the gap between the roof panel and roof glass.
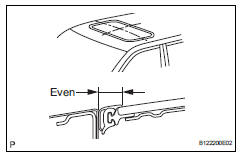
Notice:
The gap must be even all around.
- Using a t25 "torx" driver, install the sliding roof glass with the 4 screws.
Torque: 4.0 N*m (41 kgf*cm, 35 in.*Lbf)
- Install sliding roof side garnish lh
- Attach the claws to install the garnish.
- Install sliding roof side garnish rh
Hint:
Use the same procedures described for the lh side.
- Check for water leaks
- Adjust the sliding roof glass sub-assembly, and check for water leaks.
- If there are any leaks, readjust the sliding roof glass sub-assembly.
- Install roof headlining assembly
- Install the roof headlining (see page ir-49).
- Connect cable to negative battery terminal
 Reassembly
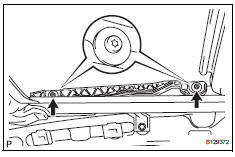
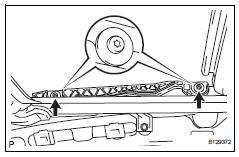
Install sliding roof drive cable
Using a screwdriver, slide the sliding roof drive
cable sub-assemblies in the direction indicated by
the arrow in the illustration to install them.
...
 Installation (2006/01- )
Install sliding roof weatherstrip
Install the sliding roof weatherstrip.
Position the joint of the weatherstrip at the rear
center.
Align the marks on the weatherstrip with the
...
Other materials:
Checking tires
Check if the treadwear indicators
are showing on the tires.
Also check the tires for uneven
wear, such as excessive wear
on one side of the tread.
Check the spare tire condition
and pressure if not rotated.
New tread
Worn tread
Treadwear indicator
The location of treadwear indicators
is show ...
Data list
Hint:
By reading the data list displayed on an intelligent
tester, values can be checked, including those of the
switches, sensors, and actuators, without removing any
parts. Reading the data list as the first step of
troubleshooting is one method of shortening diagnostic
time.
Notice:
In th ...
When towing active torque control 4wd vehicles
Use one of the methods shown below to tow the
vehicle.
If the vehicle has trouble in the chassis and drivetrain,
use method 1 (flat bed truck).
Notice:
Do not use any towing method other than those
shown above.
For example, the towing methods shown below are
dangerous or dama ...
