Toyota RAV4 (XA40) 2013-2018 Service Manual: Installation (2006/01- )
- Install sliding roof weatherstrip
- Install the sliding roof weatherstrip.
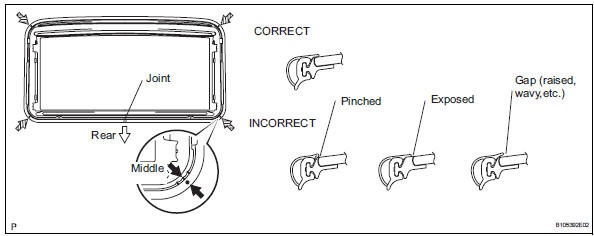
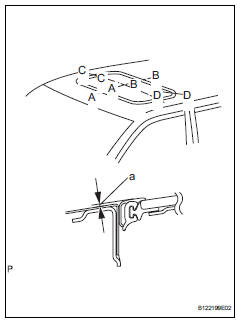
- Position the joint of the weatherstrip at the rear center.
- Align the marks on the weatherstrip with the middle marks at the corners of the plastic on the edge of the sliding roof panel and install the weatherstrip. Make sure that the marks on the weatherstrip are positioned within the area indicated by the marks at the corners of the plastic on the edge of the sliding roof panel.
- Install the lip of the weatherstrip firmly.
- Install sliding roof housing assembly
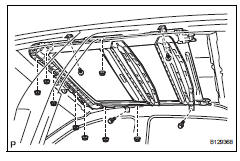
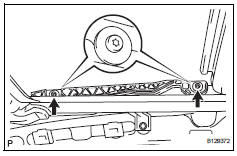
- Install the housing with the 4 bolts and 8 nuts.
Torque: 5.4 N*m (55 kgf*cm, 48 in.*Lbf)
- Connect sliding roof drain hose
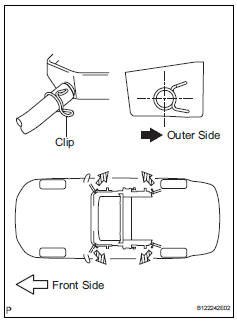
- Connect the 4 drain hoses.
Notice:
The clip must face toward the outside of the vehicle and also be above the lower surface of the sliding roof housing when installing the drain hoses.
- Install sliding roof glass sub-assembly
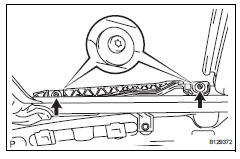
- Using a t25 "torx" driver, temporarily install the sliding roof glass sub-assembly with the 4 screws.
- Perform a level check.
- Check the difference in level for "a" between the roof panel and the upper surface of the weatherstrip when the sliding roof glass is fully closed.
Standard measurement 
Hint:
"+" Represents the condition that the glass is above the panel level. "-" Represents the condition that the glass is below the panel level.
- Perform a gap check.
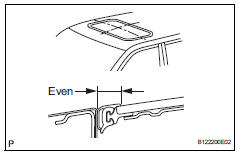
- Check the gap between the roof panel and roof glass.
Notice:
The gap must be even all around.
- Using a t25 "torx" driver, install the sliding roof
glass with the 4 screws.
Torque: 4.0 N*m (41 kgf*cm, 35 in.*Lbf)
- Install sliding roof side garnish lh

- Attach the claws to install the garnish.
- Install sliding roof side garnish rh
Hint:
Use the same procedures described for the lh side.
- Check for water leaks
- Adjust the sliding roof glass sub-assembly, and check for water leaks.
- If there are any leaks, readjust the sliding roof glass sub-assembly.
- Install roof headlining assembly
- Install the roof headlining (see page ir-59).
- Connect cable to negative battery terminal
 Installation (2005/11-2006/01)
Install sliding roof weatherstrip
Install the sliding roof weatherstrip.
Position the joint of the weatherstrip at the rear
center.
Align the marks on the weatherstrip with the
...
 Sliding roof switch assembly
Removal
Disconnect cable from negative battery terminal
Caution:
Wait at least 90 seconds after disconnecting the
cable from the negative (-) battery terminal to
prevent airbag and seat belt ...
Other materials:
Emergency flashers
The emergency flashers are used to warn other drivers when the
vehicle has to be stopped in the road to a breakdown, etc.
Press the switch.
All the turn signals will flash.
To turn them off, press the switch
once again.
Emergency flashers
If the emergency flashers are used for a long ...
Back-up light circuit
Description
The park / neutral position switch turns on when the shift lever is moved
into the r position, causing the
back-up lights to illuminate.
Wiring diagram
Inspection procedure
Inspect fuse (gauge1)
Remove the gauge1 fuse from the instrument panel
junction block.
Meas ...
Brake pedal load sensing switch
Description
The brake pedal load sensing switch is turned on when the brake pedal is
depressed with force exceeding
a predetermined level.
The skid control ecu detects if the brake pedal is depressed or not via this
circuit.
Wiring diagram
Inspection procedure
Notice:
When repla ...
