Toyota RAV4 (XA40) 2013-2018 Owners Manual: General maintenance
Listed below are the general maintenance items that should be performed at the intervals specified in the “owner’s warranty information booklet” or “owner’s manual supplement/scheduled maintenance guide”. It is recommended that any problem you notice should be brought to the attention of your toyota dealer or qualified service shop for advice.
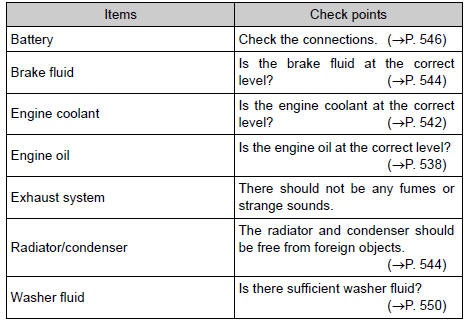
Engine compartment
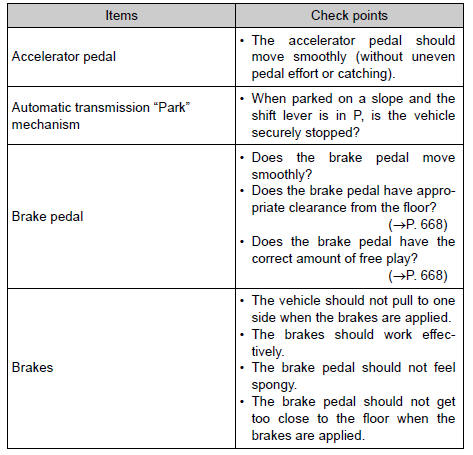
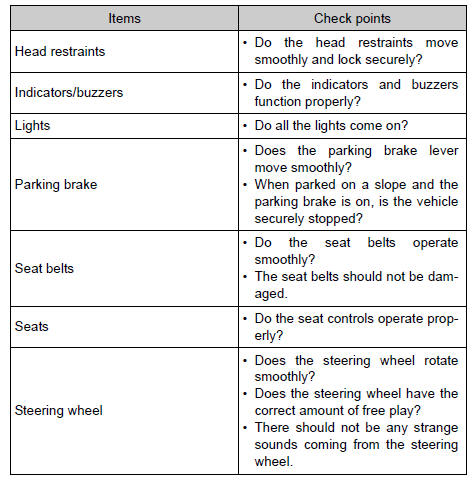
Vehicle interior
Vehicle exterior

Caution
If the engine is running
Turn the engine off and ensure that there is adequate ventilation before performing maintenance checks.
 Maintenance requirements
To ensure safe and economical driving, day-to-day care and regular
maintenance are essential. It is the owner’s responsibility to
perform regular checks. Toyota recommends the following maintenanc ...
 Emission inspection
and maintenance (i/m)
programs
Emission inspection
and maintenance (i/m)
programs
Some states have vehicle emission inspection programs which
include obd (on board diagnostics) checks. The obd system
monitors the operation of the emission control system.
If the malfunction indic ...
Other materials:
Inspection
Inspect engine coolant temperature sensor
Measure the resistance of the sensor.
Standard resistance
Notice:
If checking the sensor in water, be careful not to
allow water to contact the terminals. After
checking, wipe the water off the sensor.
If the result is not as specified, ...
Radiator
Components
On-vehicle inspection
Check radiator reservoir cap subassembly
Measure the valve opening pressure.
If there are water stains or foreign matter on oring
1, clean it with water and finger scouring.
Check that o-ring 1 is not deformed, cracked or
sw ...
System description
Description
The eps (electronic power steering) system generates
torque through the operation of the motor and the
reduction gear installed on the column shaft in order to
assist steering effort.
The power steering ecu determines directions and the
amount of assisting power in accordanc ...
