
Toyota RAV4 (XA40) 2013-2018 Service Manual: How to proceed with troubleshooting
Hint:
- Use these procedures to troubleshoot the tire pressure warning system.
- *: Use the intelligent tester.
- Vehicle brought to workshop

- Inspect battery voltage
Standard voltage: 11 to 14 v
If the voltage is below 11 v, recharge or replace the battery before proceeding.

- Check indicator light
- Check the indicator light (see page tw-17).

- Check dtc*
- Check for dtc (see page tw-20).
- Clear the dtc (see page tw-20).
- Recheck for dtc (see page tw-20).
Result 


- Dtc chart
- Check for tire pressure warning system dtc output (see page tw-22).
- Problem symptom confirmation

- Problem symptoms table
Result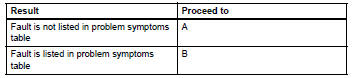


- Overall analysis and troubleshooting*
- Terminals of ecu (see page tw-16).
- Data list/active test (see page tw-21).

- Repair or replace

- Confirmation test

End
 System description
Description of system
A tire pressure warning antenna and receiver is
equipped with a tire pressure sensor and a
transmitter and is installed in each tire wheel. The
sensor measures the ...
 Registration
In case of tire pressure warning ecu
replacement
Read id stored in the old ecu using the intelligent
tester.
In case of tire pressure warning valve and
transmitter and/or tire pre ...
Other materials:
Underdrive clutch
Components
Disassembly
Inspect pack clearance of underdrive
clutch (see page ax-247)
Remove no. 1 Underdrive clutch disc
Using a screwdriver, pry out the underdrive clutch
flange snap ring.
Remove the flange, 3 discs and 3 plates from the
underdrive clutch drum.
In ...
How to proceed with troubleshooting
Hint:
Use these procedures to troubleshoot the supplemental
restraint system.
*: Use the intelligent tester.
Vehicle brought to workshop
Inspect battery voltage*
Standard voltage:
11 to 14 v
If the voltage is below 11 v, recharge or replace the battery
before proceeding.
...
General maintenance (2006/01- )
Inspect drive belt (see page em-7)
Replace spark plugs (see page ig-7)
Replace air cleaner filter
Remove the air filter.
Visually check that the air filter is not excessively
damaged or oily.
Replace the air filter with a new one, if necessary.
Replace engine oil and oil fil ...
