Toyota RAV4 (XA40) 2013-2018 Service Manual: Installation (2006/01- )
- Install abs and traction actuator assembly with bracket
Notice:
do not remove the hole plug before connecting the brake tube. new actuators are filled with brake fluid.
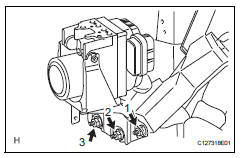
- Install the actuator with bracket with the 3 nuts.
Torque: 19 n*m (194 kgf*cm, 14 ft.*Lbf)
Hint:
The nuts should be tightened in order from 1 to 3 as shown in the illustration.
Notice:
Be careful not to damage the brake tubes.
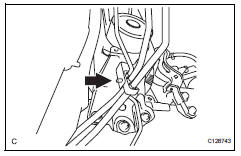
- Connect the brake tube clamp to the bracket.
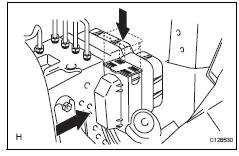
- Connect the connector and push the lock lever downward.
- Connect brake lines
- Using sst, connect the 6 brake lines to the correct locations on the actuator, as shown in the illustration.
Sst 09023-00101
Torque: 15.2 N*m (155 kgf*cm, 11 ft.*Lbf) without sst
14 N*m (144 kgf*cm, 10 ft.*Lbf) with sst
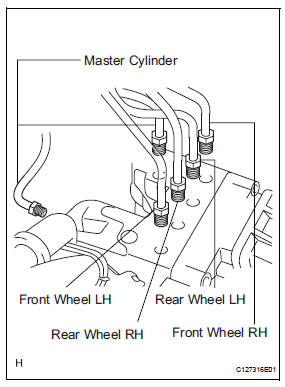
Hint:
Use a torque wrench with a fulcrum length of 30 cm (11.81 In.).
- Fill reservoir with brake fluid (see page br- 6)
- Bleed air from brake master cylinder (see page br-7)
- Bleed air from brake line (see page br-7)
- Bleed air from abs and traction actuator assembly (see page br-8)
- Check brake fluid level in reservoir (see page br-6)
- Check for brake fluid leakage
- Install air cleaner case sub-assembly (for 2az-fe)
- Install the air cleaner case (see page em-105).
Hint:
Refer to the procedures from the installation of the air cleaner case up until the installation of the purge vsv.
- Install air cleaner case (for 2gr-fe)
- Install the air cleaner case (see page em-31).
Hint:
Refer to the procedures from the installation of the air cleaner case up until the installation of the air cleaner cap sub-assembly.
- Connect cable to negative battery terminal
- Check abs and traction actuator assembly with intelligent tester
- Check the abs and traction actuator with the intelligent tester (see page bc-180).
Inspection
- Inspect front speed sensor
- Check the speed sensor. If any of the following occurs, replace the speed sensor with a new one.
- The surface of the speed sensor is cracked, dented, or chipped.
- The connector or wire harness is scratched, cracked, or damaged.
- The speed sensor has been dropped.
 Front speed sensor
Components
Removal
Hint:
Use the same procedures for the lh side and rh side.
The procedures listed below are for the lh side.
Disconnect cable from negative battery
terminal
Ca ...
 Installation
Hint:
Use the same procedures for the lh side and rh side.
The procedures listed below are for the lh side.
Install speed sensor front lh
Notice:
To prevent interference with other par ...
Other materials:
System description
General
The front passenger occupant classification system
judges whether the front passenger seat is occupied
or not in accordance with the seat belt buckle
status; and whether the seat is occupied by an adult
or child (with child seat) in accordance with the load
that is applied ...
On-vehicle inspection
Hint:
When pressing the switch for 0.3 Seconds or less, the roof
glass moves but auto operation does not operate.
Check auto operation
Turn the ignition switch on.
When the roof glass is fully closed, press the slide
open switch for 0.3 Seconds or more. Check that
the roof glass au ...
Unmatched key code
Description
This dtc is output when a key code that has not been registered in the
transponder key ecu is inserted
into the ignition key cylinder.
Inspection procedure
Reregister key
Clear the dtc (see page ei-18).
Reregister the key code with the transponder key ecu
(see ...
