Toyota RAV4 (XA40) 2013-2018 Service Manual: How to proceed with troubleshooting
Hint:
Use these procedures to troubleshoot the engine immobiliser system.
*: Use the intelligent tester.
- Vehicle brought to workshop

- Inspect battery voltage
Standard voltage: 11 to 14 v
If the voltage is below 11 v, recharge or replace the battery before proceeding.

- crank engine for more than 10 seconds

- Check for dtc*
- Check for dtcs and make a note of any codes that are output (see page ei-18).
- Clear the dtc.
- Recheck for dtcs. Based on the dtc output above, try to cause the output of the same sfi system dtc or engine immobiliser system dtc by simulating the original activity indicated by the dtc.
Result: 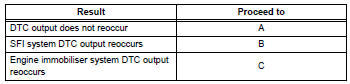


- Problem symptoms table
Result: 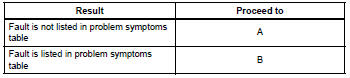


- Overall analysis and troubleshooting*
- Data list / active test (see page ei-19)
- Terminals of ecu (see page ei-13)
- Inspection (see page ei-43)

- Adjust, repair or replace

- Confirmation test
End
 System description
Engine immobiliser system description
The engine immobiliser system is designed to prevent
the vehicle from being stolen. This system uses a
transponder key ecu that stores the key codes of
a ...
 Registration
Hint:
The key has 2 codes: the key code (immobiliser code) and
the wireless code (recognition code). Both of these codes
need to be registered. For wireless code registration
procedures, refer to ...
Other materials:
Removal
Disconnect cable from negative battery terminal
Caution:
Wait at least 90 seconds after disconnecting the
cable from the negative (-) battery terminal to
prevent airbag and seat belt pretensioner activation.
Remove mass air flow meter
Disconnect the mass air flow meter connector.
...
Diagnosis system
Description
Engine immobiliser system data and diagnostic
trouble codes (dtcs) can be read through the
vehicle's data link connector 3 (dlc3). In some
cases, a malfunction may be occurring in the engine
immobiliser system even though the security
indicator light is not illuminated ...
How to proceed with troubleshooting
Notice:
Dtcs for the can communication system are as
follows: u0073, u0100, u0105, u0121, u0122, u0123,
u0124, u0126, u0129, c1280, c1296, c1297, and
b1499.
Refer to the troubleshooting procedures of each
system if dtcs regarding the can communication
system are not output.
Turn th ...
