Toyota RAV4 (XA40) 2013-2018 Owners Manual: If the vehicle battery is discharged
The following procedures may be used to start the engine if the vehicle’s battery is discharged.
You can also call your toyota dealer or a qualified repair shop.
If you have a set of jumper (or booster) cables and a second vehicle with a 12-volt battery, you can jump start your vehicle by following the steps below.
- Open the hood.
- Connect the jumper cables according to the following procedure:
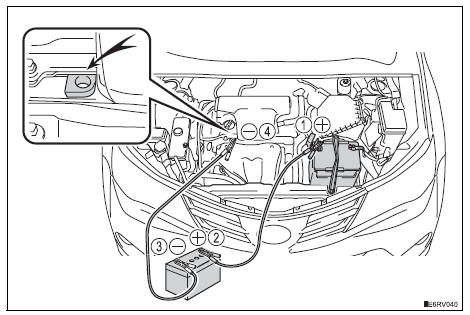
- Connect a positive jumper cable clamp to the positive (+) battery terminal on your vehicle.
- Connect the clamp on the other end of the positive cable to the positive (+) battery terminal on the second vehicle.
- Connect a negative cable clamp to the negative (-) battery terminal on the second vehicle.
- Connect the clamp at the other end of the negative cable to a solid, stationary, unpainted metallic point away from the battery and any moving parts, as shown in the illustration.
- Start the engine of the second vehicle. Increase the engine speed slightly and maintain at that level for approximately 5 minutes to recharge the battery of your vehicle.
- Vehicles with a smart key system only: open and close any of the doors of your vehicle with the engine switch off.
- Vehicles without a smart key system:
maintain the engine speed of the second vehicle and start the
engine of your vehicle.
Vehicles with a smart key system: maintain the engine speed of the second vehicle and start the engine of your vehicle by turning the engine switch to ignition on mode.
- Once the vehicle’s engine has started, remove the jumper cables in the exact reverse order from which they were connected.
Once the engine starts, have the vehicle inspected at your toyota dealer as soon as possible.
Starting the engine when the battery is discharged
The engine cannot be started by push-starting.
To prevent battery discharge
- Turn off the headlights and the audio system while the engine is off.
- Turn off any unnecessary electrical components when the vehicle is running at a low speed for an extended period, such as in heavy traffic.
Charging the battery
The electricity stored in the battery will discharge gradually even when the vehicle is not in use, due to natural discharge and the draining effects of certain electrical appliances. If the vehicle is left for a long time, the battery may discharge, and the engine may be unable to start. (The battery recharges automatically during driving.)
When recharging or replacing the battery (vehicles with a smart key system)
- In some cases, it may not be possible to unlock the doors using the smart key system when the battery is discharged. Use the wireless remote control or the mechanical key to lock or unlock the doors.
- The engine may not start on the first attempt after the battery has recharged but will start normally after the second attempt. This is not a malfunction.
- The engine switch mode is memorized by the vehicle. When the battery is
reconnected, the system will return to the mode it was in before the battery
was discharged. Before disconnecting the battery, turn the engine switch
off.
If you are unsure what mode the engine switch was in before the battery discharged, be especially careful when reconnecting the battery.
When the battery is removed or discharged
- The power back door (if equipped) must be initialized.
- The moon roof (if equipped) must be initialized.
Caution
Avoiding battery fires or explosions
Observe the following precautions to prevent accidentally igniting the flammable gas that may be emitted from the battery:
- Make sure each jumper cable is connected to the correct terminal and that it is not unintentionally in contact with any other than the intended terminal.
- Do not allow the other end of the jumper cable connected to the “+” terminal to come into contact with any other parts or metal surfaces in the area, such as brackets or unpainted metal.
- Do not allow the + and - clamps of the jumper cables to come into contact with each other.
- Do not smoke, use matches, cigarette lighters or allow open flame near the battery.
Battery precautions
- The battery contains poisonous and corrosive acidic electrolyte, while related parts contain lead and lead compounds. Observe the following precautions when handling the battery:
- When working with the battery, always wear safety glasses and take care not to allow any battery fluids (acid) to come into contact with skin, clothing or the vehicle body.
- Do not lean over the battery.
- In the event that battery fluid comes into contact with the skin
or eyes,
immediately wash the affected area with water and seek medical attention.
Place a wet sponge or cloth over the affected area until medical attention can be received.
- Always wash your hands after handling the battery support, terminals, and other battery-related parts.
- Do not allow children near the battery.
Notice
When handling jumper cables
When connecting the jumper cables, ensure that they do not become entangled in the cooling fans or engine drive belt.
 If the electronic key does
not operate properly
(vehicles with a
smart key system)
If the electronic key does
not operate properly
(vehicles with a
smart key system)
If communication between the electronic key and vehicle is
interrupted („_p. 107) Or the electronic key cannot be used
because the battery is depleted, the smart key system and wireless
remote co ...
 If your vehicle overheats
The following may indicate that your vehicle is overheating.
The high engine coolant temperature warning light Comes
on or a loss of engine power is experienced. (For example, the
vehicl ...
Other materials:
Cooling fan motor
On-vehicle inspection
Inspect no. 1 Cooling fan motor
Disconnect the no. 1 Fan connector.
Connect the battery and ammeter to the no. 1 Fan
motor connector.
Check that the no. 1 Fan rotates smoothly, and then
check the reading on the ammeter.
Standard amperage ...
Test mode procedure
Hint:
By switching the skid control ecu from normal mode to
test mode, abnormality detection sensitivity is enhanced
and troubleshooting can be conducted efficiently.
Perform a sensor check in test mode after the speed
sensor or sensor rotor has been repaired or replaced.
If the igniti ...
Driver side rear airbag sensor circuit malfunction
Description
The rear airbag sensor lh consists of parts including the diagnostic circuit
and the lateral deceleration
sensor.
When the center airbag sensor receives signals from the lateral deceleration
sensor, it determines
whether or not the srs should be activated.
Dtc b1630/23 i ...
