Toyota RAV4 (XA50) 2019-2026 Owners Manual: If the vehicle becomes stuck
Carry out the following procedures if the tires spin or the vehicle becomes stuck in mud, dirt or snow:
Recovering procedure
1. Stop the engine. Set the parking brake and shift the shift lever to P.
2. Remove the mud, snow or sand from around the stuck tire.
3. Place wood, stones or some other material to help provide traction under the tires.
4. Restart the engine.
5. Shift the shift lever to D or R and release the parking brake. Then, while exercising caution, depress the accelerator pedal.
ÔľáWhen it is difficult to free the vehicle
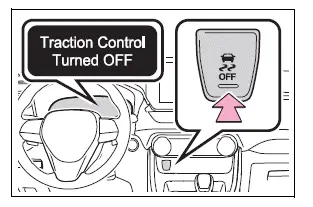
Press  to turn off TRAC.
WARNING
ÔľáWhen attempting to free a stuck vehicle
If you choose to push the vehicle back and forth to free it, make sure the surrounding area is clear to avoid striking other vehicles, objects or people. The vehicle may also lunge forward or lunge back suddenly as it becomes free.
Use extreme caution.
ÔľáWhen shifting the shift lever
Be careful not to shift the shift lever with the accelerator pedal depressed.
This may lead to unexpected rapid acceleration of the vehicle that may cause an accident resulting in death or serious injury.
NOTICE
ÔľáTo avoid damaging the transmission and other components
- Avoid spinning the wheels and depressing the accelerator pedal more than necessary.
- If the vehicle remains stuck even after these procedures are performed, the vehicle may require towing to be freed.
 If your vehicle overheats
The following may indicate
that your vehicle is overheating.
The engine coolant temperature
gauge shows the red zone or a
loss of engine power is
experienced. (For example,
the vehicle speed doe ...

Other materials:
Checking monitor status
Perform monitor drive pattern
Connect the intelligent tester to the dlc3.
Turn the ignition switch and the tester on.
Clear the dtcs (see page es-35).
Run the vehicle in accordance with the applicable
drive pattern described in readiness monitor
drive pattern (see page es-19). Do ...
Oxygen (a/f) sensor pumping current circuit
Description
Refer to dtc p2195 (see page es-292).
Monitor description
The air-fuel ratio (a/f) sensor varies its output voltage in proportion to
the air-fuel ratio. If the a/f sensor
impedance (alternating current resistance) or output voltage deviates greatly
from the standard range ...
Definition of terms
Terms
Definition
Monitor description
Description of what ecm monitors and how detects malfunctions
(monitoring purpose and
details).
Related dtcs
Group of diagnostic trouble codes that are output by ecm based on
same malfunction
detection logic.
...
