
Toyota RAV4 (XA40) 2013-2018 Service Manual: Passenger airbag on / off indicator circuit malfunction

Description
The passenger airbag on / off indicator circuit consists of the center airbag sensor and the heater control panel*1 or *2.
This circuit indicates the operation condition of the front passenger airbag, the front passenger side airbag and passenger side seat belt pretensioner.
Dtc b1660/43 is set when a malfunction is detected in the passenger airbag on / off indicator circuit.
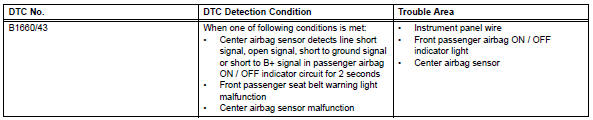
Hint:
- *1: For automatic air conditioning system
- *2: For manual air conditioning system
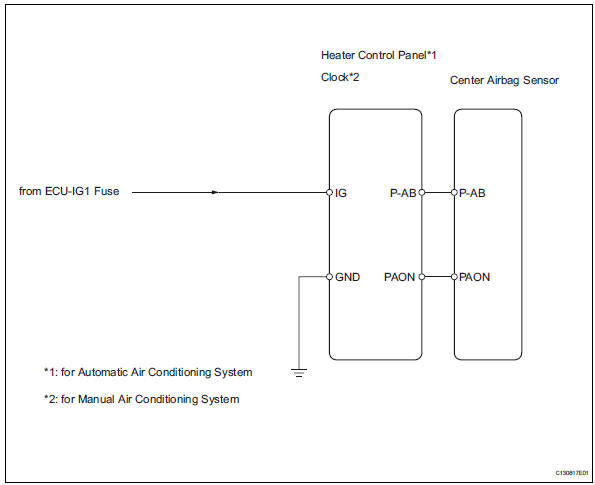
Wiring diagram
Inspection procedure
- Check passenger airbag on/off indicator operation
- Turn the ignition switch on.
- Check the passenger airbag on / off indicator operation.
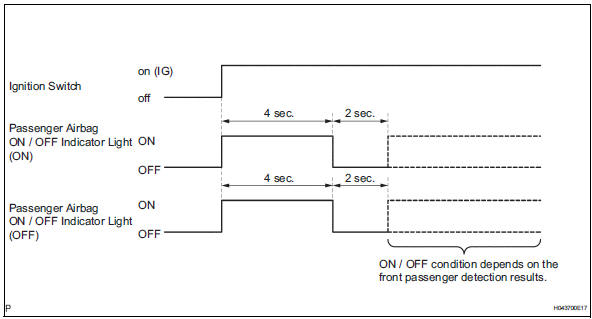
Result



- Check connection of connector
- Turn the ignition switch off.
- Disconnect the cable from the negative (-) battery terminal, and wait for at least 90 seconds.
- Check that the connectors are properly connected to the center airbag sensor and the front passenger seat belt warning light.
Ok: the connectors are properly connected.


- Check front passenger airbag on/off indicator light
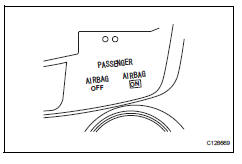
- Turn the ignition switch off.
- Disconnect the cable from the negative (-) battery terminal, and wait for at least 90 seconds.
- Disconnect the connector from the center airbag sensor.
- Connect the cable to the negative (-) battery terminal, and wait for at least 2 seconds.
- Turn the ignition switch on.
- Check the passenger airbag on / off indicator operation.
Ok: neither on nor off passenger airbag on / off indicator comes on.


- Check instrument panel wire (for open)
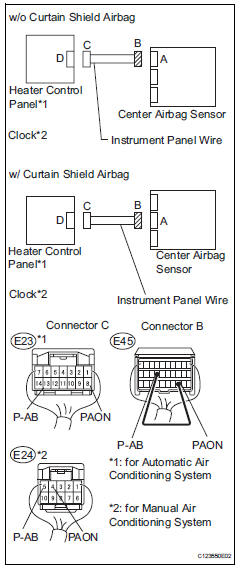
- Turn the ignition switch off.
- Disconnect the cable from the negative (-) battery terminal, and wait for at least 90 seconds.
- Disconnect the connector from the front passenger airbag on / off indicator light.
- Using a service wire, connect e45-23 (paon) and e45- 17 (p-ab) of connector b.
Notice:
Do not forcibly insert the service wire into the terminals of the connector when connecting.
- Measure the resistance of the wire harness side connectors.
Standard resistance

Hint:
*1: For automatic air conditioning system
*2: For manual air conditioning system


- Check instrument panel wire (for short)
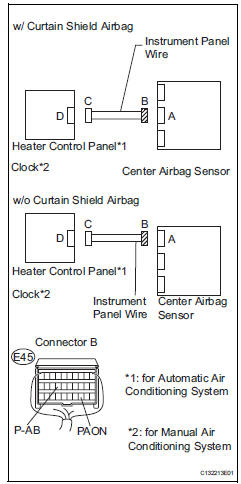
- Disconnect the service wire from connector b.
- Measure the resistance of the wire harness side connectors.
Standard resistance



- Check instrument panel wire (to b+)
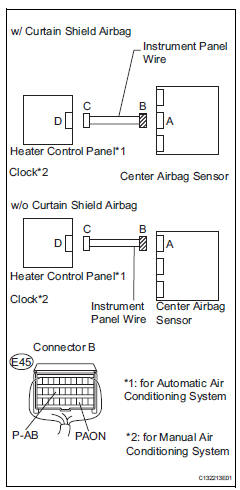
- Connect the cable to the negative (-) battery terminal, and wait for at least 2 seconds.
- Turn the ignition switch on.
- Measure the voltage of the wire harness side connectors.
Standard voltage



- Check instrument panel wire (to ground)
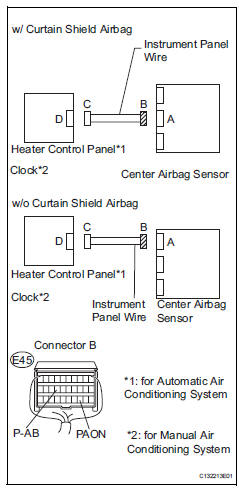
- Turn the ignition switch off.
- Disconnect the cable from the negative (-) battery terminal, and wait for at least 90 seconds.
- Measure the resistance of the wire harness side connectors.
Standard resistance



Replace front passenger airbag on/off indicator light
- Check connection of connector
- Turn the ignition switch off.
- Disconnect the cable from the negative (-) battery terminal, and wait for at least 90 seconds.
- Check that the connectors are properly connected to the center airbag sensor and the heater control panel*1 or clock*2.
Ok: the connectors are properly connected.


- Check instrument panel wire (for open)
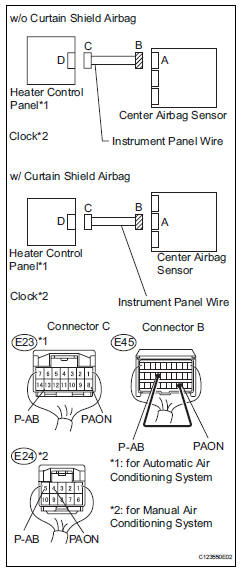
- Disconnect the connector from the front passenger airbag on / off indicator light
- Using a service wire, connect e45-23 (paon) and e45- 17 (p-ab) of connector b.
Notice:
Do not forcibly insert the service wire into the terminals of the connector when connecting.
- Measure the resistance of the wire harness side connectors.
Standard resistance

Hint:
*1: For automatic air conditioning system
*2: For manual air conditioning system


- Check instrument panel wire (for short)
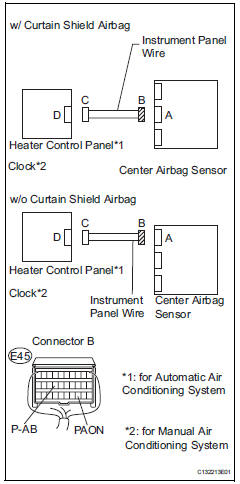
- Disconnect the service wire from connector b.
- Measure the resistance of the wire harness side connector.
Standard resistance



- Check instrument panel wire (to b+)
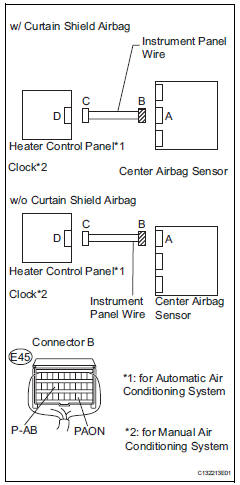
- Connect the cable to the negative (-) battery terminal, and wait for at least 2 seconds.
- Turn the ignition switch on.
- Measure the voltage of the wire harness side connector.
Standard voltage


- Check instrument panel wire (to ground)
- Turn the ignition switch off.
- Disconnect the cable from the negative (-) battery terminal, and wait for at least 90 seconds.
- Measure the resistance of the wire harness side connector.
Standard resistance


- Check wire harness (power source)
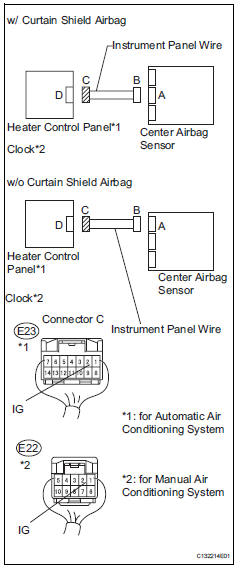
- Connect the cable to the negative (-) battery terminal, and wait for at least 2 seconds.
- Turn the ignition switch on.
- Measure the voltage of the wire harness side connector
Standard voltage
Hint:
*1: For automatic air conditioning system
*2: For manual air conditioning system


- Check front passenger airbag on/off indicator light
- Turn the ignition switch off.
- Disconnect the cable from the negative (-) battery terminal, and wait for at least 90 seconds.
- Disconnect the connector from the heater control panel*1 or clock sub-assembly*2.
- Connect the cable to the negative (-) battery terminal, and wait for at least 2 seconds.
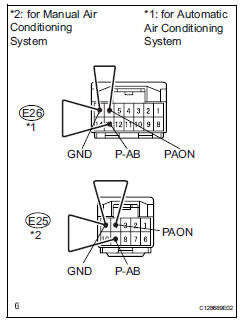
- Using a service wire, connect e23-6*1 e22-4*2 (paon) and e23-7*1 e22-5*2 (gnd) of the heater control panel *1 or clock*2.
Hint:
*1: For automatic air conditioning system
*2: For manual air conditioning system
- Using a service wire, connect e23-13*1 e22-9*2 (p-ab) and e23-7 *1 e22-5*2 (gnd) of the heater control panel *1 or clock*2.
Hint:
*1: For automatic air conditioning system
*2: For manual air conditioning system
- Turn the ignition switch on
- Check the passenger airbag on / off indicator operation.
Ok: front passenger airbag on / off indicator comes on


- Check center airbag sensor assembly
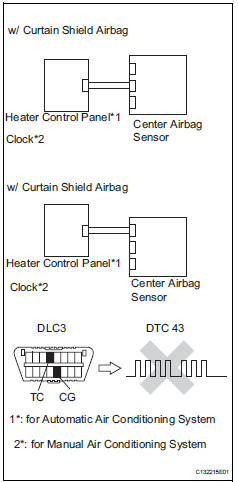
- Turn the ignition switch off.
- Disconnect the cable from the negative (-) battery terminal, and wait for at least 90 seconds.
Hint:
*1: For automatic air conditioning system
*2: For manual air conditioning system
- Connect the connector to the center airbag sensor.
- Connect the connector to the heater control panel*1 or clock*2.
- Connect the cable to the negative (-) battery terminal, and wait for at least 2 seconds.
- Turn the ignition switch on, and wait for at least 60 seconds.
- Clear the dtcs (see page rs-49).
- Turn the ignition switch off.
- Turn the ignition switch on, and wait for at least 60 seconds.
- Check for dtcs (see page rs-49).
Ok: dtc b1660/43 is not output.
Hint:
Dtcs other than b1660/43 may be output at this time, but they are not related to this check.


Use simulation method to check
 Driver side seat belt buckle switch circuit malfunction
Description
The driver side seat belt buckle switch circuit consists of the center airbag
sensor and the front seat inner
belt lh.
Dtc b1655/37 is recorded when a malfunction is detected in ...
 Short in driver side squib circuit
Description
The driver side squib circuit consists of the center airbag sensor, the
spiral cable and the steering pad.
The circuit instructs the srs to deploy when the deployment conditions ...
Other materials:
Catalyst system efficiency below threshold (bank 1)
Monitor description
The ecm uses sensors mounted in front of and behind the three-way catalytic
converter (twc) to
monitor its efficiency.
The first sensor, the air-fuel ratio (a/f) sensor, sends pre-catalyst
information to the ecm. The second
sensor, the heated oxygen (ho2) sensor, se ...
Underdrive planetary gear
Components
Disassembly
Remove underdrive planetary gear
preload (see page ax-240)
Remove underdrive input shaft nut
Sst 09930-00010 (09931-00010, 09931-00020),
09387-00050, 09564-16020
Using sst, loosen the staked part of the nut.
Clamp the underdrive planetary gear in ...
Front airbag sensor
Components
On-vehicle inspection
Check front airbag sensor (vehicle not
involved in collision and airbag not
deployed)
Perform a diagnostic system check (see page rs-
49).
Check front airbag sensor (vehicle
involved in collision and airbag has not
deployed)
Perfo ...
