Toyota RAV4 (XA40) 2013-2018 Service Manual: Removal
- Disconnect cable from negative battery terminal
Caution:
Wait at least 90 seconds after disconnecting the cable from the negative (-) battery terminal to prevent airbag and seat belt pretensioner activation.
- Remove front seat track bracket outer cover lh (see page se-11)
- Remove front seat track bracket inner cover lh (see page se-11)
- Remove seat track bracket cover outer front rh
- Use the same procedures described for the lh side.
- Remove seat track bracket cover inner front rh
- Use the same procedures described for the lh side.
- Remove front seat assembly (for power seat) (see page se-27)
- Remove front seat assembly (for manual seat) (see page se-11)
- Remove front seat cushion shield rh (for power seat) (see page se-29)
- Remove front seat cushion inner shield lh (for manual seat) (see page se-13)
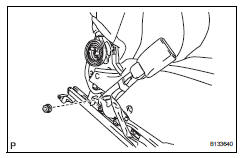
- Remove front seat inner belt assembly (for power seat)
- For driver seat: disconnect the 2 connectors and detach the 2 clamps.
- For passenger seat: disconnect the connector and detach the 2 clamps.
- Remove the nut and seat belt
- Remove front seat inner belt assembly (for manual seat)
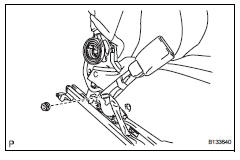
- For driver seat: disconnect the 2 connectors and detach the 3 clamps.
- For passenger seat: disconnect the connector and detach the 2 clamps.
- Remove the nut and seat belt.
 Front seat inner belt assembly
Components
...
 Installation
Hint:
A bolt without a torque specification is shown in the standard
bolt chart (see page ss-2).
Install front seat inner belt assembly (for power seat)
Install the front seat inner be ...
Other materials:
Mil circuit
Description
The mil (malfunction indicator lamp) is used to indicate vehicle malfunction
detections by the ecm.
When the ignition switch is turned on, power is supplied to the mil circuit, and
the ecm provides the
circuit ground which illuminates the mil.
The mil operation can be checked ...
Power seat switch
Inspection
Inspect front power seat switch
Measure the resistance between the terminals when
each switch is operated.
Standard resistance
Slide switch
Front vertical switch
Lifter switch
Reclining switch
If the result is not as specified, replace the switch. ...
Power outlets
The power outlet can be used for 12 v accessories that run on
less than 10 a.
Open the lid.
The power outlets can be used when
Vehicles without a smart key system
The engine switch is in the “acc” or “on” position.
Vehicles with a smart key system
The engine switch is in ...
