Toyota RAV4 (XA40) 2013-2018 Service Manual: Removal
Hint:
- Use the same procedures for the rh side and lh side.
- The procedures listed below are for the lh side.
Caution:
Be sure to read the precautionary notices concerning the srs airbag system before servicing it (see page rs-1).
- Disconnect cable from negative battery terminal
Caution:
Wait at least 90 seconds after disconnecting the cable from the negative (-) battery terminal to prevent airbag and seat belt pretensioner activation.
- Remove roof headlining assembly (see page ir-37)
- Remove curtain shield airbag assembly lh
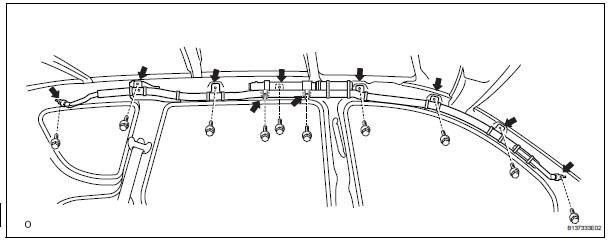
- Disconnect the connector.
Notice:
When handling the airbag connector, take care not to damage the airbag wire harness.
- Remove the 10 bolts and curtain shield airbag.
- Remove roof side rail bracket lh
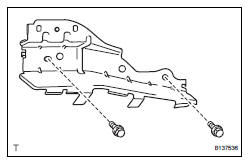
- Remove the 2 bolts and bracket.
 Curtain shield airbag assembly
Components
On-vehicle inspection
Check curtain shield airbag assembly (vehicle not involved in
collision)
Perform a diagnostic system check (see page rs-
49).
With the curtai ...
 Installation
Caution:
Be sure to read the precautionary notices concerning the
srs airbag system before servicing it (see page rs-1).
Install roof side rail bracket lh
Install the bracket with the ...
Other materials:
Luggage cover (if
equipped)
â– Installing the luggage cover
1. Compress the both ends of
the luggage cover and insert
into the recess to install.
2. Pull out the luggage cover
and hook it onto the anchors.
â– Removing the luggage
cover
1. Release the cover from the
left and right anchors and
allow it to retract.
2. Compre ...
Evaporator temperatur sensor
Removal
Remove air conditioning unit
Remove the air conditioning radiator (see page ac-
185).
Remove evaporator temperature sensor
(see page ac-193)
Inspection
Inspect evaporator temperature sensor
Measure the resistance of the sensor.
Standard resistance
No ...
Front wiper motor and link
Components
Removal
Disconnect cable from negative battery
terminal
Caution:
Wait at least 90 seconds after disconnecting the
cable from the negative (-) battery terminal to
prevent airbag and seat belt pretensioner activation.
Remove front wiper arm head cap
Remove the 2 c ...
