Toyota RAV4 (XA40) 2013-2018 Service Manual: Installation
Caution:
Be sure to read the precautionary notices concerning the srs airbag system before servicing it (see page rs-1).
- Install roof side rail bracket lh
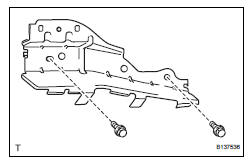
- Install the bracket with the 2 bolts.
Torque: 14 n*m (143 kgf*cm, 10 ft.*Lbf)
- Install curtain shield airbag assembly lh
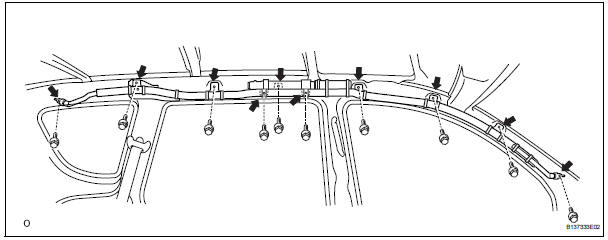
- Install the curtain shield airbag with the 10 bolts.
Torque: 14 n*m (143 kgf*cm, 10 ft.*Lbf)
Notice:
Do not twist the curtain shield airbag when installing it.
- Connect the connector.
Notice:
When handling the airbag connector, take care not to damage the airbag wire harness.
- Install roof headlining assembly (see page ir-50)
- Connect cable to negative battery terminal
- Check srs warning light
- Check the srs warning light (see page rs-34).
 Removal
Hint:
Use the same procedures for the rh side and lh side.
The procedures listed below are for the lh side.
Caution:
Be sure to read the precautionary notices concerning the
srs airbag syst ...
 Disposal
Hint:
When scrapping a vehicle equipped with an srs or disposing
of the curtain shield airbag assembly, be sure to deploy the
airbag first in accordance with the procedure described
below. If any ...
Other materials:
Symptom confirmation and diagnostic trouble code
Hint:
The diagnostic system in the rav4 has various
functions.
The first function is the diagnostic trouble code
(dtc) check. A dtc is a code stored in the ecu
memory whenever a malfunction in the signal circuits
to the ecu occurs. In a dtc check, a previous
malfunction's dtc can be ch ...
Problem symptoms table (2006/01- )
Hint:
Use the table below to help determine the cause of the
problem symptom. The potential causes of the symptoms are
listed in order of probability in the "suspected area" column
of the table. Check each symptom by checking the suspected
areas in the order they are listed. Replace p ...
Door lock position circuit
Description
This circuit detects the state of the door lock detection sensor and sends it
to the main body ecu.
Wiring diagram
Inspection procedure
Read value of intelligent tester (door lock position)
Connect the intelligent tester (with can vim) to the
dlc3.
Turn the ignitio ...
