Toyota RAV4 (XA40) 2013-2018 Service Manual: Front brake
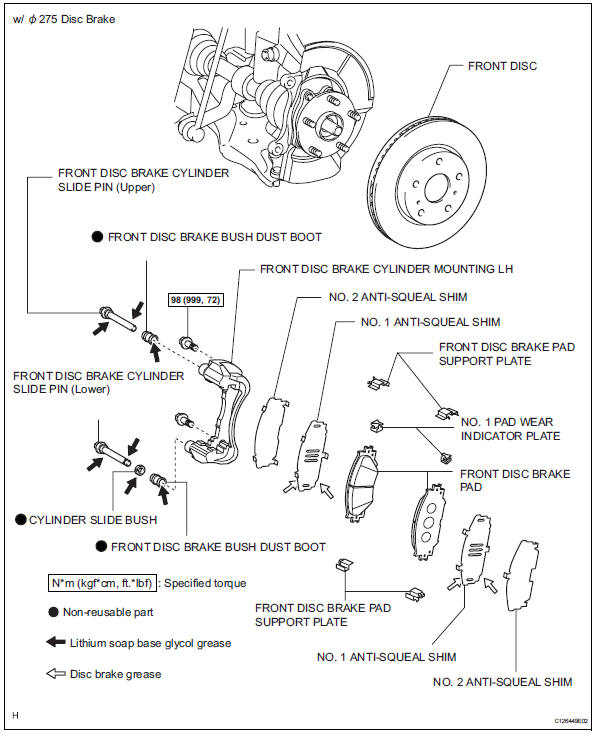
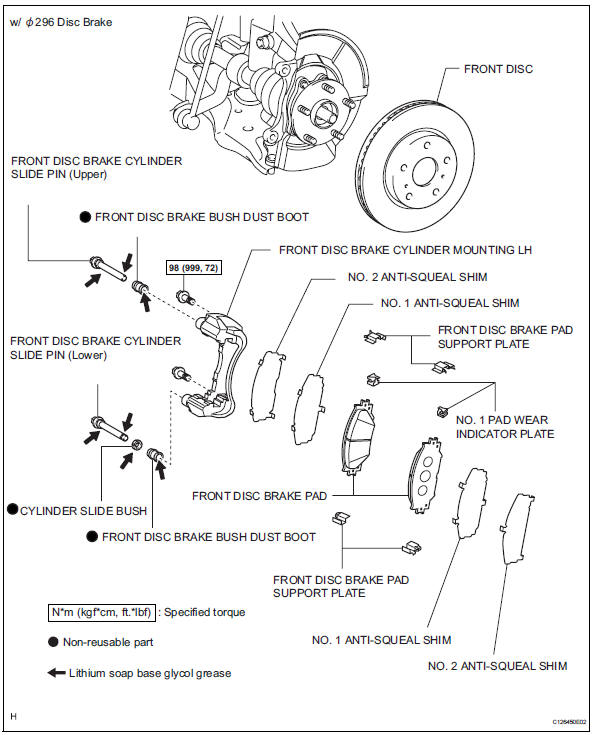
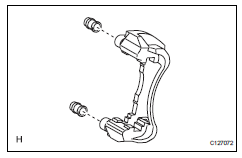
Components
Removal
Hint:
- Use the same procedures for the lh side and rh side.
- The procedures listed below are for the lh side.
- Remove front wheel
- Drain brake fluid
Notice:
Wash off brake fluid immediately if it comes in contact with any painted surface.
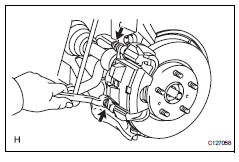
- Disconnect front flexible hose
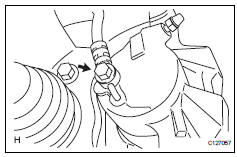
- Remove the union bolt and gasket(s).
- Disconnect the flexible hose from the brake cylinder.
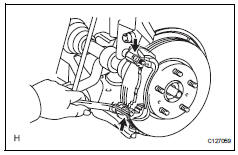
- Remove disc brake cylinder assembly lh
- Remove the 2 bolts and cylinder.
Disassembly
Hint:
- Use the same procedures for the lh side and rh side.
- The procedures listed below are for the lh side.
- Remove front disc brake pad
- Remove the 2 disc brake pads.
- Remove anti-squeal shim kit front
- Remove the shims from each pad.
- Remove no. 1 Pad wear indicator plate
- Remove the indicator plates from each pad.
- Remove front disc brake pad support plate
- Remove the 4 plates from the brake cylinder mounting.
- Remove front disc brake cylinder mounting lh
- Remove the 2 bolts and cylinder mounting.
- Remove front disc brake cylinder slide pin
- Remove the 2 pins (upper and lower) from the mounting.
- Using a screwdriver, remove the slide bush from the pin (lower).
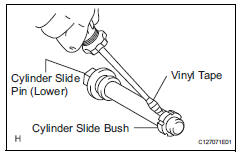
Notice:
Be careful not to damage the pin.
Hint:
Tape the screwdriver tip before use.
- Remove front disc brake bush dust boot
- Remove the 2 boots from the mounting.
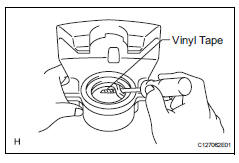
- Remove cylinder boot
- Using a screwdriver, pry out the set ring and boot.
Notice:
Be careful not to damage the brake piston and cylinder.
Hint:
Tape the screwdriver tip before use.
- Remove front disc brake piston
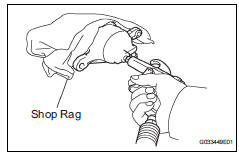
- Place a shop rag or piece of cloth between the piston and disc brake cylinder.
- Apply compressed air to remove the piston from the disc brake cylinder.
Caution:
Do not place your fingers in front of the piston when applying compressed air.
Notice:
Be careful not to spatter the brake fluid.
- Remove piston seal
- Using a screwdriver, pry out the seal from the cylinder.
Notice:
Be careful not to damage the inner cylinder and piston seal groove.
Hint:
Tape the screwdriver tip before use.
- Remove front disc brake bleeder plug
- Remove the bleeder plug cap and bleeder plug from the cylinder.
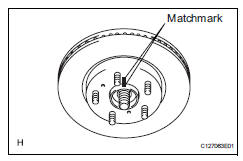
- Remove front disc
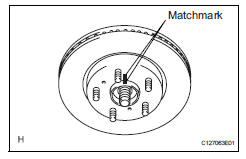
- Put matchmarks on the disc and axle hub.
- Remove the disc.
Inspection
- Check brake cylinder and piston
- Check the cylinder bore and piston for rust or scoring.
If necessary, replace the cylinder and piston.
- Check pad lining thickness
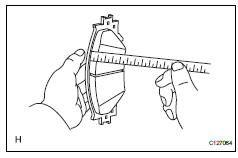
- Using a ruler, measure the pad lining thickness.
Standard thickness: 12.0 Mm (0.472 In.)
Minimum thickness: 1.0 Mm (0.039 In.)
If the pad lining thickness is equal to or less than the minimum, replace the pad.
- Check front disc brake pad support plate
- Check the 4 plates as follows. If necessary, replace the pates.
- Use brake cleaner to clean the pad support plate's pad and cylinder mounting contact surface. Inspect for deformation, cracks, rust and foreign matter that is difficult to remove.
- Use brake cleaner to clean the cylinder
mounting's pad support plate contact surface.
After installing the pad support plate to the cylinder mounting, inspect for looseness and deformation.
- After installing the pad, inspect if the pad falls off easily (due to the spring force of the pad support plate).
- Check disc thickness
- Using a micrometer, measure the disc thickness.
Standard thickness

Minimum thickness

If the disc thickness is less than the minimum, replace the disc.
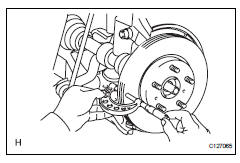
- Check disc runout
- Check the axle hub bearing (see page ah-6).
- Tighten the disc with the 3 hub nuts.
- Using a dial indicator, measure the disc runout 10.0 Mm (0.39 In.) From the outer edge of the disc.
Maximum disc runout: 0.05 Mm (0.0020 In.)
If the runout is greater than the maximum, change the installation positions of the disc and axle so that the runout will become minimal. If the runout is greater than the maximum even when the installation positions are changed, grind the disc. If the disc thickness is less than the minimum, replace the disc.
- Remove the 3 hub nuts.
Reassembly
Hint:
- Use the same procedures for the lh side and rh side.
- The procedures listed below are for the lh side.
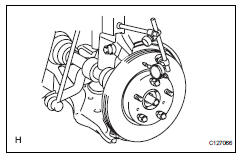
- Install front disc
- Align the matchmarks and install the disc.
Hint:
When replacing the disc with a new one, select the installation position where the disc has the minimum runout.
- Check disc runout (see page br-43)
- Temporarily tighten front disc brake bleeder plug
- Install the bleeder plug to the cylinder.
Hint:
The bleeder plug will be tightened to a torque specification in the "bleed air from brake line" procedures.
- Install the bleeder plug cap.
- Install piston seal
- Apply lithium soap base glycol grease to a new seal.
- Install the seal to the cylinder.
Notice:
Securely install the piston seal into the groove of the disc brake cylinder.
- Install front disc brake piston
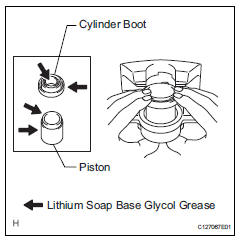
- Apply lithium soap base glycol grease to the piston and a new cylinder boot.
- Install the boot to the piston.
- Install the piston (with boot) to the cylinder.
Notice:
Do not forcibly install the piston to the cylinder.
- Install cylinder boot
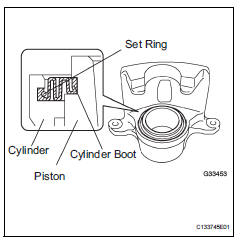
- Install the cylinder boot to the cylinder.
Notice:
Securely install the cylinder boot into the groove of the disc brake cylinder.
- Using a screwdriver, install a new set ring.
Notice:
Do not damage the cylinder boot.
Hint:
Tape the screwdriver tip before use.
- Install front disc brake bush dust boot
- Apply lithium soap base glycol grease to 2 new boots.
- Install the 2 boots to the mounting.
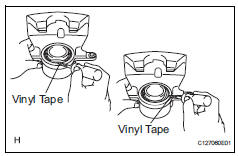
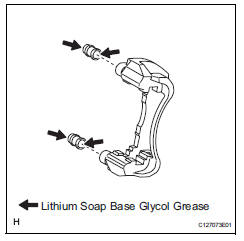
- Install front disc brake cylinder slide pin
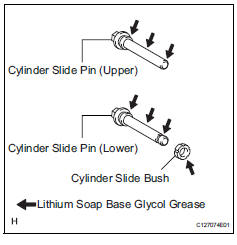
- Apply lithium soap base glycol grease to the pins and a new bush as shown in the illustration.
- Install the bush to the pin (lower).
- Install the 2 pins (upper and lower) to the mounting.
- Install front disc brake cylinder mounting lh
- Install the cylinder mounting with the 2 bolts.
Torque: 98 n*m (999 kgf*cm, 72 ft.*Lbf)
- Install front disc brake pad support plate
- Install the 4 plates to the mounting.
- Install no. 1 Pad wear indicator plate
- Install the 2 indicator plates to the upper side of each pad.
- –ú
- W/

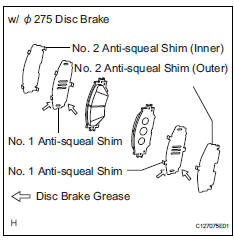
275 disc brake:
- Apply disc brake grease to both sides of each no. 1 Shim.
- Install the no. 1 And no. 2 Shims to each pad.
Notice:
- When replacing a worn pad, the shims must be replaced together with the pads.
- Install the shims in the correct positions and direction as shown in the illustration.
- W/

296 disc brake:
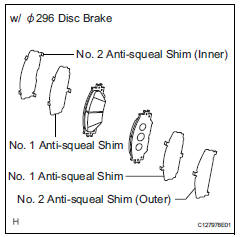
- Install the no. 1 And no. 2 Shims to each pad.
Notice:
- When replacing a worn pad, the shims must be replaced together with the pads.
- Install the shims in the correct positions and direction as shown in the illustration.
- Install front disc brake pad
- Install the 2 disc brake pads to the mounting.
Notice:
There should be no oil or grease on the friction surface of the pads and disc.
 Brake booster
Installation
(2005/11-2006/01)
Install check valve grommet
Install the grommet to the booster.
Install brake vacuum check valve
assembly
Install the check valve to the grommet ...
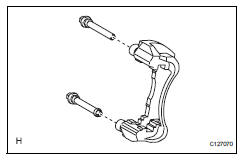
 Brake front brake flexible hose
Components
Removal
Hint:
Use the same procedures for the lh side and rh side.
The procedures listed below are for the lh side.
Remove front wheel
Drain brake fluid
Notice:
Wash ...
Other materials:
Vehicle speed signal error (test mode dtc)
Description
The tire pressure warning ecu receives a speed signal from the combination
meter. This dtc is stored
upon entering test mode, and cleared when a vehicle speed signal of 12 mph (20
km/h) is detected for 3
seconds or more. The dtc is output only in test mode.
Wiring diagram ...
Pressure control solenoid "A " performance (shift solenoid valve sl1)
Description
The ecm uses signals from the vehicle speed sensor to detect the actual gear
position (1st, 2nd, 3rd or
o/d gear).
Then the ecm compares the actual gear with the shift schedule in the ecm memory
to detect mechanical
problems of the shift solenoid valves, valve body or automatic ...
Folding the mirrors
Push the mirror back in the direction
of the vehicle’s rear.
Mirror angle can be adjusted when
Vehicles without a smart key system
The engine switch is in the “acc” or “on” position.
Vehicles with a smart key system
The engine switch is in accessory or ignition on mode. ...
