Toyota RAV4 (XA40) 2013-2018 Service Manual: Removal
Hint:
- Use the same procedures for the rh side and lh side.
- The procedures listed below are for the lh side.
- Remove rear wheel
- Remove rear stabilizer link assembly lh
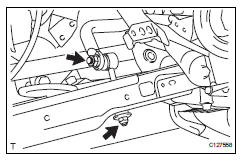
- Remove the nut and disconnect the link from the suspension no. 2 Arm.
- Remove the nut and link from the stabilizer bar.
- Remove rear stabilizer link assembly rh
Hint:
Use the same procedures described for the lh side
- Remove rear no. 2 Suspension arm assembly lh (see page sp-45)
- Remove rear no. 2 Suspension arm assembly rh
Hint:
Use the same procedures described for the lh side
- Remove rear coil spring insulator upper lh (see page sp-33)
- Remove rear coil spring lh (see page sp-33)
- Remove rear coil spring insulator lower lh (see page sp-33)
- Remove rear coil spring insulator upper rh
Hint:
Use the same procedures described for the lh side
- Remove rear coil spring rh
Hint:
Use the same procedures described for the lh side
- Remove rear coil spring insulator lower rh
Hint:
Use the same procedures described for the lh side
- Remove rear no. 1 Stabilizer bar bracket
- Remove the 2 nuts and bracket.
Hint:
Use the same procedures for the other side.
- Remove rear stabilizer bar
- Remove the stabilizer bar from the vehicle.
Notice:
When removing the stabilizer bar from the vehicle, make sure not to damage the sensor wire, brake hose, etc.
- Remove rear stabilizer bush
- Remove the 2 stabilizer bushes from the stabilizer bar.
 Suspension & axle rear stabilizer bar
Components
...
 Inspection
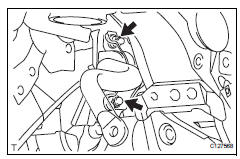
Inspect rear stabilizer link assembly lh
As shown in the illustration, move the ball joint stud
back and forth 5 times before installing the nut.
Using a torque wrench, turn the nut c ...
Other materials:
Underdrive planetary gear
Components
Disassembly
Remove underdrive planetary gear
preload (see page ax-240)
Remove underdrive input shaft nut
Sst 09930-00010 (09931-00010, 09931-00020),
09387-00050, 09564-16020
Using sst, loosen the staked part of the nut.
Clamp the underdrive planetary gear in ...
Unlocking and locking the doors
Front doors
Grip the driver’s door handle to
unlock the door. Grip the passenger’s
door handle to unlock all the
doors.*
Make sure to touch the sensor on
the back of the handle.
The doors cannot be unlocked for
3 seconds after the doors are
locked.
*: The door unlock settings can be ...
Circuit opening relay
On-vehicle inspection
Disconnect cable from negative battery
terminal
Caution:
Wait at least 90 seconds after disconnecting the
cable from the negative (-) battery terminal to
prevent airbag and seat belt pretensioner activation.
Inspect instrument panel junction block
Notice:
Th ...
