Toyota RAV4 (XA40) 2013-2018 Service Manual: Removal
- Disconnect cable from negative battery terminal
Caution:
Wait at least 90 seconds after disconnecting the cable from the negative (-) battery terminal to prevent airbag and seat belt pretensioner activation.
- Remove rear door scuff plate rh (see page ir-29)
- Remove package tray trim pocket subassembly (w/o rear no. 2 Seat)
- Remove tonneau cover assembly (w/o rear no. 2 Seat)
- Remove rear floor no. 1 Board (w/o rear no.
2 Seat)
- Remove deck board assembly (w/o rear no. 2 Seat)
- Remove no. 2 Seat hinge cover lh (w/ rear no.
2 Seat) (see page se-109)
- Remove no. 2 Seat hinge cover rh (w/ rear no.
2 Seat) (see page ir-30)
- Remove no. 2 Seat leg cover lh (w/ rear no. 2 Seat) (see page se-109)
- Remove no. 2 Seat leg cover rh (w/ rear no. 2 Seat) (see page ir-30)
- Remove rear no. 2 Seat assembly lh (w/ rear no. 2 Seat) (see page se-110)
- Remove rear no. 2 Seat assembly rh (w/ rear no. 2 Seat) (see page ir-30)
- Remove rear floor no. 3 Board
- Remove rear floor no. 2 Board
- Remove rear floor no. 1 Mat support side plate (see page ir-31)
- Remove rear floor finish plate (see page ir- 31)
- Remove rear deck trim cover rh (w/ rear no.
2 Seat) (see page ir-31)
- Remove reclining remote control lever bezel rh (w/o rear no. 2 Seat) (see page se-80)
- Remove tether anchor bracket subassembly (w/o rear no. 2 Seat) (see page ir-32)
- Remove deck trim side panel assembly rh (w/o rear no. 2 Seat) (see page ir-33)
- Remove deck trim side panel assembly rh (w/ rear no. 2 Seat) (see page ir-34)
- Remove inner roof side garnish assembly rh (see page ir-35)
- Remove tire pressure warning antenna and receiver
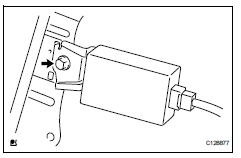
- Disconnect the connector.
- Remove the bolt and receiver.
 Tc and cg terminal circuit
Description
Dtc output mode is set by connecting terminals 13 (tc) and 4 (cg) of the
dlc3. The dtcs are indicated
by the blinking of the tire pressure warning light.
Wiring diagram
Hint:
Wh ...
 Installation
Install tire pressure warning antenna and receiver
Install the receiver with the bolt.
Torque: 7.5 N*m (76 kgf*cm, 66 in.*Lbf)
Connect the connector.
Install inner roof side g ...
Other materials:
Side airbag sensor
Components
On-vehicle inspection
Check side airbag sensor (vehicle not
involved in collision)
Perform a diagnostic system check (see page rs-
49).
Check side airbag sensor (vehicle involved
in collision and airbag has not deployed)
Perform a diagnostic system check ( ...
Pressure sensor circuit
Description
This dtc is output when the refrigerant pressure is either extremely low
(0.19 Mpa [2.0 Kgf/cm2, 28 psi]
or less) or extremely high (3.14 Mpa [32.0 Kgf/cm2, 455 psi] or more). The air
conditioning pressure
sensor, which is installed on the pipe of the high pressure side, detec ...
Reassembly
Hint:
Thoroughly clean all parts to be assembled.
Before installing the parts, apply fresh engine oil to all
sliding and rotating surfaces.
Replace oil seals with new ones.
Install valve stem oil seal
Using sst, push in a new oil seal.
Sst 09201-41020
Hint:
The int ...
