Toyota RAV4 (XA40) 2013-2018 Service Manual: Installation
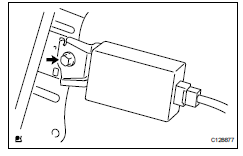
- Install tire pressure warning antenna and receiver

- Install the receiver with the bolt.
Torque: 7.5 N*m (76 kgf*cm, 66 in.*Lbf)
- Connect the connector.
- Install inner roof side garnish assembly rh (see page ir-52)
- Install deck trim side panel assembly rh (w/o rear no. 2 Seat) (see page ir-53)
- install deck trim side panel assembly rh (w/ rear no. 2 seat) (see page ir-54)
- Install tether anchor bracket subassembly (w/o rear no. 2 Seat) (see page ir-54)
- Install reclining remote control lever bezel rh (w/o rear no. 2 Seat) (see page se-105)
- Install rear deck trim cover rh (w/ rear no.
2 Seat) (see page ir-55)
- Install rear floor finish plate (see page ir- 55)
- Install rear floor no. 1 Mat support side plate (see page ir-55)
- Install rear floor no. 2 Board
- Install rear floor no. 3 Board
- Install rear no. 2 Seat assembly lh (w/ rear no. 2 Seat) (see page se-121)
- Install rear no. 2 Seat assembly rh (w/ rear no. 2 Seat) (see page ir-55)
- Install no. 2 Seat leg cover lh (w/ rear no. 2 Seat) (see page se-123)
- Install no. 2 Seat leg cover rh (w/ rear no. 2 Seat) (see page ir-56)
- Install no. 2 Seat hinge cover lh (w/ rear no.
2 Seat) (see page se-123)
- Install no. 2 Seat hinge cover rh (w/ rear no.
2 Seat) (see page ir-56)
- Install deck board assembly (w/o rear no. 2 Seat)
- Install rear floor no. 1 Board (w/o rear no.
2 Seat)
- Install tonneau cover assembly (w/o rear no. 2 Seat)
- Install package tray tirm pocket subassembly (w/o rear no. 2 Seat)
- Install rear door scuff plate rh (see page ir-57)
- Connect cable to negative battery terminal
- Register transmitter id (see page tw-10)
- Inspect tire pressure warning system
 Removal
Disconnect cable from negative battery
terminal
Caution:
Wait at least 90 seconds after disconnecting the
cable from the negative (-) battery terminal to
prevent airbag and seat belt preten ...
 Tire pressure warning valve and transmitter
Components
Removal
Remove front tire
Remove rear tire
Remove tire pressure warning valve subassembly
Remove the valve core and cap, and release air
from the tire.
After ensuring ...
Other materials:
Air conditioning control assembly (for automatic air conditioning system)
Components
Removal
Disconnect cable from negative battery
terminal
Notice:
Wait at least 90 seconds after disconnecting the
cable from the negative (-) battery terminal to
prevent airbag and seat belt pretensioner activation.
Remove no. 2 Instrument cluster finish
panel center ...
Gcwr, twr and unbraked twr
Confirm that the gross trailer weight, gross combination weight, gross
vehicle weight, gross axle weight and tongue weight are all within the
limits.
Gcwr*
2Wd models: 5985 lb. (2715 Kg)
Awd models: 6100 lb. (2765 Kg)
Twr*
1500 Lb. (680 Kg)
Unbraked twr*
1000 Lb. (450 Kg)
*: ...
Unmatched encryption code
Description
This dtc is output when a key with an incomplete key code is inserted into
the ignition key cylinder.
Inspection procedure
Reregister key
Clear the dtc (see page ei-18).
Reregister the key code with the transponder key ecu
(see page ei-5)
Check that the engine ...
