Toyota RAV4 (XA40) 2013-2018 Service Manual: Side airbag sensor
Components
On-vehicle inspection
- Check side airbag sensor (vehicle not involved in collision)
- Perform a diagnostic system check (see page rs- 49).
- Check side airbag sensor (vehicle involved in collision and airbag has not deployed)
- Perform a diagnostic system check (see page rs- 49).
- When the center pillar of the vehicle or its area is damaged, check if there is any damage to the side airbag sensor. If there are any defects as mentioned below, replace the side airbag sensor with a new one:
- Cracks, dents or chips on the sensor housing.
- Cracks or other damage to the connector.
- Peeling off of the label or damage to the serial number.
Caution:
For removal and installation procedures of the side airbag sensor, be sure to follow the correct procedure.
- Check side airbag sensor (vehicle involved in collision and airbag has deployed)
- Replace the side airbag sensor.
Caution:
- For removal and installation procedures of the side airbag sensor, be sure to follow the correct procedure.
- If the airbags have deployed, replace the side airbag sensor on the side in which the collision occurred. Replace both if necessary.
Removal
Caution:
Be sure to read the precautionary notices concerning the srs airbag system before servicing it (see page rs-1).
Hint:
- Use the same procedures for the rh side and lh side.
- The procedures listed below are for the lh side.
- Disconnect cable from negative battery terminal
Caution:
Wait at least 90 seconds after disconnecting the cable from the negative (-) battery terminal to prevent airbag and seat belt pretensioner activation.
- Remove front door scuff plate lh (see page ir-26)
- Remove rear door scuff plate lh (see page ir-57)
- Remove center pillar garnish lower lh (see page sb-27)
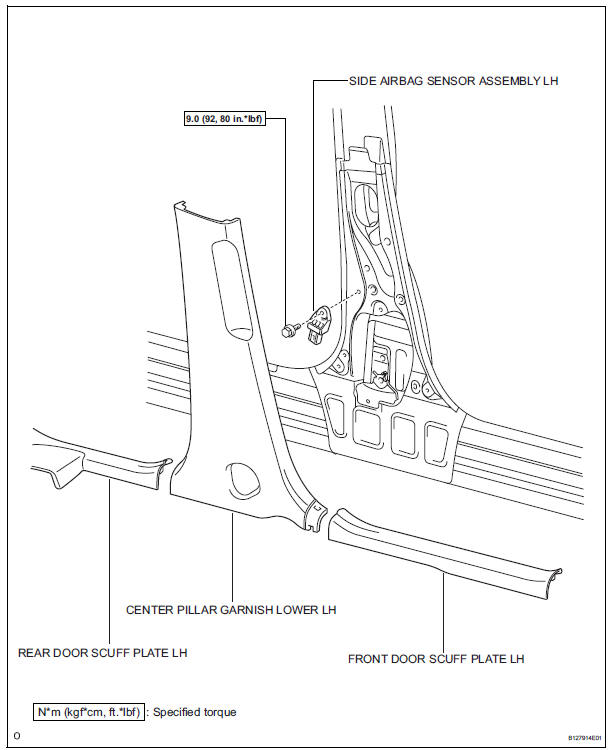
- Remove side airbag sensor assembly lh
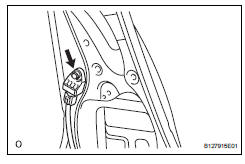
- Disconnect the connector.
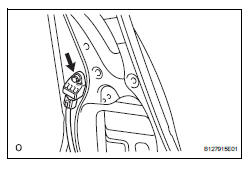
- Remove the bolt and sensor.
Installation
Hint:
- Use the same procedures for the rh side and lh side.
- The procedures listed below are for the lh side.
Caution:
Be sure to read the precautionary notices concerning the srs airbag system before servicing it (see page rs-1).
- Install side airbag sensor assembly lh
- Install the sensor with the bolt.
Torque: 9.0 N*m (92 kgf*cm, 82 in.*Lbf)
Notice:
- If the airbag sensor has been dropped, or there are any cracks, dents or other defects in the case, bracket or connector, replace it with a new one.
- When installing the airbag sensor, be careful that the srs wiring does not interfere with other parts and that it is not pinched between other parts.
- Check that there is no looseness in the installation parts of the sensor
- Connect the connector.
- Install center pillar garnish lower lh (see page sb-31)
- Install rear door scuff plate lh (see page ir-57)
- Install front door scuff plate lh (see page ir-59)
- Connect cable to negative battery terminal
- Check srs warning light
- Check the srs warning light (see page rs-34).
 Front airbag sensor
Components
On-vehicle inspection
Check front airbag sensor (vehicle not
involved in collision and airbag not
deployed)
Perform a diagnostic system check (see page rs-
49).
C ...
 Rear airbag sensor
Components
On-vehicle inspection
Check rear airbag sensor (vehicle not
involved in collision)
Perform a diagnostic system check (see page rs-
49).
Check rear airbag sensor (ve ...
Other materials:
Components
...
Bluetooth® audio/phone
Bluetooth® audio
The bluetooth® audio system enables you to enjoy music played on
a portable digital audio player (portable player) from the vehicle
speakers via wireless communication.
This audio system supports bluetooth®, a wireless data system
capable of playing portable audio music wi ...
Front airbag sensor rh circuit malfunction
Description
The front airbag sensor rh consists of the diagnostic circuit, the frontal
deceleration sensor, etc.
If the center airbag sensor assembly receives signals from the frontal
deceleration sensor, it determines
whether or not the srs should be activated.
Dtc b1610/13 is recor ...
