Toyota RAV4 (XA50) 2019-2026 Owners Manual: Wiper insert replacement
When replacing the wiper insert, perform the following procedure to operate each wiper.
Windshield wipers
â– Windshield wiper blade removal and installation
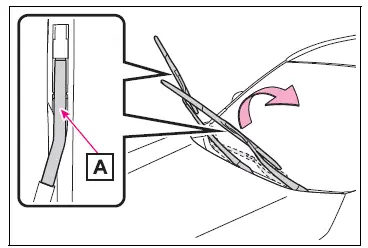
1. While holding the hook portion A of the wiper arm, first lift up the driver side, and then lift up the passenger side.
When returning the wiper arms to their original positions, first lower the passenger side, and then lower the driver side.
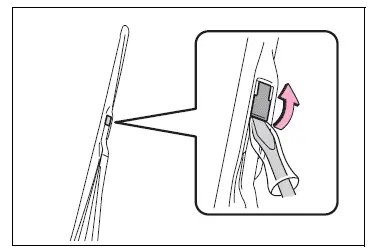
2. Lift the stopper using a flathead screwdriver as shown in the illustration.
To prevent damage to the wiper arm, protect the tip of the screwdriver with a rag.
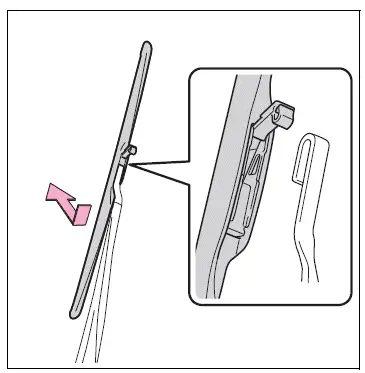
3. Slide the wiper blade to remove it from the wiper arm.
When installing, reverse the steps listed.
â– Wiper insert replacement
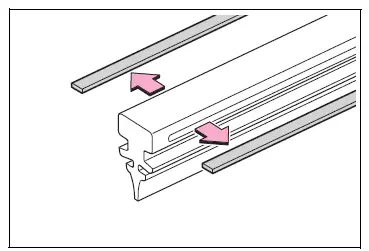
1. Pull the wiper insert to remove the claw of the wiper blade from the stopper, and pull out the wiper insert.
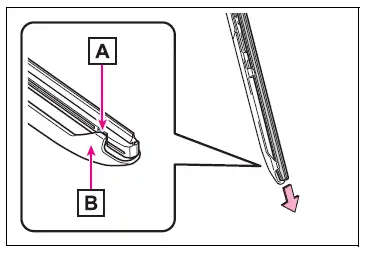
- Stopper
- Claw
2. Remove the 2 metal plates from the wiper insert pulled out, and install the plates to a new wiper insert.
Make sure that the cutout location and warp direction of the metal blades are same as the original.
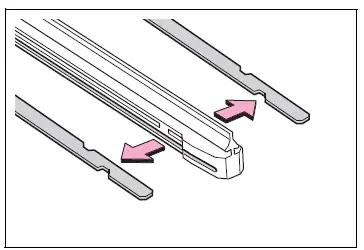
3. Install the wiper insert to the wiper blade from the side without the stopper.
4. Secure the stopper of the wiper insert with the claw of the wiper blade.
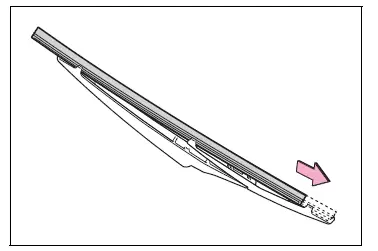
Rear window wiper
1. Lift up the rear window wiper arm head cap.
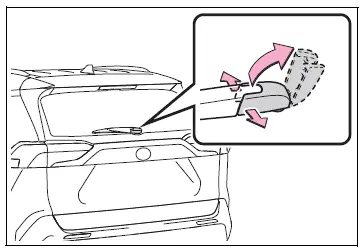
2. Move the wiper blade until a click sound can be heard and the claw detaches, and then remove the wiper blade from the wiper arm.
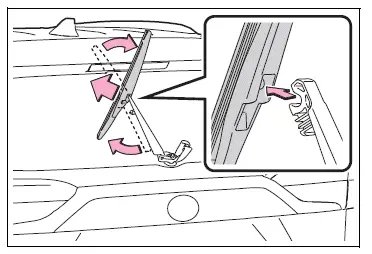
3. Pull the wiper insert out past the stopper on the wiper blade, and then continue to pull until it is completely removed.
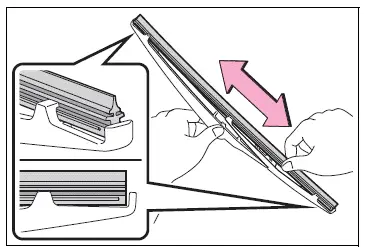
Lightly grasp between the claws of the wiper blade to allow the wiper insert to lift up, making it easier to remove.
4. Remove the 2 metal plates from the old wiper insert and install them to the replacement wiper insert.
5. Insert the wiper insert starting from the claw at the center of the wiper blade. Pass the wiper insert through the 3 claws so that it sticks out from the stopper, and then pass the wiper insert through the final remaining claw.
Applying a small amount of washer fluid to the wiper insert can make it easier to insert the claws into the grooves.
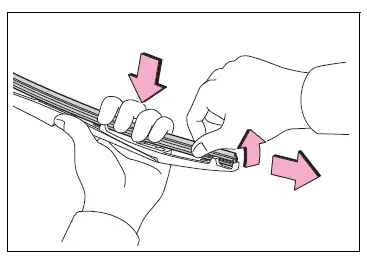
6. Check that the wiper blade claws are fitted in the grooves of the wiper insert.
If the wiper blade claws are not fitted in the grooves of the wiper insert, grasp the wiper insert and slide it back and forth multiple times to insert the claws into the grooves.
Lightly lift up the center of the wiper insert to make the rubber easier to slide.
7. When installing a wiper blade, reverse the procedure in step 1.
After installing the wiper blade, check that the connection is locked.
â– Wiper blade and wiper insert handling
Improper handling may result in damage to the wiper blades or wiper insert. If you have any concerns about replacing the wiper blades or wiper insert yourself, contact your Toyota dealer.
NOTICE
â– When lifting the windshield wipers
- When raising the wiper arms off the windshield, lift up the driver side first, and then lift up passenger side. When returning the wipers to their original position, return the passenger side first.
- Do not lift a windshield wiper by the wiper blade. Otherwise, the wiper blade may be deformed.
- Do not operate the wiper lever when the windshield wipers are lifted. Otherwise, the windshield wipers may contact the hood, possibly resulting in damage to the windshield wipers and/or hood.
â– To prevent damage
- Be careful not to damage the claws when replacing the wiper insert.
- After the wiper blade is removed from the wiper arm, place a cloth, etc., between the rear window and wiper arm to prevent damage to the rear window.
- Be sure not to pull excessively on the wiper insert or deform its metal plates.
 Air conditioning filter
The air conditioning filter
must be changed regularly
to maintain air conditioning
efficiency.
Removal method
1. Turn the engine switch to
OFF.
2. Open the glove box and slide
off the damper.
3. Pus ...
 Wireless remote control/electronic key battery
Replace the battery with a
new one if it is depleted.
â– If the key battery is depleted
The following symptoms may occur:
The smart key system (if
equipped) and wireless remote
control will not fu ...
Other materials:
Data list / active test
Read data list
Hint:
Using the intelligent tester's data list allows switch,
sensor, actuator, and other item values to be read
without removing any parts. Reading the data list
early in troubleshooting is one way to save time.
Notice:
In the table below, the values listed under "no ...
Adjustment procedure
To select a mirror to adjust,
press the switch.
Left
Right
To adjust the mirror, press the
switch.
Up
Right
Down
Left
...
Weight limits
The gross trailer weight must
never exceed the TWR
described below.
Without towing package
1500 lb. (680 kg)
With towing package
3500 lb. (1590 kg)
The gross combination weight
must never exceed the
GCWR described below.
Without towing package
Vehicles without Dynamic Torque
Vectoring AWD ...
