Toyota RAV4 (XA40) 2013-2018 Service Manual: Automatic transaxle fluid
On-vehicle inspection
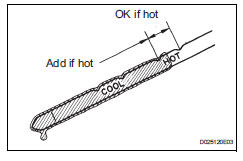
- Check transaxle fluid level
Hint:
Drive the vehicle so that the engine and transaxle are at normal operating temperature.
Fluid temperature: 70 to 80°c (158 to 176°f)
- Park the vehicle on a level surface and set the parking brake.
- With the engine idling and the brake pedal depressed, move the shift lever to each position from p to l position, and return it to the p position.
- Take out the atf dipstick and wipe it clean.
- Fully push the dipstick back into the pipe.
- Take it out and check that the fluid level is at the
hot position.
If there are leaks, it is necessary to repair or replace o-rings, fipgs, oil seals, plugs and/or other parts.
 Torque converter clutch solenoid circuit
Description
The shift solenoid valve dsl is turned on and off by signals from the ecm to
control the hydraulic
pressure acting on the lock-up relay valve, which then controls operation of the ...
 Speed sensor
Components
Removal
Disconnect cable from negative battery
terminal
Caution:
Wait at least 90 seconds after disconnecting the
cable from the negative (-) battery terminal to
prevent ai ...
Other materials:
Random / multiple cylinder misfire detected
Description
When the engine misfires, high concentrations of hydrocarbons (hc) enter the
exhaust gas. Extremely
high hc concentration levels can cause increases in exhaust emission levels.
High concentrations of hc
can also cause increases in the three-way catalytic converter (twc) te ...
Eps warning light circuit
Description
If the power steering ecu detects a malfunction, the p/s warning light comes
on. At this time, the power
steering ecu stores a dtc in its memory.
Wiring diagram
Inspection procedure
Check for dtc
Using the intelligent tester (with can vim), check for
dtcs and confir ...
Multiplex communication circuit
Description
The air conditioning amplifier communicates data with the ecm and combination
meter through the can
communication system.
Wiring diagram
Inspection procedure
Check dtc
Clear the dtc (see page ac-127).
Read the dtc (see page ac-127).
Result
Go to can ...
