Toyota RAV4 (XA50) 2019-2026 Owners Manual: Child restraint system fixed with a seat belt
A child restraint system for a small child or baby must itself be properly restrained on the seat with the lap portion of the lap/shoulder belt.
‚Ė† Installing child restraint system using a seat belt (child restraint lock function belt)
Install the child restraint system in accordance to the operation manual enclosed with the child restraint system.
‚Ė† Rear-facing - Infant seat/convertible seat
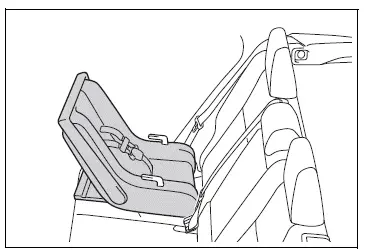
1. Adjust the rear seat.
If there is a gap between the child restraint system and the seatback, adjust the seatback angle until good contact is achieved.
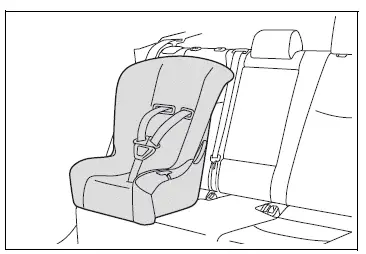
2. Place the child restraint system on the rear seat facing the rear of the vehicle.
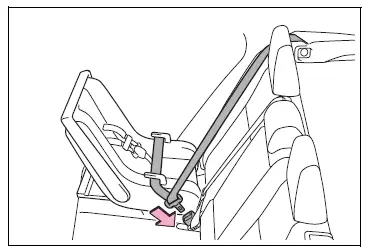
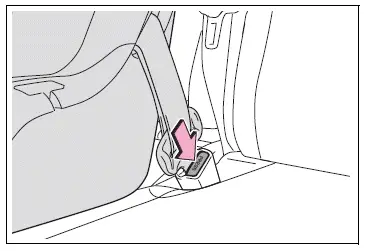
3. Run the seat belt through the child restraint system and insert the plate into the buckle. Make sure that the belt is not twisted.
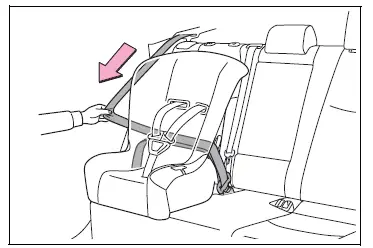
4. Fully extend the shoulder belt and allow it to retract to put it in lock mode. In lock mode, the belt cannot be extended.
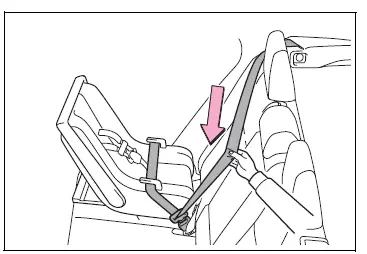
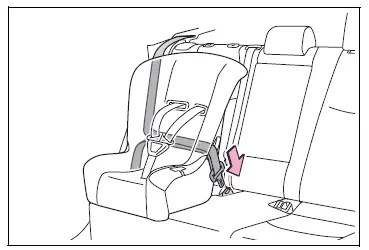
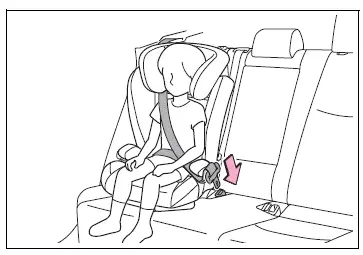
5. While pushing the child restraint system down into the rear seat, allow the shoulder belt to retract until the child restraint system is securely in place.
After the shoulder belt has retracted to a point where there is no slack in the belt, pull the belt to check that it cannot be extended.
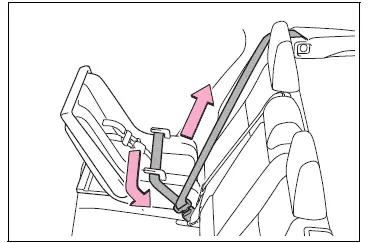
6. After installing the child restraint system, rock it back and forth to ensure that it is installed securely.
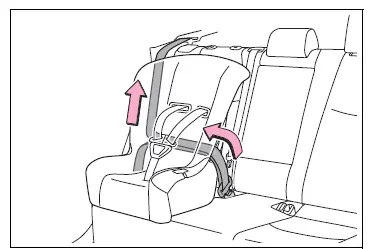
‚Ė† Forward-facing - Convertible seat
1. Adjust the seat.
When using the front passenger seat: If installing the child restraint system to the front passenger seat is unavoidable.
When using the rear seat: If there is a gap between the child restraint system and the seatback, adjust the seatback angle until good contact is achieved.
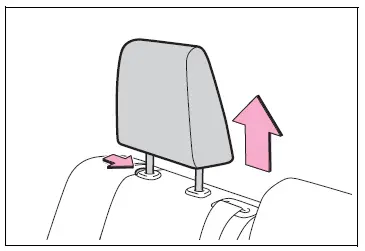
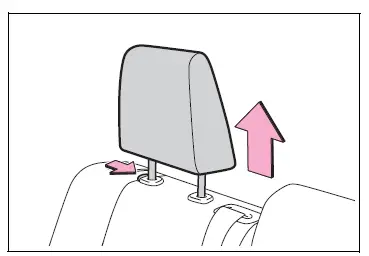
2. If the head restraint interferes with the child restraint system installation and the head restraint can be removed, remove the head restraint.
3. Place the child restraint system on the seat facing the front of the vehicle.
4. Run the seat belt through the child restraint system and insert the plate into the buckle. Make sure that the belt is not twisted.
5. Fully extend the shoulder belt and allow it to retract to put it in lock mode. In lock mode, the belt cannot be extended.
6. While pushing the child restraint system into the rear seat, allow the shoulder belt to retract until the child restraint system is securely in place.
After the shoulder belt has retracted to a point where there is no slack in the belt, pull the belt to check that it cannot be extended.
7. If the child restraint has a top tether strap, follow the child restraint manufacturer's operation manual regarding the installation, using the top tether strap to latch onto the top tether strap anchor.
8. After installing the child restraint system, rock it back and forth to ensure that it is installed securely.
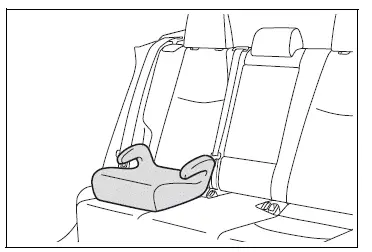
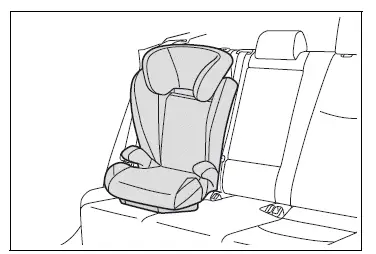
‚Ė† Booster seat
1. If installing the child restraint system to the front passenger seat is unavoidable.
2. High back type: If the head restraint interferes with your child restraint system, and the head restraint can be removed, remove the head restraint.
3. Place the child restraint system on the seat facing the front of the vehicle.
Booster type
High back type
4. Sit the child in the child restraint system. Fit the seat belt to the child restraint system according to the manufacturer's instructions and insert the plate into the buckle. Make sure that the belt is not twisted.
Check that the shoulder belt is correctly positioned over the child's shoulder and that the lap belt is as low as possible.
‚Ė† Removing a child restraint system installed with a seat belt
Press the buckle release button and fully retract the seat belt.
When releasing the buckle, the child restraint system may spring up due to the rebound of the seat cushion. Release the buckle while holding down the child restraint system.
Since the seat belt automatically reels itself, slowly return it to the stowing position.
WARNING
‚Ė†When installing a child restraint system
Observe the following precautions.
Failure to do so may result in death or serious injury.
- Do not allow children to play
with the seat belt. If the seat belt
becomes twisted around a
child's neck, it may lead to
choking or other serious injuries
that could result in death.
If this occurs and the buckle cannot be unfastened, scissors should be used to cut the belt.
- Ensure that the belt and plate are securely locked and the seat belt is not twisted.
- Shake the child restraint system left and right, and forward and backward to ensure that it has been securely installed.
- After securing a child restraint system, never adjust the seat.
- When a booster seat is installed, always ensure that the shoulder belt is positioned across the center of the child's shoulder. The belt should be kept away from the child's neck, but not so that it could fall off the child's shoulder.
- Follow all installation instructions provided by the child restraint system manufacturer.
- When securing some types of
child restraint systems in rear
seats, it may not be possible to
properly use the seat belts in
positions next to the child
restraint without interfering with
it or affecting seat belt effectiveness.
Be sure your seat belt fits snugly across your shoulder and low on your hips. If it does not, or if it interferes with the child restraint, move to a different position. Failure to do so may result in death or serious injury.
- When installing a child restraint system in the center rear seat, adjust both seatbacks at the same angle. Otherwise, the child restraint system cannot be securely restrained and this may cause death or serious injuries in the event of sudden braking, sudden swerving or an accident.
‚Ė†When installing a booster seat
To prevent the belt from going into ALR lock mode, do not fully extend the shoulder belt. ALR mode causes the belt to tighten only. This could cause injury or discomfort to the child.
‚Ė†Do not use a seat belt extender
If a seat belt extender is used when installing a child restraint system, the seat belt will not securely hold the child restraint system, which could cause death or serious injury to the child or other passengers in the event of sudden braking, sudden swerving or an accident.
 Child restraint system
‚Ė† Types of child restraint system installation methods
Confirm with the operation manual enclosed with the child restraint
system about the installation of the child restraint system.
Seat belt atta ...
 Child restraint system
fixed with a child restraint
LATCH anchor
Child restraint system
fixed with a child restraint
LATCH anchor
‚Ė† Child restraint LATCH
anchors
LATCH anchors are provided for
the outboard rear seats.
‚Ė† When installing in the rear
outboard seats
Install the child restraint system
in accordance to the operat ...
Other materials:
Blind Spot Monitor operation
‚Ė† Objects that can be detected while driving
The Blind Spot Monitor uses rear side radar sensors to detect the
following vehicles traveling in adjacent lanes and advises the driver
of the presence of such vehicles via the indicators on the outside
rear view mirrors.
Vehicles that are traveling ...
Removal
Hint:
Use the same procedures for the rh side and lh side.
The procedures listed below are for the lh side.
Remove rear wheel
Remove rear stabilizer link assembly lh
Remove the nut and disconnect the link from the
suspension no. 2 Arm.
Remove the nut and link from the sta ...
Instrument cluster
For the purpose of explanation, the following illustrations display all
warning lights and indicators illuminated.
‚Ė† With 7-inch multi-information display
The display of the speedometer can be selected from two types,
analog or digital.
When analog speedometer is displayed
The units used on the m ...
