
Toyota RAV4 (XA40) 2013-2018 Owners Manual: Contact/call history settings
The contact can be transferred from a bluetooth® phone to the system.
The contact also can be added, edited and deleted.
The call history can be deleted and contact and favorites can be changed.
- Display the “phone/message settings” screen.
- Select “contact/call history settings”.
- Select the desired item to be set.
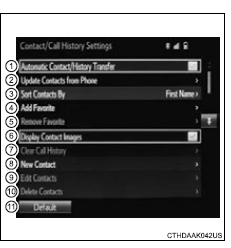
- For pbap compatible bluetooth® phones, select to set automatic contact/history transfer on/off. When set to on, the phone’s contact data and history are automatically transferred.
- Select to update contacts from the connected phone.
- Select to sort contacts by the first name or last name field.
- Select to add contacts to the favorites list.
- Select to delete contacts from the favorites list.
- Select to display contact images.
- Select to clear contacts from the call history.*
- Select to add new contacts to the contact list.*
- Select to edit contacts in the contact list.*
- Select to delete contacts from the contact list.*
- Select to reset all setup items.
*: For pbap compatible bluetooth® phones only, this function is available when “automatic contact/history transfer” is set to off.
Update contacts from phone
Operation methods differ between pbap compatible and pbap incompatible but opp compatible bluetooth® phones.
If your cellular phone is neither pbap nor opp compatible, the contacts cannot be transferred.
For pbap compatible bluetooth® phones
- Select “update contacts from phone”.
- Check that a confirmation screen is displayed when the operation is complete.
This operation may be unnecessary depending on the type of cellular phone.
Depending on the type of cellular phone, obex authentication may be required when transferring contact data. Enter “1234” into the bluetooth® phone.
If another bluetooth® device is connected when transferring contact data, depending on the phone, the connected bluetooth® device may need to be disconnected.
Depending on the type of bluetooth® phone being connected, it may be necessary to perform additional steps on the phone.
For pbap incompatible but opp compatible bluetooth® phones
- Select “update contacts from phone”.
- Transfer the contact data to the system using a bluetooth® phone.
This operation may be unnecessary depending on the type of cellular phone.
Depending on the type of cellular phone, obex authentication may be required when transferring contact data. Enter “1234” into the bluetooth® phone.
To cancel this function, select “cancel”.
- Select “done” when it appears on the screen.
- Check that a confirmation screen is displayed when the operation is complete.
Updating the contacts in a different way (from the “call history” screen)
For pbap compatible bluetooth® phones, this function is available when “automatic contact/history transfer” is set to off.
- Display the phone screen.
- Select the “call history” tab and select a contact not yet registered in the contact list.
- Select “update contact”.
- Select the desired contact.
- Select a phone type for the phone number.
Registering a new contact to the contact list
New contact data can be registered. Up to 4 numbers per person can be registered. For pbap compatible bluetooth® phones, this function is available when “automatic contact/history transfer” is set to off.
- Select “new contact”.
- Enter the name and select “ok”.
- Enter the phone number and select “ok”.
- Select the phone type for the phone number.
- To add another number to this contact, select “yes”.
Registering a new contact in a different way (from the “call history” screen)
- Display the phone screen.
- Select the “call history” tab and select a contact not yet registered in the contact list.
- Select “add to contacts”.
- Follow the steps in “registering a new contact to the contacts list” from 3.
Editing the contact data
For pbap compatible bluetooth® phones, this function is available when “automatic contact/history transfer” is set to off.
- Select “edit contact”.
- Select the desired contact.
- Select
 corresponding to the
desired name or number.
For editing the name
- Follow the steps in “registering a new contact to the contacts list” from 2.
For editing the number
Editing the contacts in a different way (from the “contact details” screen)
- Display the phone screen.
- Select the “contacts”, “call history” tab or the “favorites” tab and select the desired contact.
- Select “edit contact”.
“E-mail addresses”: select to display all registered e-mail addresses for the contact.
- Follow the steps in “editing the contact data” from 4 .
Deleting the contact data
For pbap compatible bluetooth® phones, this function is available when “automatic contact/history transfer” is set to off.
- Select “delete contacts”.
- Select the desired contact and select “delete”.
- Select “yes” when the confirmation screen appears.
Deleting the contact in a different way (from the “contact details” screen)
- Display the phone screen.
- Select the “contacts”, “call history” tab or the “favorites” tab and select the desired contact.
- Select “edit contact”.
- Select “yes” when the confirmation screen appears.
Favorites list setting
Up to 15 contacts (maximum of 4 numbers per contact) can be registered in the favorites list.
Registering the contacts in the favorites list
- Select “add favorite”.
- Select the desired contact to add to the favorites list.
Dimmed contacts are already stored as a favorite.
- Check that a confirmation screen is displayed when the operation is complete.
When 15 contacts have already been registered to the favorites list
- When 15 contacts have already been registered to the favorites
list, a registered contact needs to be replaced.
Select “yes” when the confirmation screen appears to replace a contact.
- Select the contact to be replaced.
- Check that a confirmation screen is displayed when the operation is complete.
Registering contacts in the favorites list in a different way (from the “contacts” screen)
- Display the phone screen.
- Select the “contacts” tab.
- Select
 at the
beginning of the desired contact list name to be registered in the favorites list.
When selected,  is changed to
 , and the contact is
registered in
the favorites list.
Registering contacts in the favorites list in a different way (from the “contact details” screen)
- Display the phone screen.
- Select the “contacts” tab or the “call history” tab and select the desired contact.
- Select “add favorite”.
- Check that a confirmation screen is displayed when the operation is complete.
Deleting the contacts in the favorites list
- Select “remove favorite”.
- Select the desired contacts and select “remove”.
- Select “yes” when the confirmation screen appears.
- Check that a confirmation screen is displayed when the operation is complete.
Deleting contacts in the favorites list in a different way (from the “contacts” screen)
- Display the phone screen
- Select the “contacts” tab.
- Select
 at the
beginning of the contact list name to be deleted from the favorites. List.
When selected ,  is
is
changed to  , and the data is
deleted from the
list.
Deleting contacts in the favorites list in a different way (from the “contact details” screen)
- Display the phone screen.
- Select the “contacts”, “call history” tab or the “favorites” tab and select the desired contact to delete.
- Select “remove favorite”.
- Select “yes” when the confirmation screen appears.
- Check that a confirmation screen is displayed when the operation is complete.
Message settings
- Display the “phone/message settings” screen.
- Select “messaging settings”.
- Select the desired item to be set.
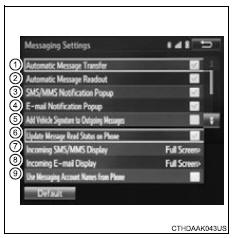
- Set automatic message transfer on/off.
- Set automatic message readout on/off.
- Set the sms/mms notification popup on/off.
- Set the e-mail notification popup on/off.
- Set adding the vehicle signature to outgoing messages on/off.
- Set updating message read status on phone on/off.
- Change the incoming sms/mms display.
“Full screen”: when an sms/mms message is received, the incoming sms/mms display screen is displayed and can be operated on the screen.
“Drop-down”: when an sms/mms message is received, a message is displayed on the upper side of the screen.
- Change the incoming e-mail display.
“Full screen”: when an e-mail is received, the incoming e-mail display screen is the displayed and can be operated on the screen.
“Drop-down”: when an e-mail is received, a message is displayed on the upper side of the screen.
- Set display of messaging account names on the inbox tab on/off.
When set to on, messaging account names used on the cellular phone will be displayed.
To return to the default settings
Select “default”, and then “yes”.
Displaying the “messaging settings” screen in a different way
- Display the phone screen.
- Select

- Select “settings”.
- Select “message settings”.
Phone display settings
- Display the “phone/message settings” screen
- Select “phone display settings”.
- Select the desired item to be set.
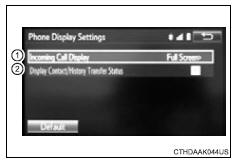
- Change the incoming call display.
“Full screen”: when a call is received, the hands-free screen is displayed and can be operated on the screen.
“Drop-down”: a message is displayed on the upper side of the screen.
- Set display of the contact/ history transfer completion message on/off.
To return to the default settings
Select “default”, and then “yes”.
 Bluetooth® phone
settings
Bluetooth® phone
settings
You can adjust the hands-free system to your desired settings.
“Phone/message settings” screen
To display the screen shown below, press the “setup” button, and
select “phone” on the “ ...
 What to do if...
(Troubleshooting)
What to do if...
(Troubleshooting)
If there is a problem with the hands-free system or a bluetooth®
device, first check the table below.
When using the hands-free system with a bluetooth® device
When registering/connectin ...
Other materials:
Changing the display
The multi-information display is
operated using the meter control
switches.
Scroll the screen*/switch the
display*/move the cursor
Press: Enter/Set
Press and hold: Reset/Display
customizable items
Return to the previous screen
Call sending/receiving and
history display (if equipped)
Linke ...
Playing back mp3 and wma discs
Power
Volume
Cd eject
Selecting a file or displaying
folder list
Searching playback
Next commands, random play
or back button
Repeat play
Fast-forwarding, rewinding or
selecting a folder
Changing the audio source/
playback
Playback/pause
Previous commands
Selecti ...
Open in one side of can branch line
Description
If 2 or more ecus and/or sensors do not appear on the intelligent tester's
"bus check" screen via the
can vim, one side of the can branch wire may be open. (One side of the canh
[branch wire] /canl
[branch wire] of the ecu and/or sensor is open.)
Wiring diagram
...
