Toyota RAV4 (XA40) 2013-2018 Service Manual: Differential oil seal
Components

Replacement
- Replace transaxle housing oil seal lh
- Drain the automatic transaxle fluid.
- Remove the drain plug and gasket, and drain atf.
- Install a new gasket and drain plug.
Torque: 47 n*m (479 kgf*cm, 35 ft.*Lbf)
- Remove the front drive shaft lh (see page ds-41).
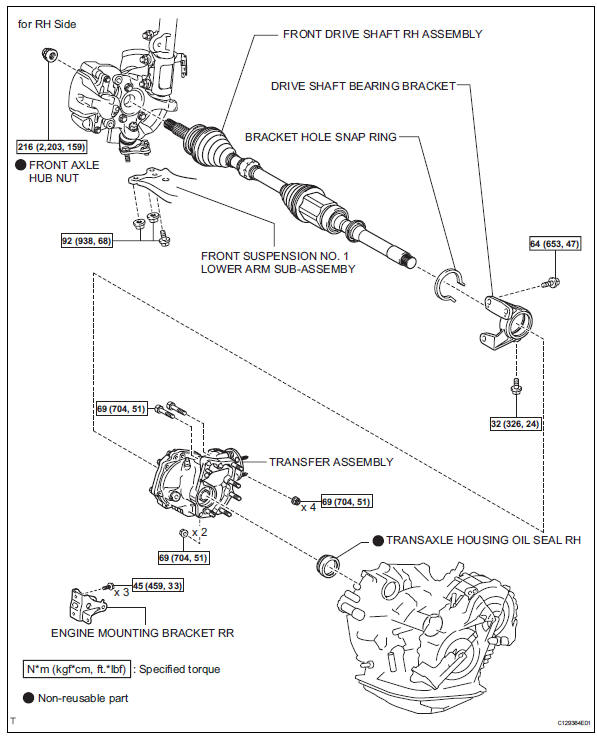
- Remove the transaxle housing oil seal lh.
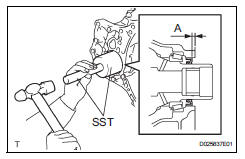
- Using sst, tap out the oil seal.
Sst 09308-00010
- Install a new transaxle housing oil seal lh.
- Coat the lip of a new oil seal with mp grease.
- Using sst and a hammer, tap in the oil seal.
Sst 09726-27012 (09726-02041), 09950- 70010 (09951-07200, 09951-07200)
Standard depth: 0 +-0.5 Mm (0 +-0.020 In.)
- Install the front drive shaft lh (see page ds-65).
- Add automatic transaxle fluid.
Fluid type: toyota genuine atf ws
- Inspect the transaxle fluid level (see page ax-102).
- Replace transaxle housing oil seal rh
- Remove the engine with transaxle (see page em- 98).
- Drain the automatic transaxle fluid.
- Remove the drain plug and gasket, and drain atf.
- Install a new gasket and the drain plug.
Torque: 47 n*m (479 kgf*cm, 35 ft.*Lbf)
- Remove the 3 bolts and drive shaft bearing bracket.
- Remove the 3 bolts and engine mount bracket rr.
- Remove the transfer assembly (see page tf-59).
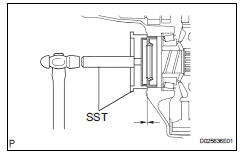
- Remove the transaxle housing oil seal rh.
- Using a screwdriver with vinyl tape wound around its tip, remove the oil seal.
Notice:
Be careful not to damage the housing.
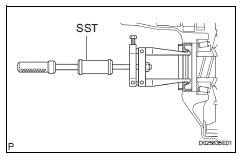
- Install a new transaxle housing oil seal rh.
- Coat the lip of a new oil seal with mp grease.
- Using sst and a hammer, tap in the oil seal.
Sst 09309-37010 standard depth: 6.0 +-0.5 Mm (0.236 +-0.020 In.)
- Install the transfer assembly (see page tf-75).
- Install the engine mount bracket rr with the 3 bolts.
Torque: 64 n*m (652 kgf*cm, 47 ft.*Lbf)
- Install the drive shaft bearing bracket with the 3 bolts.
Torque: 64 n*m (653 kgf*cm, 47 ft.*Lbf)
- Install the engine with transaxle (see page em-105).
- Add automatic transaxle fluid.
Fluid type: toyota genuine atf ws
- Inspect the fluid level (see page ax-102).
 Floor shift assembly
Components
Removal
Disconnect cable from negative battery
terminal
Caution:
Wait at least 90 seconds after disconnecting the
cable from the negative (-) battery terminal to
preven ...
 Automatic transaxle assembly
Components
Removal
Remove engine assembly with transaxle
Remove the engine with transaxle (see page em-
98).
Drain automatic transaxle fluid
Remove the drain plug and gask ...
Other materials:
Terminals of ecm
Check ecm
Measure the voltage of the ecm connector.
Hint:
Each ecm terminal's standard voltage is shown in
the table below.
In the table, first follow the information under
"condition". Look under "symbols (terminal no.)"
For the terminals to be inspected. ...
Folding the mirrors
Push the mirror back in the direction
of the vehicle’s rear.
Mirror angle can be adjusted when
Vehicles without a smart key system
The engine switch is in the “acc” or “on” position.
Vehicles with a smart key system
The engine switch is in accessory or ignition on mode. ...
Operating the interior
lights
â– Front interior lights
Turns the lights on/off
Turns the switch to the door
position (door linked)
When a door is opened while the
door position is on, the lights turn
on.
Turns the door position on
Turns the lights off
â– Rear interior light
Turns the light on
Turns the door-linked fu ...
