
Toyota RAV4 (XA50) 2019-2026 Owners Manual: Digital Rear-view Mirror
The Digital Rear-view Mirror is a system that uses the camera on the rear of the vehicle and displays its image on the display of the Digital Rear-view Mirror.
The Digital Rear-view Mirror can be changed between optical mirror mode and digital mirror mode by operating the lever.
The Digital Rear-view Mirror allows the driver to see the rear view despite obstructions, such as the head restraints or luggage, ensuring rear visibility.
Also, the rear seats are not displayed and privacy of the passengers is enhanced.
WARNING
Observe the following precautions.
Failure to do so may result in death or serious injury.
â– Before using the Digital Rearview Mirror
- Make sure to adjust the mirror
before driving.
- Change to optical mirror mode and adjust the position of the Digital Rear-view Mirror so that the area behind your vehicle can be viewed properly.
- Change to digital mirror mode and adjust the display settings.
- As the range of the image displayed by the Digital Rear-view Mirror is different from that of the optical mirror, make sure to check this difference before driving.
System components
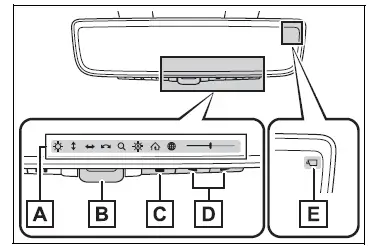
- Icon display area
Displays icons, adjusting gauge, etc. - Lever
Operate to change between digital mirror mode and optical mirror mode. - Menu button
Press to display the icon display area and select the item you want to adjust. - Select/adjust button Press to change the setting of the item you want to adjust.
- Camera indicator
Indicates that the camera is operating normally.
Changing modes
Operate the lever to change between digital mirror mode and optical mirror mode.
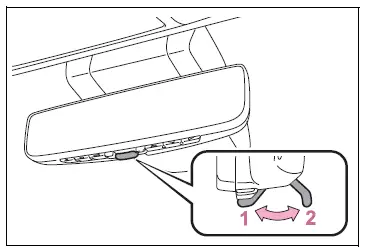
- Digital mirror mode
Displays an image of the area behind the vehicle. will illuminate in this mode.
 - Optical mirror mode
Turns off the display of the Digital Rear-view Mirror allows it to be used as an optical mirror.
â– Digital mirror mode operating condition
The engine switch is turned to ON.
When the engine switch is changed from ON to OFF or ACC, the image will disappear after several seconds.
â– When using the Digital Rearview Mirror in digital mirror mode
- If it is difficult to see the displayed image due to light reflected off the Digital Rear-view Mirror, the camera being dirty or covered with water droplets, or if lights of a vehicle behind your vehicle or the displayed image are bothering you, change to optical mirror mode.
- When the back door is open, the Digital Rear-view Mirror image may not display properly. Before driving, make sure the back door is closed.
- If the display is difficult to see due to reflected light, close the sunshade for the moon roof (if equipped) or the electronic sunshade for the panoramic moon roof (if equipped).
- Any of the following conditions may occur when driving in the dark, such as at night. None of them indicates that a malfunction has occurred.
- Colors of objects in the displayed image may differ from their actual color.
- Depending on the height of the lights of the vehicle behind, the area around the vehicle may appear white and blurry.
- Automatic image adjustment for brighter surrounding image may cause flickering.
If it is difficult to see the displayed image or flickering bothers you, change to optical mirror mode.
- The Digital Rear-view Mirror may
become hot while it is in digital
mirror mode.
This is not a malfunction.
- Depending on your physical condition or age, it may take longer than usual to focus on the displayed image. In this case, change to optical mirror mode.
- Do not let passengers stare at the displayed image when the vehicle is being driven, as doing so may cause motion sickness.
â– When the system malfunctions
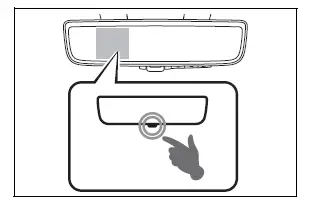
If the symbol shown in the illustration is displayed when using the Digital Rear-view Mirror in digital mirror mode, the system may be malfunctioning. The symbol will disappear in a few seconds. Operate the lever, change to optical mirror mode and have the vehicle inspected by your Toyota dealer.
 Inside rear view mirror
The rear view mirror's position
can be adjusted to
enable sufficient confirmation
of the rear view.
Adjusting the height of
rear view mirror
The height of the rear view mirror
can be adjusted to suit ...
 Adjusting the mirror
â– Adjusting the mirror height
The height of the rear view mirror
can be adjusted to suit your
driving posture.
Change to optical mirror mode,
adjusting the height of the rear
view mirror by moving ...
Other materials:
Throttle actuator control motor circuit
Description
The throttle actuator is operated by the ecm and opens and closes the
throttle valve using gears.
The opening angle of the throttle valve is detected by the throttle position (tp)
sensor, which is mounted
on the throttle body. The tp sensor provides feedback to the ecm. This ...
Rear wiper motor
Components
Removal
Disconnect cable from negative battery
terminal
Caution:
Wait at least 90 seconds after disconnecting the
cable from the negative (-) battery terminal to
prevent airbag and seat belt pretensioner activation.
Remove back door center garnish (see page
ed-59)
...
Automatic air conditioning
system
Air outlets and fan speed are automatically adjusted according
to the temperature setting.
Air conditioning controls
Automatic mode switch
Left-hand side temperature control knob
Right-hand side temperature control knob
"SYNC" switch
"OFF" switch
Windshield defogger switch
Rear window and o ...
