Toyota RAV4 (XA50) 2019-2026 Owners Manual: Adjusting the mirror
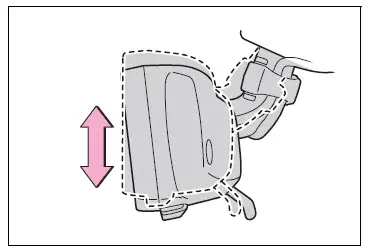
â– Adjusting the mirror height
The height of the rear view mirror can be adjusted to suit your driving posture.
Change to optical mirror mode, adjusting the height of the rear view mirror by moving it up and down.
â– Display settings (digital mirror mode)
Settings of the display in the digital mirror mode, on/off operation of the automatic anti-glare function, etc. can be changed.
1. Press the menu button.
The icons will be displayed.
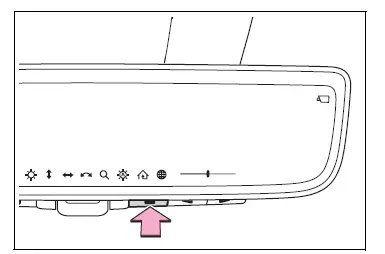
2. Press the menu button repeatedly and select the item you want to adjust.
3. Press  or
or
 to
to
change the setting.
The icons will disappear if a button is not operated for approximately 5 seconds or more.
 Select to adjust the brightness
of the display.
 Select to adjust the area
displayed up/down.
 Select to adjust the area
displayed to the left/right.
 Select to adjust the angle of
the displayed image.
 Select to zoom in/out the
displayed image.
 Select to enable/disable the
automatic anti-glare function.*
Responding to the brightness
of the headlights of
vehicles behind, the
reflected light is automatically
adjusted.
The automatic anti-glare function is enabled each time the engine switch is changed to ON.
 Select to display
HomeLink Training Tutorial
to assist customers to
train their Garage Door
Opener System.
 Select to change the language
of the Homelink
Training Tutorial.
*: This is a function for the optical mirror mode, however, the setting can also be changed while using the digital mirror mode.
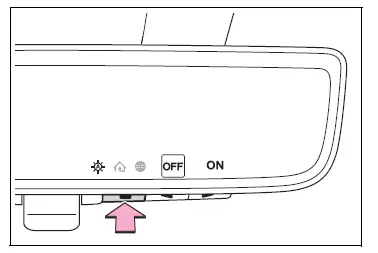
â– Enabling/disabling the automatic anti-glare function (optical mirror mode)
The automatic anti-glare function in the optical mirror mode can be enabled/disabled. The setting can be changed in both the digital mirror mode and the optical mirror mode.
When using the optical mirror mode
1. Press the menu button.
The icons will be displayed.
2. Press the menu button
repeatedly and select  .
.
The setting display will be displayed.
3. Press  or
or
 to
to
enable (ON)/disable (OFF)
the automatic anti-glare function.
The icons will disappear if a button is not operated for approximately 5 seconds or more.
â– Adjusting the display (digital mirror mode)
- If the displayed image is adjusted, it may appear distorted. This is not a malfunction.
- If the brightness of the Digital Rear-view Mirror is set too high, it may cause eye strain. Adjust the Digital Rear-view Mirror to an appropriate brightness. If your eyes become tired, change to optical mirror mode.
- The brightness of the Digital Rearview Mirror will change automatically according to the brightness of the area in front of your vehicle.
â– To prevent the light sensors from malfunctioning
To prevent the light sensors from malfunctioning, do not touch or cover them

WARNING
Observe the following precautions.
Failure to do so may result in death or serious injury.
â– While driving
- Do not adjust the position of the
Digital Rear-view Mirror or
adjust the display settings while
driving.
Stop the vehicle and operate the Digital Rear-view Mirror control switches.
Failure to do so may cause a steering wheel operation error, resulting in an unexpected accident.
- Always pay attention to the vehicle's surroundings.
The size of the vehicles and other objects may look different when in digital mirror mode and optical mirror mode.
When backing up, make sure to directly check the safety of the area around your vehicle, especially behind the vehicle.
Additionally, if a vehicle approaches from the rear in the dark, such as at night, the surrounding area may appear dim.
â– To prevent causes of fire
If the driver continues using the Digital Rear-view Mirror while smoke or odor comes from the mirror, it may result in fire. Stop using the system immediately and contact your Toyota dealer.
 Digital Rear-view Mirror
The Digital Rear-view Mirror
is a system that uses the
camera on the rear of the
vehicle and displays its
image on the display of the
Digital Rear-view Mirror.
The Digital Rear-view Mirror
can be cha ...
 Cleaning the Digital Rearview
Mirror
Cleaning the Digital Rearview
Mirror
â– Cleaning the mirror surface
If the mirror surface is dirty, the
image on the display may be difficult
to see.
Clean the mirror surface gently
using a soft dry cloth.
â– Cleaning the camera
If th ...
Other materials:
Operation flow
Hint:
Perform troubleshooting in accordance with the
procedures below. The following is an outline of basic
troubleshooting procedures. Confirm the troubleshooting
procedures for the circuit you are working on before
beginning troubleshooting.
Ask
the customer about the conditions and en ...
Rear bumper
Components
Removal
Remove rear bumper cover
Remove the 9 screws and 7 clips.
Put protective tape under the quarter panel.
Detach the 12 claws and remove the bumper cover.
Remove rear bumper protector
Hint:
When removing the bumper protector, heat the bumper
prot ...
Inspection
Inspect cylinder head for warpage
Using a precision straightedge and feeler gauge,
measure the warpage of the contact surfaces of the
cylinder block and manifolds.
Maximum warpage:
0.08 Mm (0.0032 In.)
If the warpage is greater than the maximum, replace
the cylinder head sub-a ...
