Toyota RAV4 (XA40) 2013-2018 Service Manual: Disassembly
- Remove sliding roof drive gear subassembly

- Remove the claw and room light bracket.
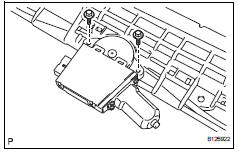
- Remove the 2 bolts and drive gear.
- Remove sliding roof drain hose joint lh
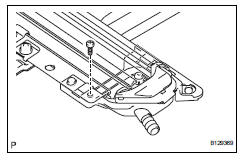
- Remove the screw and joint.
- Remove sliding roof drain hose joint rh
Hint:
Use the same procedures described for the lh side.
- Remove sunshade trim sub-assembly
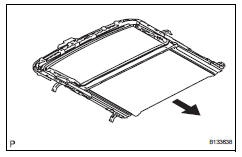
- Slide and remove the sunshade trim sub-assembly.
- Remove sliding roof drive cable

Notice:
Do not disassemble the sliding roof drive cable subassembly except when replacing it.
- Remove the 2 screws and 2 sliding roof side stoppers.
- Using a screwdriver, detach the 2 claws. Then slide the drip channel rearward to remove it.
Hint:
Tape the screwdriver tip before use.

- Using a screwdriver, slide the drive cables backward and remove them.
Hint:
- Tape the screwdriver tip before use.
 Removal (2006/01- )
Disconnect cable from negative battery
terminal
Caution:
Wait at least 90 seconds after disconnecting the
cable from the negative (-) battery terminal to
prevent airbag and seat belt preten ...
 Reassembly
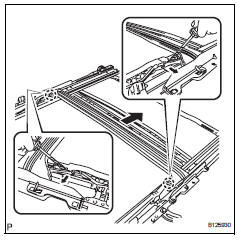
Install sliding roof drive cable
Using a screwdriver, slide the sliding roof drive
cable sub-assemblies in the direction indicated by
the arrow in the illustration to install them.
...
Other materials:
Compressor solenoid circuit (2006/01- )
Description
In this circuit, the compressor receives a refrigerant compression demand
signal from the air conditioning
amplifier. Based on this signal, the compressor changes the degree of
refrigerant compression.
Hint:
*: Compressor and pulley for 2az-fe, compressor and magnetic clu ...
All doors cannot be locked / unlocked simultaneously
Description
The main body ecu receives switch signals from the door control switch on the
power window regulator
master switch, door control switch and driver side door key cylinder, and
activates the door lock motor on
each door accordingly.
Wiring diagram
Inspection procedure
Perf ...
Adjustment procedure
To select a mirror to adjust,
press the switch.
Left
Right
To adjust the mirror, press the
switch.
Up
Right
Down
Left
...
