Toyota RAV4 (XA50) 2019-2026 Owners Manual: Refueling
Opening the fuel tank cap
Perform the following steps to open the fuel tank cap:
Before refueling the vehicle
- Close all the doors and windows, and turn the engine switch to OFF.
- Confirm the type of fuel.
â– Fuel tank opening for unleaded gasoline
To help prevent incorrect fueling, your vehicle has a fuel tank opening that only accommodates the special nozzle on unleaded fuel pumps.
â– If the malfunction indicator lamp illuminates
The malfunction indicator lamp may illuminate erroneously if refueling is performed repeatedly when the fuel tank is nearly full.
WARNING
â– When refueling the vehicle
Observe the following precautions while refueling the vehicle. Failure to do so may result in death or serious injury.
- After exiting the vehicle and before opening the fuel door, touch an unpainted metal surface to discharge any static electricity. It is important to discharge static electricity before refueling because sparks resulting from static electricity can cause fuel vapors to ignite while refueling.
- Always hold the grips on the
fuel tank cap and turn it slowly
to remove it.
A whooshing sound may be heard when the fuel tank cap is loosened. Wait until the sound cannot be heard before fully removing the cap. In hot weather, pressurized fuel may spray out of the filler neck and cause injury.
- Do not allow anyone that has not discharged static electricity from their body to come close to an open fuel tank.
- Do not inhale vaporized fuel.
Fuel contains substances that are harmful if inhaled.
- Do not smoke while refueling
the vehicle.
Doing so may cause the fuel to ignite and cause a fire.
- Do not return to the vehicle or touch any person or object that is statically charged. This may cause static electricity to build up, resulting in a possible ignition hazard.
â– When refueling
Observe the following precautions to prevent fuel overflowing from the fuel tank:
- Securely insert the fuel nozzle into the fuel filler neck.
- Stop filling the tank after the fuel nozzle automatically clicks off.
- Do not top off the fuel tank.
NOTICE
â– Refueling
Do not spill fuel during refueling.
Doing so may damage the vehicle, such as causing the emission control system to operate abnormally or damaging fuel system components or the vehicle's painted surface.
Opening the fuel tank cap
1. Pull up the opener to open the fuel filler door.
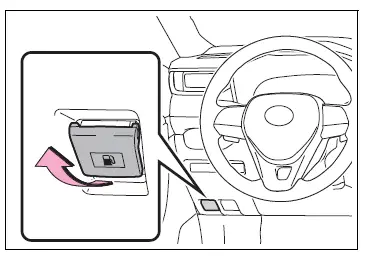
2. Turn the fuel tank cap slowly to open it and put it into the holder on the fuel filler door.
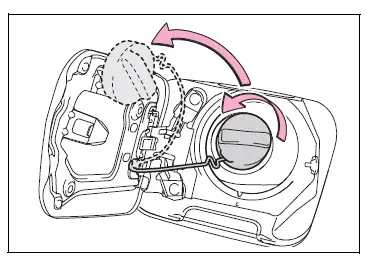
Closing the fuel tank cap
After refueling, turn the fuel tank cap until you hear a click. Once the cap is released, it will turn slightly in the opposite direction.

â– When "Check Fuel Cap" is displayed on the multi-information display
The fuel tank cap may be unfastened or loose. Turn the engine switch to OFF, check the cap and tighten it securely. If the message remains, wait a few seconds and then turn the engine switch to OFF once again.
WARNING
â– When replacing the fuel tank cap
Do not use anything but a genuine Toyota fuel tank cap designed for your vehicle. Doing so may cause a fire or other incident which may result in death or serious injury.
 Rear window wiper and
washer
Rear window wiper and
washer
The rear window wiper and
washer can be used by
operating the lever.
NOTICE
â– When the rear window is dry
Do not use the wiper, as it may
damage the rear window.
Operating the wiper lever
Operating t ...

Other materials:
Floor shift assembly
Components
Removal
Disconnect cable from negative battery
terminal
Caution:
Wait at least 90 seconds after disconnecting the
cable from the negative (-) battery terminal to
prevent airbag and seat belt pretensioner activation.
Remove shift lever knob sub-assembly
Remove re ...
Selecting the audio
source
Switching between audio sources such as radio and cd are
explained in this section.
Changing audio source
Press the “audio” button to display the audio source selection
screen.
If the audio source selection screen is not displayed, press the “audio”
button again.
Select the d ...
Combination meter ecu communication stop mode
Description
Wiring diagram
Inspection procedure
Notice:
Turn the ignition switch off before measuring the resistances of the
main wire and the branch
wire.
After the ignition switch is turned off, check that the key reminder
warning system and light
reminder warning system ...
