Toyota RAV4 (XA50) 2019-2026 Owners Manual: Rear window wiper and washer
The rear window wiper and washer can be used by operating the lever.
NOTICE
â– When the rear window is dry
Do not use the wiper, as it may damage the rear window.
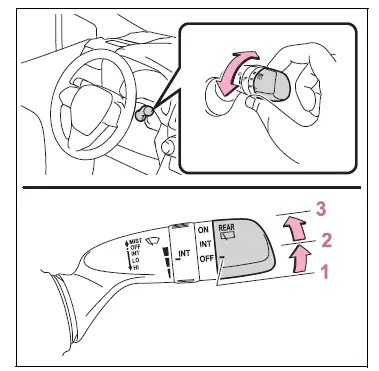
Operating the wiper lever
Operating the  switch
operates the rear wiper as follows:
 *1 or
*1 or
 *2 Off
 *1 or
*1 or
 *2 Intermittent
operation *1 or
*1 or
 *2 Normal operation
*1:For the U.S.A.
*2:For Canada
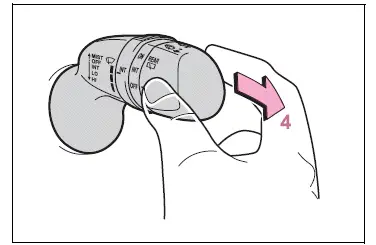
 Washer/wiper dual
operation
Pushing the lever operates the wiper and washer.
The wiper will automatically operate a couple of times after the washer squirts.
â– The rear window wiper and washer can be operated when
The engine switch is in ON.
â– If no washer fluid sprays
Check that the washer nozzle is not blocked if there is washer fluid in the washer fluid reservoir.
â– Back door opening linked rear window wiper stop function
When the rear window wiper is operating, if the back door is opened while the vehicle is stopped, operation of the rear window wiper will be stopped to prevent anyone near the vehicle from being sprayed by water from the wiper. When the back door is closed, wiper operation will resume.* *: The setting must be customized at your Toyota dealer.
â– Reverse-linked rear window wiper function
When the shift lever is shifted to R when the front wipers are operating, the rear window wiper will operate once.
â– Customization
Setting of the reverse-linked function can be changed.
NOTICE
â– When the washer fluid tank is empty
Do not operate the switch continually as the washer fluid pump may overheat.
â– When a nozzle becomes blocked
In this case, contact your Toyota dealer.
Do not try to clear it with a pin or other object. The nozzle will be damaged.
â– To prevent battery discharge
Do not leave the wiper on longer than necessary when the engine is off.
 Windshield wipers and
washer
Windshield wipers and
washer
Operating the lever can
switch between automatic
operation and manual operation,
or can use the
washer.
NOTICE
â– When the windshield is dry
Do not use the wipers, as they
may damage the windshield.
O ...
 Refueling
Opening the fuel tank cap
Perform the following steps
to open the fuel tank cap:
Before refueling the vehicle
Close all the doors and windows,
and turn the engine
switch to OFF.
Confirm the type ...
Other materials:
Evap system
Related dtcs
If any evap system dtcs are set, the malfunctioning area can be determined
using the table below.
Notice:
If the reference pressure difference between the first and second checks
is greater than the
specification, all the dtcs relating to the reference pressure (p043e, p ...
Open in stop light switch circuit
Description
The skid control ecu detects the brake operating conditions through a signal
transmitted by the stop light
switch. The skid control ecu incorporates an open circuit detection circuit.
This dtc is set under either of
the following conditions:
An open is detected in the stop lig ...
Luggage compartment features
Cargo hooks
Raise the hook to use.
The cargo hooks are provided for
securing loose items.
WARNING
â– When cargo hooks are not in
use
To avoid injury, always return the
hooks to their stowed positions
when not in use.
Deck board
â– Flipping the deck board
upside down
The deck board can be flipped
...
