Toyota RAV4 (XA50) 2019-2026 Owners Manual: Fuel consumption information
The fuel consumption information can be displayed on the Multimedia Display.
Display procedure
Press  on the main menu,
then press "Trip information" on
the sub menu.
For detail regarding the Multimedia Display, refer to "MULTIMEDIA OWNER'S MANUAL".
â– Current fuel consumption screen
If a screen other than current fuel consumption screen is displayed, press "Current".
Use the displayed average fuel consumption as a reference.
Some screens may vary depending on the type of multi-media display.
The image is an example only, and may vary slightly from actual conditions.

- Resetting the consumption data
- Fuel consumption in the past 15 minutes
- Current fuel consumption
- Average vehicle speed since the engine was started.
- Trip range
- Elapsed time since the engine was started.
â– History screen
If a screen other than history screen is displayed, press "History".
Use the displayed average fuel consumption as a reference.
Some screens may vary depending on the type of multi-media display.
The image is an example only, and may vary slightly from actual conditions.
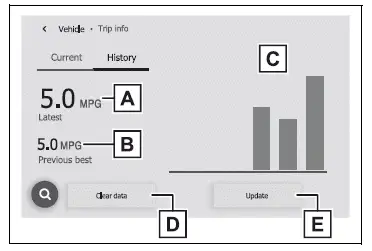
- Latest fuel consumption
- Best recorded fuel consumption
- Previous fuel consumption record
- Resetting the history data
- Updating the latest fuel consumption data
â– Updating the history data
Update the latest fuel consumption by pressing "Update" to measure the current fuel consumption again.
â– Resetting the data
The fuel consumption data can be deleted by pressing "Clear data".
â– Trip range
Displays the estimated maximum distance that can be driven with the quantity of fuel remaining.
This distance is computed based on your average fuel consumption. As a result, the actual distance that can be driven may differ from that displayed.
 Settings display
Vehicle settings and the content
displayed on the screen can be
changed by using the meter
control switches.
â– Setting procedure
1. Press and hold to display
the cursor on the content display
area ...
 Before driving
...
Other materials:
Traction control switch (for 2wd)
Components
Removal
Disconnect cable from negative battery
terminal
Caution:
Wait at least 90 seconds after disconnecting the
cable from the negative (-) battery terminal to
prevent airbag and seat belt pretensioner activation.
Remove traction control switch (auto lsd switch)
...
Removal
Hint:
Use the same procedures for the rh side and lh side.
The procedures listed below are for the rh side.
Remove front seat headrest assembly
Remove front seat assembly
Operate the power seat switch knob and move the
seat to the foremost position.
Using a screwdriver, d ...
Center airbag sensor assembly communication circuit malfunction
Description
The center airbag sensor communication circuit consists of the occupant
classification ecu and the
center airbag sensor.
Dtc b1790 is recorded when a malfunction is detected in the center airbag sensor
communication circuit.
Wiring diagram
Inspection procedure
Hin ...
