Toyota RAV4 (XA40) 2013-2018 Service Manual: Installation
- Install rear no. 1 Seat assembly lh (w/o rear no. 2 Seat)
- Fully tilt the seatback forward.
- Place the seat in the cabin.
Notice:
Be careful not to damage the vehicle body.
- Connection procedures of seat to lock cable when reusing seat:
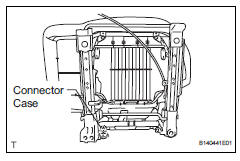
- Using a screwdriver, detach the claw and remove the connector case from the seat.
Hint:
Tape the screwdriver tip before use.
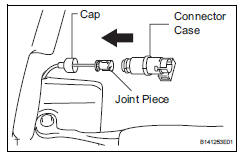
- Install the connector case to the body's cap.
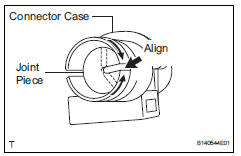
- Pull out the joint piece. Align the slits of the joint piece and connector case.
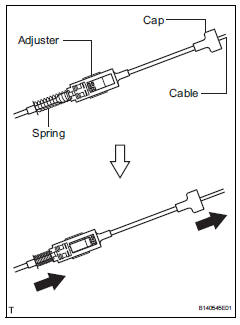
- Compress the spring of the adjuster, and pull out the cable from the seat's cap.
Hint:
Perform this procedure with the lock of the adjuster released.
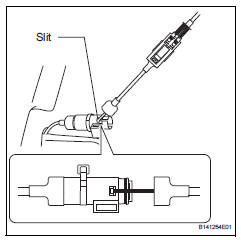
- Install the seat cable's end part to the connector case's slit.
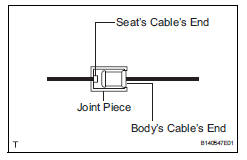
Hint:
Position the joint piece cable's end part as shown in the illustration.
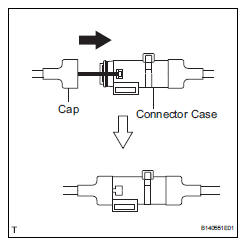
- Install the seat's cap to the connector case.
- Temporarily place the seat into the vehicle where it will be installed.
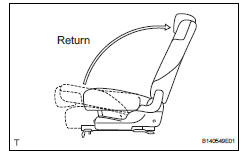
- Return the seatback to the upright position.
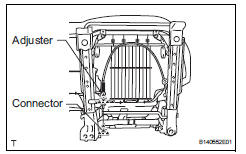
- Attach the claws of the connector and adjuster, and install them to the seat.
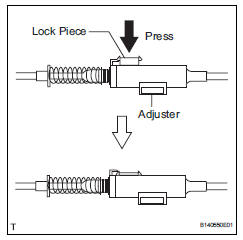
- Press the adjuster's lock piece to lock it.
Notice:
When pressing the lock piece, make sure the adjuster's spring is not compress.
- Connection procedures of seat to lock cable when replacing seat:
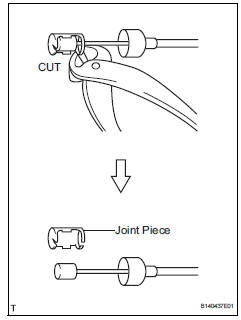
- Cut the joint piece on the lock cable, and remove it.
Hint:
- A joint piece is included with new seats.
- This procedure is not necessary when the lock cable is replaced with a new one.
- Temporarily place the seat into the vehicle where it will be installed.
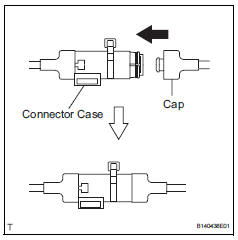
- Install the body's cap to the connector case.
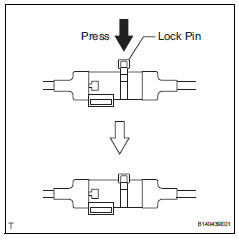
- Press the adjuster's lock pin.
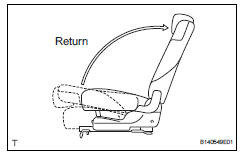
- Return the seatback to the upright position.
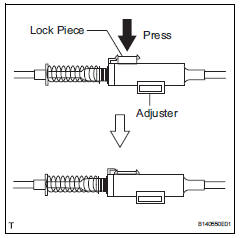
- Press the adjuster's lock piece to lock it.
Notice:
When pressing the lock piece, make sure the adjuster's spring is not compress.
- Lift up the seat track adjusting handle and move the seat to the foremost position.
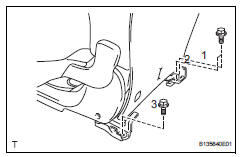
- Tighten the 3 bolts on the rear side of the seat.
Torque: 42 n*m (428 kgf*cm, 31 ft.*Lbf)
Hint:
Tighten the bolts in the order indicated in the illustration.
- Lift up the seat track adjusting handle and move the seat to the rearmost position.
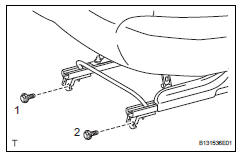
- Tighten the 2 bolts on the front side of the seat.
Torque: 42 n*m (428 kgf*cm, 31 ft.*Lbf)
Hint:
Tighten the bolts in the order indicated in the illustration.
- Install rear no. 1 Seat assembly lh (w/ rear no. 2 Seat)
- Fully tilt the seatback forward.
- Place the seat in the cabin.
Notice:
Be careful not to damage the vehicle body.
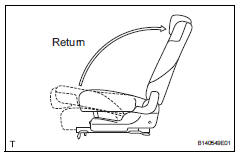
- Return the seatback to the upright position.
- Lift up the seat track adjusting handle and move the seat to the foremost position.
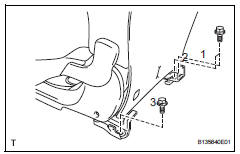
- Tighten the 3 bolts on the rear side of the seat.
Torque: 42 n*m (428 kgf*cm, 31 ft.*Lbf)
Hint:
Tighten the bolts in the order indicated in the illustration.
- Lift up the seat track adjusting handle and move the seat to the rearmost position.
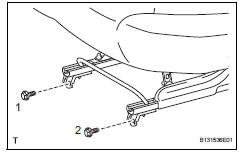
- Tighten the 2 bolts on the front side of the seat.
Torque: 42 n*m (428 kgf*cm, 31 ft.*Lbf)
Hint:
Tighten the bolts in the order indicated in the illustration.
- Install rear no. 1 Seat lock cable assembly (w/o rear no. 2 Seat)
- Attach the clamps and install the cable to the vehicle body.
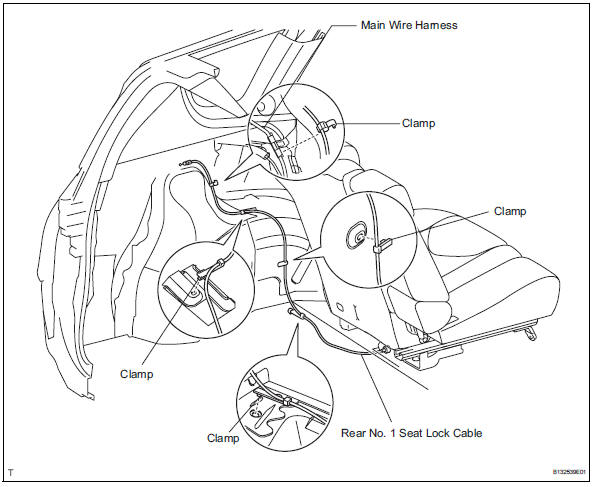
- Install rear seat lap type belt assembly center rh (w/ rear no. 2 Seat) (see page sb-42)
- Install rear seat lap type belt center assembly rh (w/o rear no. 2 Seat) (see page sb- 42)
- Install rear seat leg cover
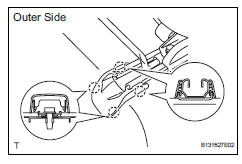
- Attach the 8 claws to install the 2 leg covers.
- Install rear no. 5 Seat leg side cover
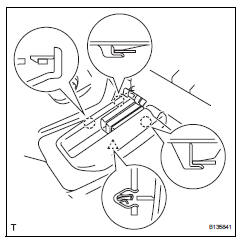
- Attach the 3 claws and clip to install the side cover.
- Install rear no. 4 Seat leg side cover (w/ rear no. 2 Seat)
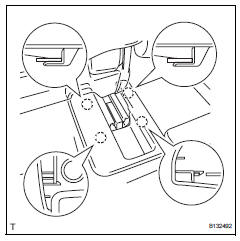
- Attach the 4 claws to install the side cover.
- Install rear no. 4 Seat leg side cover (w/o rear no. 2 Seat)
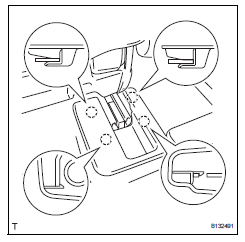
- Attach the 4 claws to install the rear no. 4 Seat leg side cover.
- Install rear no. 3 Seat leg side cover (w/ rear no. 2 Seat)
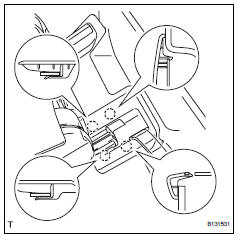
- Attach the 4 claws to install the side cover.
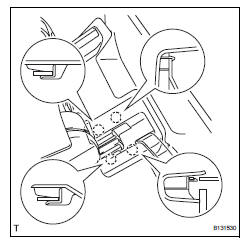
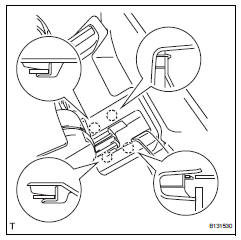
- Install rear no. 3 Seat leg side cover (w/o rear no. 2 Seat)
- Attach the 4 claws to install the side cover.
- Install reclining remote control lever sub-assembly lh (w/o rear no. 2 Seat)
- Connect the rear no. 1 Seat lock cable to the lever.
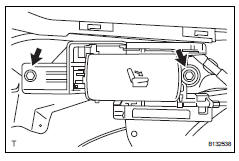
- Install the lever with the 2 bolts.
Torque: 18 n*m (184 kgf*cm, 13 ft.*Lbf)
- Install deck trim side panel assembly lh (w/ o rear no. 2 Seat) (see page ir-52)
- Install tether anchor bracket subassembly (w/o rear no. 2 Seat) (see page ir-54)
- Install reclining remote control lever bezel lh (w/o rear no. 2 Seat)
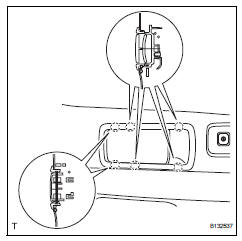
- Attach the 6 claws to install the bezel.
- Install rear floor finish plate (w/o rear no.
2 Seat) (see page ir-55)
- Install back door weatherstrip (w/o rear no. 2 Seat)
- Install rear floor no. 1 Mat support side plate (w/o rear no. 2 Seat) (see page ir-55)
- Install rear floor no. 3 Board (w/o rear no.
2 Seat)
- Install rear floor no. 2 Board (w/o rear no.
2 Seat)
- Install deck board assembly (w/o rear no. 2 Seat)
- Install rear floor no. 1 Board (w/o rear no.
2 Seat)
- Install tonneau cover assembly (w/o rear no. 2 Seat)
- Install package tray trim pocket subassembly (w/o rear no. 2 Seat)
 Reassembly
Caution:
Wear protective gloves. Sharp areas on the seatback
frame, seat cushion frame and reclining adjuster may
injure your hands.
Hint:
A bolt without a torque specification is shown in the st ...
 Rear no. 2 Seat assembly
Components
...
Other materials:
Exhaust gas precautions
Harmful substance to the human body is included in exhaust
gases if inhale.
Caution
Exhaust gases include harmful carbon monoxide (co), which is colorless and
odorless. Observe the following precautions.
Failure to do so may cause exhaust gases enter the vehicle and may lead to
an accident c ...
Disassembly
Remove no. 1 Side defroster nozzle duct
Remove the 3 screws and duct.
Remove no. 2 Side defroster nozzle duct
Remove the 3 screws and duct.
Remove no. 1 Heater to register duct
Remove the screw and duct.
Remove no. 2 Heater to register duct
...
For your information
Main owner’s manual
Please note that this manual applies to all models and all equipment,
including
options. Therefore, you may find some explanations for equipment not
installed on your vehicle.
All specifications provided in this manual are current at the time of printing.
However, be ...
