Toyota RAV4 (XA50) 2019-2026 Owners Manual: Maintenance requirements
To ensure safe and economical driving, day-to-day care and regular maintenance are essential. It is the owner's responsibility to perform regular checks.
Toyota recommends the following maintenance:
â– Repair and replacement
It is recommended that genuine Toyota parts be used for repairs to ensure performance of each system.
If non-Toyota parts are used in replacement or if a repair shop other than a Toyota dealer performs repairs, confirm the warranty coverage.
â– Allow inspection and repairs to be performed by a Toyota dealer
- Toyota technicians are well-trained specialists and are kept up to date with the latest service information. They are well informed about the operations of all systems on your vehicle.
- Keep a copy of the repair order. It proves that the maintenance that has been performed is under warranty coverage. If any problem should arise while your vehicle is under warranty, your Toyota dealer will promptly take care of it.
WARNING
â– If your vehicle is not properly maintained
Improper maintenance could result in serious damage to the vehicle and possible death or serious injury.
â– Handling of the battery
- Engine exhaust, some of its constituents, and a wide variety of automobile components contain or emit chemicals known to the State of California to cause cancer and birth defects and other reproductive harm. Work in a well ventilated area.
- Oils, fuels and fluids contained in vehicles as well as waste produced by component wear contain or emit chemicals known to the State of California to cause cancer and birth defects or other reproductive harm. Avoid exposure and wash any affected area immediately.
- Battery posts, terminals and
related accessories contain lead
and lead compounds which are
known to cause brain damage.
Wash your hands after handling.
General maintenance
General maintenance should be performed on a daily basis. This can be done by yourself or by a Toyota dealer.
Scheduled maintenance
Scheduled maintenance should be performed at specified intervals according to the maintenance schedule.
For details about maintenance items and schedules, refer to the "Scheduled Maintenance Guide" or "Owner's Manual Supplement".
â– Resetting the message indicating maintenance is required (with 7-inch display)
After the required maintenance is performed according to the maintenance schedule, please reset the reminder light or message.
To reset the reminder light or message, follow the procedure described below:
1. Press  or
or
 of the meter
control switches and select 
on the multi-information display.
2. Press  or
or
 of the meter
control switches and select
"Vehicle Settings". Then press
and hold  .
.
3. Press  or
or
 of the meter
control switches and select
"Scheduled Maintenance". Then
press  .
.
4. Select "Yes" and press  .
.
A message will be displayed when the reset procedure has been completed.
â– Resetting the message indicating maintenance is required (with 12.3-inch display)
After the required maintenance is performed according to the maintenance schedule, please reset the reminder light or message.
To reset the reminder light or message, follow the procedure described below:
1. Press and hold  to display
the
cursor on the content display
area (center) of the multi-information
display.
2. Press  or
or
 of the meter
control switches to select 
and then press  .
.
3. Press  or
or
 of the meter
control switches and select
" Vehicle Settings". Then
press and hold  .
.
4. Press  or
or
 of the meter
control switches and select
"Scheduled Maintenance". Then
press  .
.
5. Select "Yes" and press .
A message will be displayed when the reset procedure has been completed.
Do-it-yourself maintenance
You can perform some maintenance procedures by yourself.
Please be aware that do-it-yourself maintenance may affect warranty coverage.
The use of Toyota Repair Manuals is recommended.
For details about warranty coverage, refer to the separate "Owner's Warranty Information Booklet" or "Owner's Manual Supplement".
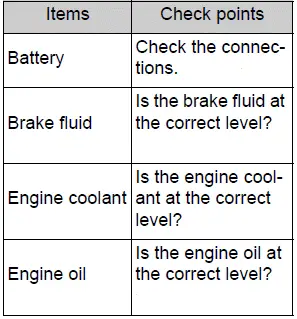
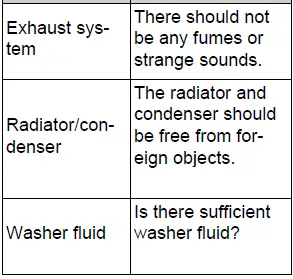
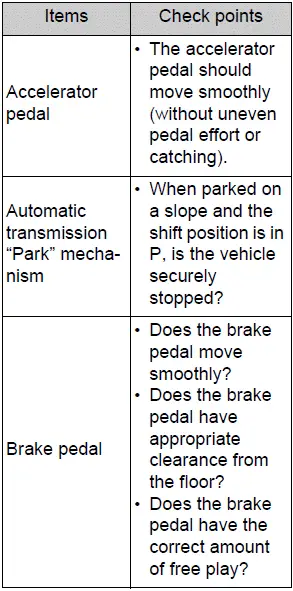
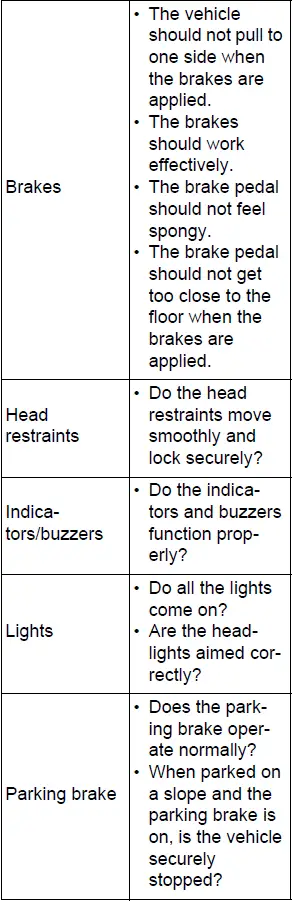
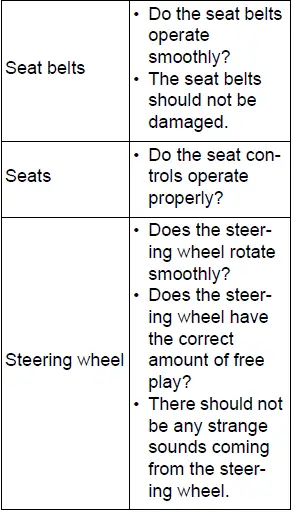
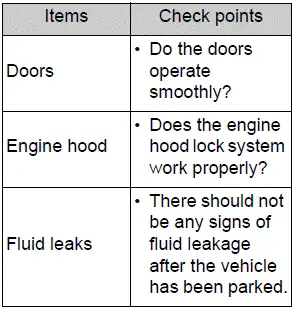
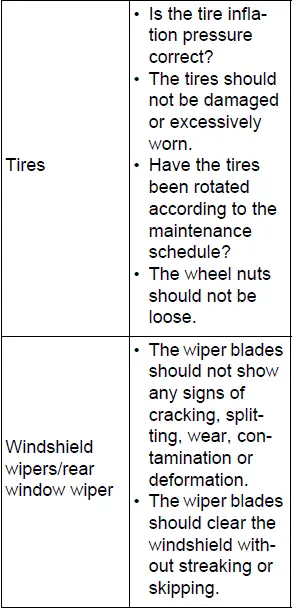
General maintenance
Listed below are the general maintenance items that should be performed at the intervals specified in the "Owner's Warranty Information Booklet" or "Owner's Manual Supplement/Scheduled Maintenance Guide". It is recommended that any problem you notice should be brought to the attention of your Toyota dealer or qualified service shop for advice.
WARNING
â– If the engine is running
Turn the engine off and ensure that there is adequate ventilation before performing maintenance checks.
Engine compartment
Vehicle interior
Vehicle exterior
 Cleaning and protecting the vehicle interior
Perform cleaning in a manner
appropriate to each
component and its material.
Protecting the vehicle
interior
Remove dirt and dust using a
vacuum cleaner. Wipe dirty
surfaces with a cloth dampened
...
 Emission inspection and maintenance (I/M) programs
Some states have vehicle
emission inspection programs
which include OBD
(On Board Diagnostics)
checks. The OBD system
monitors the operation of
the emission control system.
If the malfunction indicato ...
Other materials:
Installation
Caution:
Be sure to read the precautionary notices concerning the
srs airbag system before servicing it (see page rs-1).
Install front passenger airbag assembly
Attach the rear side hook of the front passenger
airbag to the rear side airbag door.
Bend the front side hook so that it a ...
Cold start
Description
The electronic throttle control system (etcs) controls the engine idling
speed. The etcs operates the
throttle actuator to open and close the throttle valve, and adjusts the intake
air amount to achieve the
target idling speed.
In addition, the ecm retards the ignition timi ...
Seat position airbag sensor circuit malfunction
Description
The seat position sensor circuit consists of the center airbag sensor and the
seat position sensor.
Dtc b1653/35 is recorded when a malfunction is detected in the seat position
sensor circuit.
Wiring diagram
Inspection procedure
Check for dtc
Turn the ...
