Toyota RAV4 (XA40) 2013-2018 Owners Manual: Operating instructions
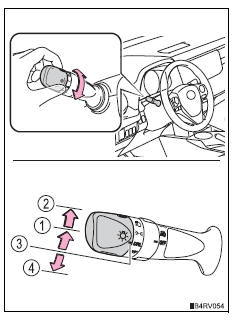
Turning the end of the lever turns on the lights as follows:
Type a
 The side marker, parking,
tail, license plate, daytime running lights and instrument panel lights turn on. The headlights and all
lights listed above (except daytime running lights) turn on. The headlights and all the
lights listed above turn on and off automatically.(When the engine switch is in the “on” position [vehicles without a smart key system] or ignition on mode [vehicles with a smart key system])
 Off
Off
 The daytime running
lights turn on.

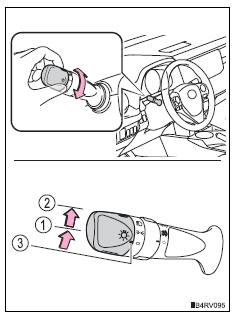
Type b
 The side marker, parking,
tail, license plate, daytime running lights and instrument panel lights turn on. The headlights and all
lights listed above (except daytime running lights) turn on. The daytime running lights
turn on. Off
Off
Type c
 The side marker, parking,
tail, license plate, daytime running lights and instrument panel lights turn on. The headlights and all
lights listed above (except daytime running lights) turn on. The daytime running lights
turn on.
 Headlight switch
The headlights can be operated manually or automatically. ...
 Turning on the high beam headlights
With the headlights on, push
the lever away from you to turn
on the high beams.
Pull the lever toward you to the
center position to turn the high
beams off.
Pull the lever toward you ...
Other materials:
Installation
(2005/11-2006/01)
Install front drive shaft assembly lh
Coat the spline of the inboard joint shaft with gear
oil.
Using a brass bar and hammer, align the shaft
splines in the drive shaft.
Notice:
Set the snap ring with the opening side facing
downwards.
Be careful not to damage the oil s ...
Optimal use of the
audio system
On the “sound settings” screen, sound quality (treble/mid/
bass), volume balance can be adjusted.
How to adjust the sound settings and sound quality
Select “-” or “+” to adjust
the treble, mid or bass to
a level between -5 and 5.
Select “front” or “rear” to
adjust the fr ...
Center airbag sensor assembly communication circuit malfunction
Description
The center airbag sensor communication circuit consists of the occupant
classification ecu and the
center airbag sensor.
Dtc b1790 is recorded when a malfunction is detected in the center airbag sensor
communication circuit.
Wiring diagram
Inspection procedure
Hin ...
