Toyota RAV4 (XA40) 2013-2018 Service Manual: Registration
Notice:
The vehicle identification number (vin) must be input into the replacement ecm.
Hint:
The vin is a 17-digit alphanumeric number. The intelligent tester is required to register the vin.
- Description
This registration section consists of 3 parts: input instructions, read vin and write vin.
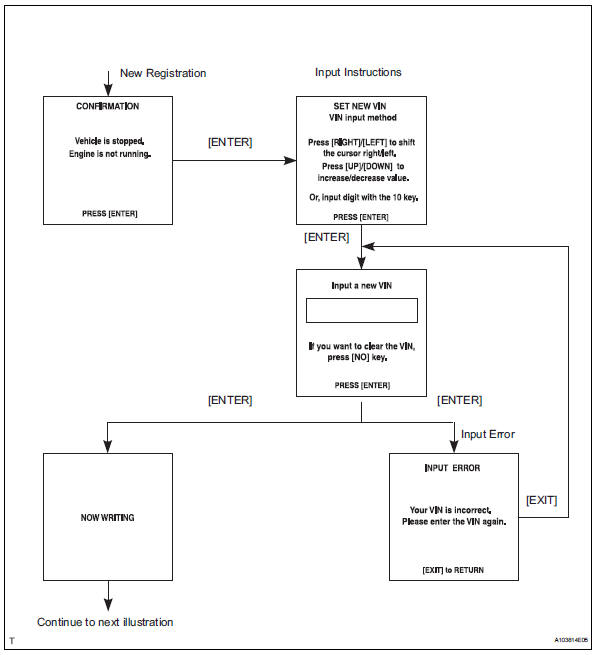
- Input instructions: explains the general vin input instructions when using the intelligent tester.
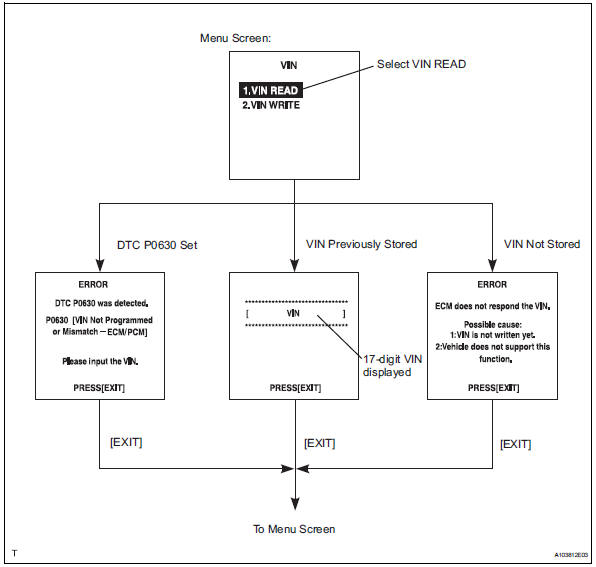
- Read vin: explains the vin reading process in a flowchart. This process allows the vin stored in the ecm to be read in order to confirm that the two vins, provided with the vehicle and stored in the vehicle's ecm, are the same.
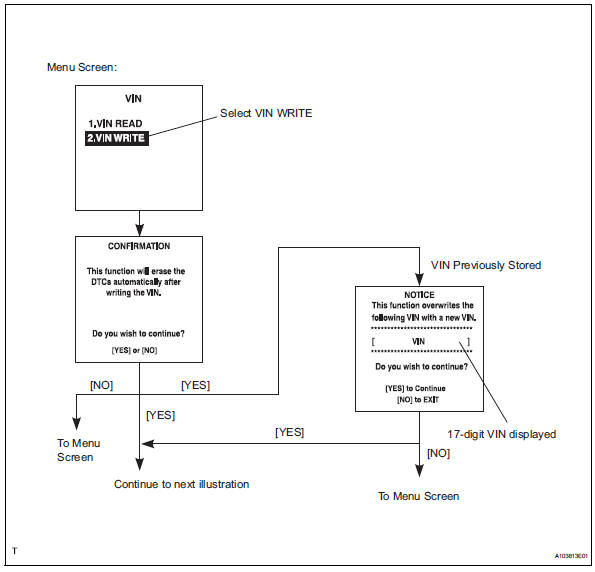
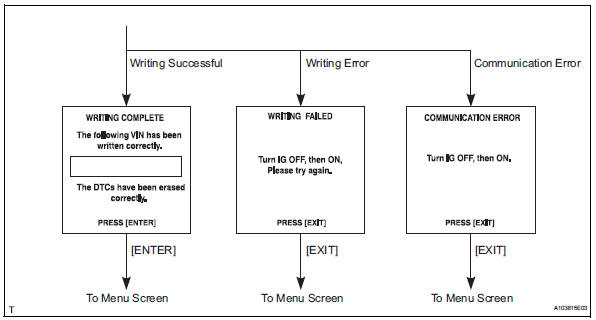
- Write vin: explains the vin writing process in a flowchart. This process allows the vin to be input into the ecm. If the ecm is changed, or the vehicle vin and ecm vin do not match, the vin can be registered or overwritten in the ecm by following this procedure.
- Input instructions
- Intelligent tester
The arrow buttons (up, down, right and left) and numerical buttons (0 to 9) are used to input the vin.
- Cursor operation
To move the cursor around the tester screen, press the right and left buttons.
- Alphabetical character input
- Press the up and down buttons to select the desired alphabetical character.
- After selection, the cursor should move.
- Numeric character input
- Press the numerical button corresponding to the number that you want to input.
- After input, the cursor should move.
Hint:
Numerical characters can also be selected by using the up and down buttons.
- Correction
- When correcting the input character(s), put the cursor onto the character using the right and left buttons.
- Select or input the correct character using the up/down buttons, or the numerical buttons.
- Finishing input operation
- Make sure that the input vin matches the vehicle vin after input.
- Press the enter button on the tester.
- Read vin
- Confirm the vehicle vin.
- Connect the intelligent tester to the dlc3.
- Turn the ignition switch on.
- Turn the tester on.
- Select the following menu items: diagnosis / enhanced obd ii/ vin.
- Write vin
- Confirm the vehicle vin.
- Connect the intelligent tester to the dlc3.
- Turn the ignition switch on.
- Turn the tester on.
Select the following menu items: diagnosis / enhanced obd ii/ vin.
 Basic inspection
When a malfunction is not confirmed by the dtc check,
troubleshooting should be carried out in all circuits
considered to be possible causes of the problem. In many
cases, by carrying out the basic ...
 Checking monitor status
Perform monitor drive pattern
Connect the intelligent tester to the dlc3.
Turn the ignition switch and the tester on.
Clear the dtcs (see page es-35).
Run the vehicle in accordance with ...
Other materials:
Dtc check / clear
Check dtc
When using intelligent tester:
Connect the intelligent tester (with can vim) to
the dlc3.
Turn the ignition switch on and press the
intelligent tester main switch on.
Read the dtcs by following the prompts on the
intelligent tester.
Hint:
Refer to the intel ...
Interior
SRS airbags
Floor mats
Front seats
Rear seats
Head restraints
Seat belts
Console box
Inside lock buttons
Cup holders
Assist grips
Rear seat heater switches*
*: If equipped
Ceiling
"SOS" button*1
Auxiliary box
Moon roof switches*1
Interior lights*2
Personal lights
Electronic sun ...
Selecting the driving mode
The following modes can be selected to suit driving conditions.
Eco drive mode
Use eco drive mode to help achieve low fuel consumption during
trips that involve frequent accelerating.
Press the ŌĆ£eco modeŌĆØ button
to select eco drive mode.
The ŌĆ£eco modeŌĆØ indicator
comes on.
Press t ...
