Toyota RAV4 (XA40) 2013-2018 Service Manual: Checking monitor status
- Perform monitor drive pattern
- Connect the intelligent tester to the dlc3.
- Turn the ignition switch and the tester on.
- Clear the dtcs (see page es-35).
- Run the vehicle in accordance with the applicable drive pattern described in readiness monitor drive pattern (see page es-19). Do not turn the ignition switch off.
Note:
The test results will be lost if the ignition switch is turned off.
- Access monitor result
- Select the following items from the intelligent tester menus: diagnosis, enhanced obd ii, monitor info and monitor result. The monitor status appears after the component name.
- Incmp: the component has not been monitored yet.
- Pass: the component is functioning normally.
- Fail: the component is malfunctioning.
- Confirm that the component is either pass or fail.
- Select the component and press enter. The accuracy test value appears if the monitor status is either pass or fail.
- Check component status
- Compare the test value with the minimum test limit (min limit) and maximum test limit (max limit).
- If the test value is between the minimum and
maximum test limits, the component is functioning
normally. If not, the component is malfunctioning.
The test value is usually not near the test limits. If the test value is near the test limits, the component is likely to malfunction in the near future.
Hint:
The monitor result might on rare occasions be pass even if the malfunction indicator lamp (mil) is illuminated. This indicates the system malfunctioned on a previous driving cycle. This might be caused by an intermittent problem.
- Monitor result information
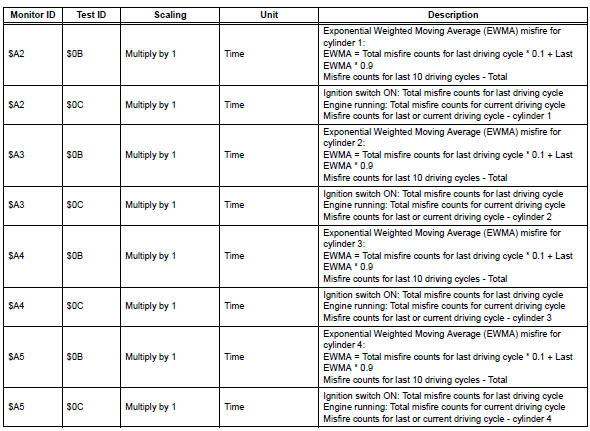
If you use a generic scan tool, multiply the test value by the scaling value listed below.

 Registration
Notice:
The vehicle identification number (vin) must be input
into the replacement ecm.
Hint:
The vin is a 17-digit alphanumeric number. The intelligent
tester is required to register the vin.
...

Other materials:
Throttle actuator control throttle body range / performance
Description
The electronic throttle control system (etcs) is composed of the throttle
actuator, throttle position (tp)
sensor, accelerator pedal position (app) sensor, and ecm. The ecm operates the
throttle actuator to
regulate the throttle valve in response to driver inputs. The tp senso ...
Front passenger side - side airbag sensor assembly initialization incomplete
Description
The side airbag sensor rh consists of parts including the diagnostic circuit
and the lateral deceleration
sensor.
When the center airbag sensor receives signals from the lateral deceleration
sensor, it determines
whether or not the srs should be activated.
Dtc b1628/82, ...
Child restraint system
‚Ė† Types of child restraint system installation methods
Confirm with the operation manual enclosed with the child restraint
system about the installation of the child restraint system.
Seat belt attachment
Child restraint LATCH
anchors attachment
Anchor brackets (for
top tether strap) attachment
...
