Toyota RAV4 (XA40) 2013-2018 Service Manual: Removal
Hint:
- Use the same procedures for the rh side and lh side.
- The procedures listed below are for the rh side.
- Remove front seat headrest assembly
- Remove front seat assembly
- Operate the power seat switch knob and move the seat to the foremost position.
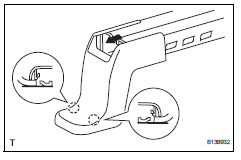
- Using a screwdriver, detach the 2 claws.
Hint:
Tape the screwdriver tip before use.
- remove the front seat track bracket outer cover in the direction indicated by the arrow in the illustration.
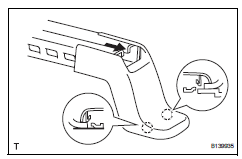
- Using a screwdriver, detach the 2 claws.
Hint:
Tape the screwdriver tip before use.
- Remove the front seat track bracket inner cover in the direction indicated by the arrow in the illustration.
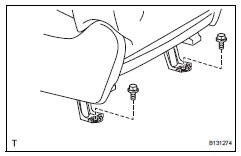
- Remove the 2 bolts on the rear side of the seat.
- Operate the power seat switch knob and move the seat to the rearmost position.
- Remove the 2 bolts on the front side of the seat.
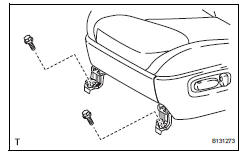
- Operate the power seat switch knob and move the seat to the center position. Then, operate the power seat switch knob and move the seatback to the upright position.
- Disconnect the cable from the negative (-) battery terminal.
Caution:
Wait at least 90 seconds after disconnecting the cable from the negative (-) battery terminal to prevent airbag and seat belt pretensioner activation.
- Disconnect the connectors under the seat. Then remove the seat.
 Installation
Hint:
Use the same procedures for the rh side and lh side.
The procedures listed below are for the rh side.
Install front seat assembly
Place the seat in the cabin.
Notice:
Be ca ...
 Disassembly
Caution:
Wear protective gloves. Sharp areas on the seat frame
(with adjuster) may injure your hands.
Remove reclining power seat switch knob
Using a screwdriver, detach the knob.
H ...
Other materials:
Reassembly
Hint:
Use the same procedures for the rh side and lh side.
The procedures listed below are for the lh side.
Install seat lock release band
Install the band with nut.
Hint:
After installing the band, feed it through the
seatback frame hole towards the rear of the vehicle.
I ...
Skid control buzzer circuit
Description
The skid control buzzer sounds while the vsc is activated.
Wiring diagram
Inspection procedure
Notice:
When replacing the abs and traction actuator, perform the zero point
calibration (see page bc-
24).
Check can communication system
Check if the can communication d ...
Idle control system malfunction
Description
The idling speed is controlled by the etcs (electronic throttle control
system). The etcs is comprised
of: 1) the one valve type throttle body; 2) the throttle actuator, which
operates the throttle valve; 3) the
throttle position (tp) sensor, which detects the opening angle of ...
