Toyota RAV4 (XA40) 2013-2018 Service Manual: Installation
Hint:
- Use the same procedures for the rh side and lh side.
- The procedures listed below are for the lh side.
- When installing the moulding, heat the vehicle body and moulding using a heat light.
Standard heating temperature 
Notice:
Do not heat the vehicle body and moulding excessively.
- Install no. 1 Rocker panel moulding retainer lh
- Install the 2 retainers with the 4 screws.
- Install quarter opening retainer lh
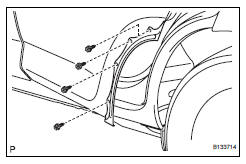
- Install the retainer with the 4 screws.
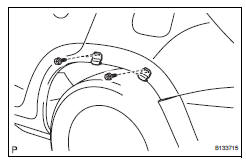
- Install no. 2 Rocker panel moulding retainer lh
- Install the retainer with the 2 screws.
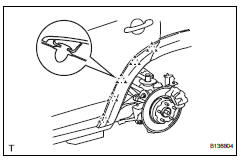
- Install rear quarter outside moulding lh
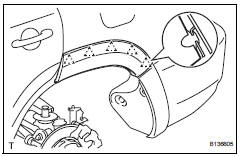
- Attach the 5 clips to install the moulding.
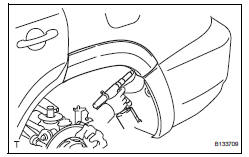
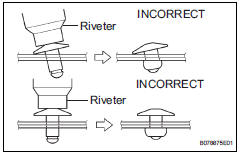
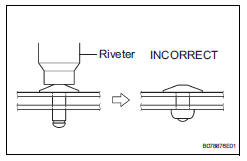
- Using an air riveter or hand riveter with a nose piece, strike 2 rivets to the vehicle to install the rear quarter outside moulding to the vehicle.
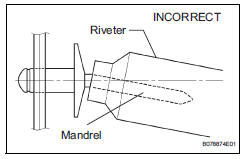
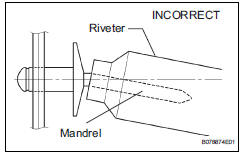
Notice:
If the rivet is not positioned perpendicularly, it will bend the mandrel.
- Do not pry the rivet with the riveter, as this will cause damage to the riveter and mandrel.
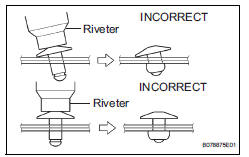
- Confirm that the rivets are seated properly against the moulding. Do not tilt the riveter when installing the rivet to the moulding. Do not leave any space between the rivet head and moulding.
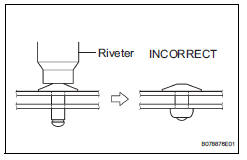
- Do not leave any space between the moulding and door panel. Firmly hold together the 2 items while installing the rivet.
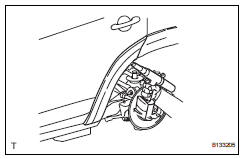
- Install no. 1 Rear wheel opening extension lh
- Attach the 5 clips to install the extension.
Using an air riveter or hand riveter with a nose piece, strike 2 rivets to the vehicle to install the rear wheel opening extension to the vehicle.
Notice:
If the rivet is not positioned perpendicularly, it will bend the mandrel.
- Do not pry the rivet with the riveter, as this will cause damage to the riveter and mandrel.
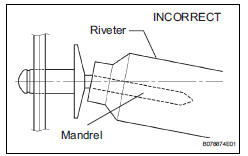
- Confirm that the rivets are seated properly against the moulding. Do not tilt the riveter when installing the rivet to the moulding. Do not leave any space between the rivet head and moulding.
- Do not leave any space between the moulding and door panel. Firmly hold together the 2 items while installing the rivet.
- Install no. 2 Rear wheel opening extension lh
- Attach the clip to install the extension.
Install the screw and clip.
- Install front fender moulding subassembly lh
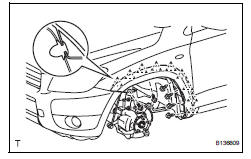
- Attach the 9 clips to install the extension
- Install the 4 screws and 2 clips.
 Removal
Hint:
Use the same procedures for the rh side and lh side.
The procedures listed below are for the lh side.
When removing the moulding, heat the vehicle body and
moulding using a heat light. ...
 Back door outside garnish
Components
Removal
Disconnect cable from negative battery
terminal
Caution:
Wait at least 90 seconds after disconnecting the
cable from the negative (-) battery terminal to
preven ...
Other materials:
Installation
Install drive plate sub-assembly
Clean the 8 bolts and 8 bolt holes.
Apply adhesive to 2 or 3 threads of the 8 bolts.
Adhesive:
Toyota genuine adhesive 1342, three bond
1342 or equivalent
Using sst, hold the crankshaft.
Sst 09213-54015 (91651-60855), 09330-00021
Instal ...
Before refueling the vehicle
Close all the doors and windows, and turn the engine switch to the
“lock” position (vehicles without a smart key system) or off (vehicles
with a smart key system).
Confirm the type of fuel.
Fuel types
Unleaded gasoline (octane rating 87 [research octane number 91] or
higher)
Cauti ...
Problem symptoms table
Hint:
Use the table below to help determine the cause of the
problem symptom. The potential causes of the symptoms
are listed in order of probability in the "suspected area"
column of the table. Check each symptom by checking the
suspected areas in the order they are listed. Re ...
